
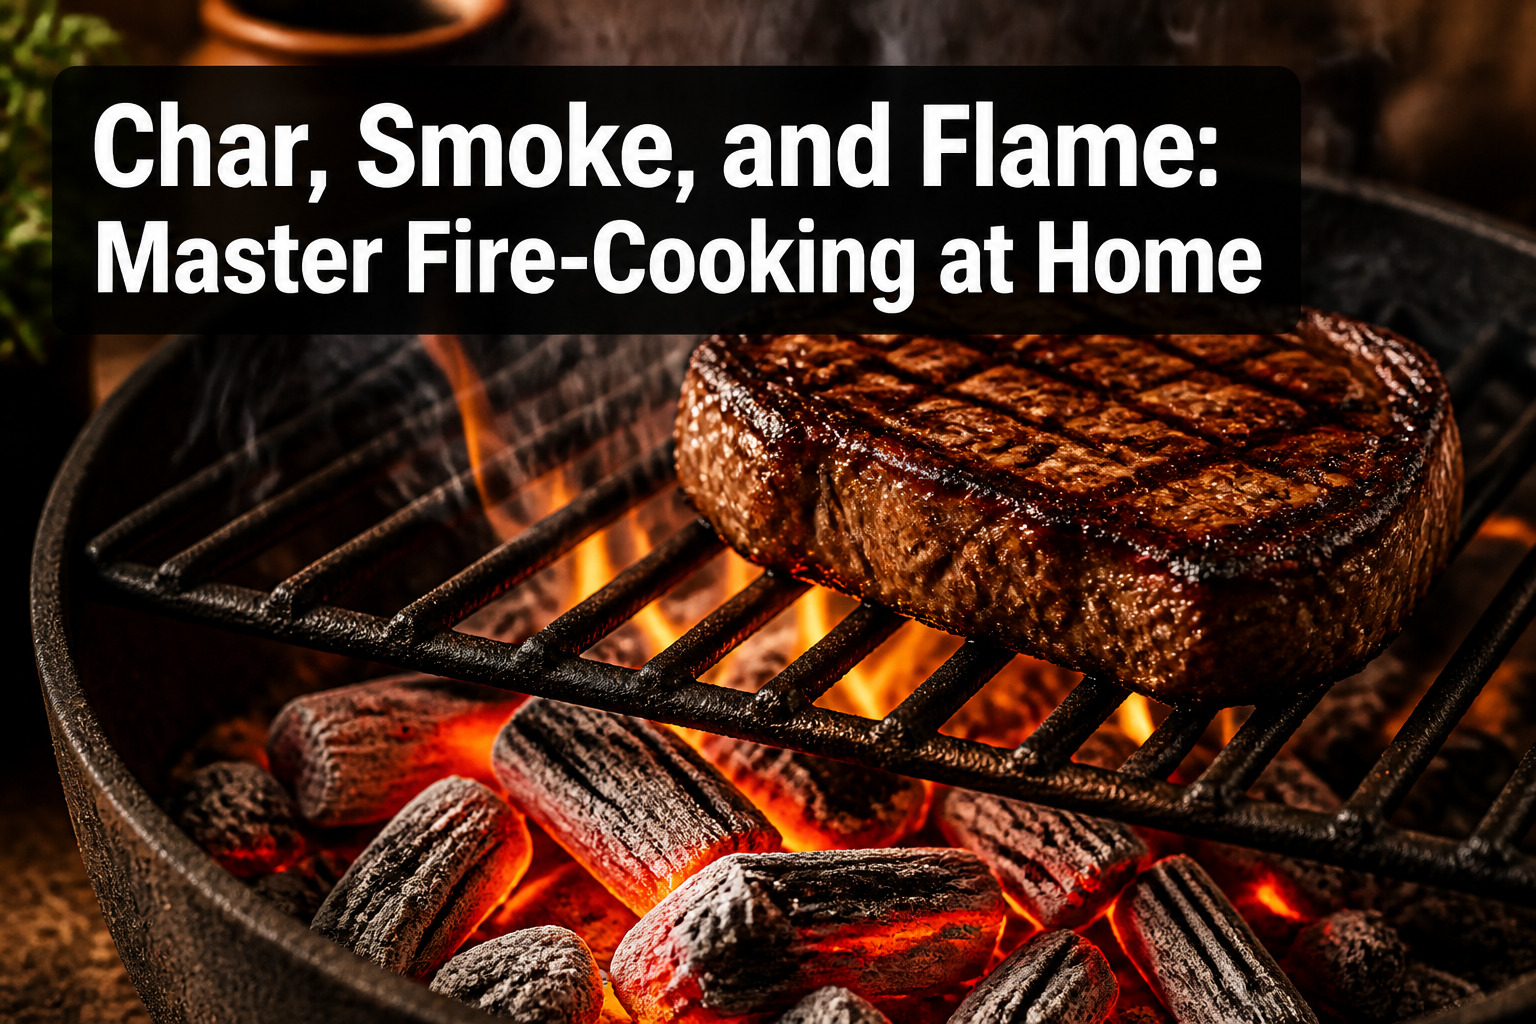
Char, Smoke, and Flame: How to Master Fire-Cooking Techniques at Home
Last updated: May 3, 2026
Quick Answer
Mastering char, smoke, and flame techniques at home requires understanding three core methods: direct coal grilling for intense char, indirect heat smoking for deep flavor, and ember cooking for rustic authenticity. Professional chefs use specialized fuels like binchotan charcoal and hardwoods, precise temperature zones, and cast iron tools to achieve restaurant-quality results in backyard setups.
Key Takeaways
- Fire cooking surged in 2026 with kamado grills, Argentine parrillas, and specialized fire pits becoming mainstream home equipment
- Three essential techniques define fire cooking: char (direct high heat), smoke (indirect low heat), and flame (open fire roasting)
- Binchotan charcoal burns hotter and cleaner than standard briquettes, producing the intense heat Michelin chefs use for perfect sear marks
- Cast iron skillets and Dutch ovens are the most versatile tools for transitioning indoor cooking skills to outdoor fire setups
- Two-zone fire setup (direct and indirect heat) enables temperature control comparable to professional kitchens
- Meat thermometers are non-negotiable for consistent results, even for experienced grill masters
- Direct coal cooking places food directly on sterile hot coals for maximum char and traditional flavor
- Wood selection matters: oak and hickory for beef, fruitwoods for poultry and pork, mesquite for bold southwestern flavors
What Is Fire-Cooking and Why Is It Trending in 2026?
Fire-cooking refers to any culinary technique using live flames, hot coals, or wood smoke as the primary heat source, ranging from simple campfire roasting to sophisticated ember grilling. This ancient method has experienced a massive revival in 2026, driven by home cooks seeking authentic flavors and restaurant-quality char that gas grills simply cannot replicate [1].
The trend centers on three specialized equipment categories gaining widespread adoption:
- Kamado grills (ceramic egg-style cookers) that maintain precise temperatures for hours
- Argentine-style parrillas (adjustable-height grill grates) for traditional asado cooking
- Fire bowls and specialized pits designed specifically for outdoor cooking setups [5]
Professional chefs have long relied on fire-cooking for its ability to create complex flavor layers through the Maillard reaction, caramelization, and smoke infusion. Now home cooks can access the same techniques with increasingly affordable equipment and better instructional resources.
Choose fire-cooking if you want deeper, more complex flavors than conventional grilling provides, enjoy hands-on cooking processes, and have outdoor space for safe fire management. Avoid it if you need precise timing for weeknight meals or lack proper ventilation and fire safety equipment.
How Do Professional Chefs Use Char, Smoke, and Flame Differently?
Professional fire-cooking breaks down into three distinct techniques, each producing different flavor profiles and textures. Understanding when to use char, smoke, or flame separates restaurant-quality results from basic backyard grilling.
Char technique uses direct, intense heat (450°F and above) to create a caramelized crust through the Maillard reaction. Chefs position food directly over hot coals or flames for 2-5 minutes per side, developing the dark, crispy exterior on steaks, vegetables, and seafood. The key is high heat for short duration to avoid burning while maximizing flavor compounds.
Smoke technique relies on indirect heat (225-275°F) with smoldering wood to infuse food with aromatic compounds over extended periods. This low-and-slow method works for tough cuts like brisket, ribs, and pork shoulder that need hours to break down connective tissue. Chefs control smoke intensity by wood selection and airflow management.
Flame technique involves cooking directly in or near open flames, either by roasting on sticks, grilling over live fire, or even placing food in embers. This method combines radiant heat with flame contact for rustic, primal flavors. It’s the foundation of traditional cooking styles like Argentine asado and Mediterranean whole-fish grilling [2].
Common mistake: Using the same heat level for all three techniques. Char requires maximum heat, smoke needs low steady temperatures, and flame cooking demands constant attention to prevent flare-ups.
What Equipment Do You Need to Start Fire-Cooking at Home?
Starting with fire-cooking requires surprisingly minimal investment. Two essential tools enable most techniques: a cast iron skillet and a Dutch oven [2]. These workhorses handle everything from searing steaks to baking bread over coals, and their heat retention mimics professional kitchen equipment.
Essential Fire-Cooking Gear
Foundation equipment:
- Cast iron skillet (12-inch) for searing, sautéing, and high-heat cooking
- Dutch oven (5-7 quart) for stews, braises, and ember baking
- Long-handled tongs and spatula (18-inch minimum) for safe food handling
- Instant-read meat thermometer for precise doneness [3]
- Fire-resistant gloves rated to 500°F minimum
- Chimney starter for efficient charcoal lighting
Fuel options by technique:
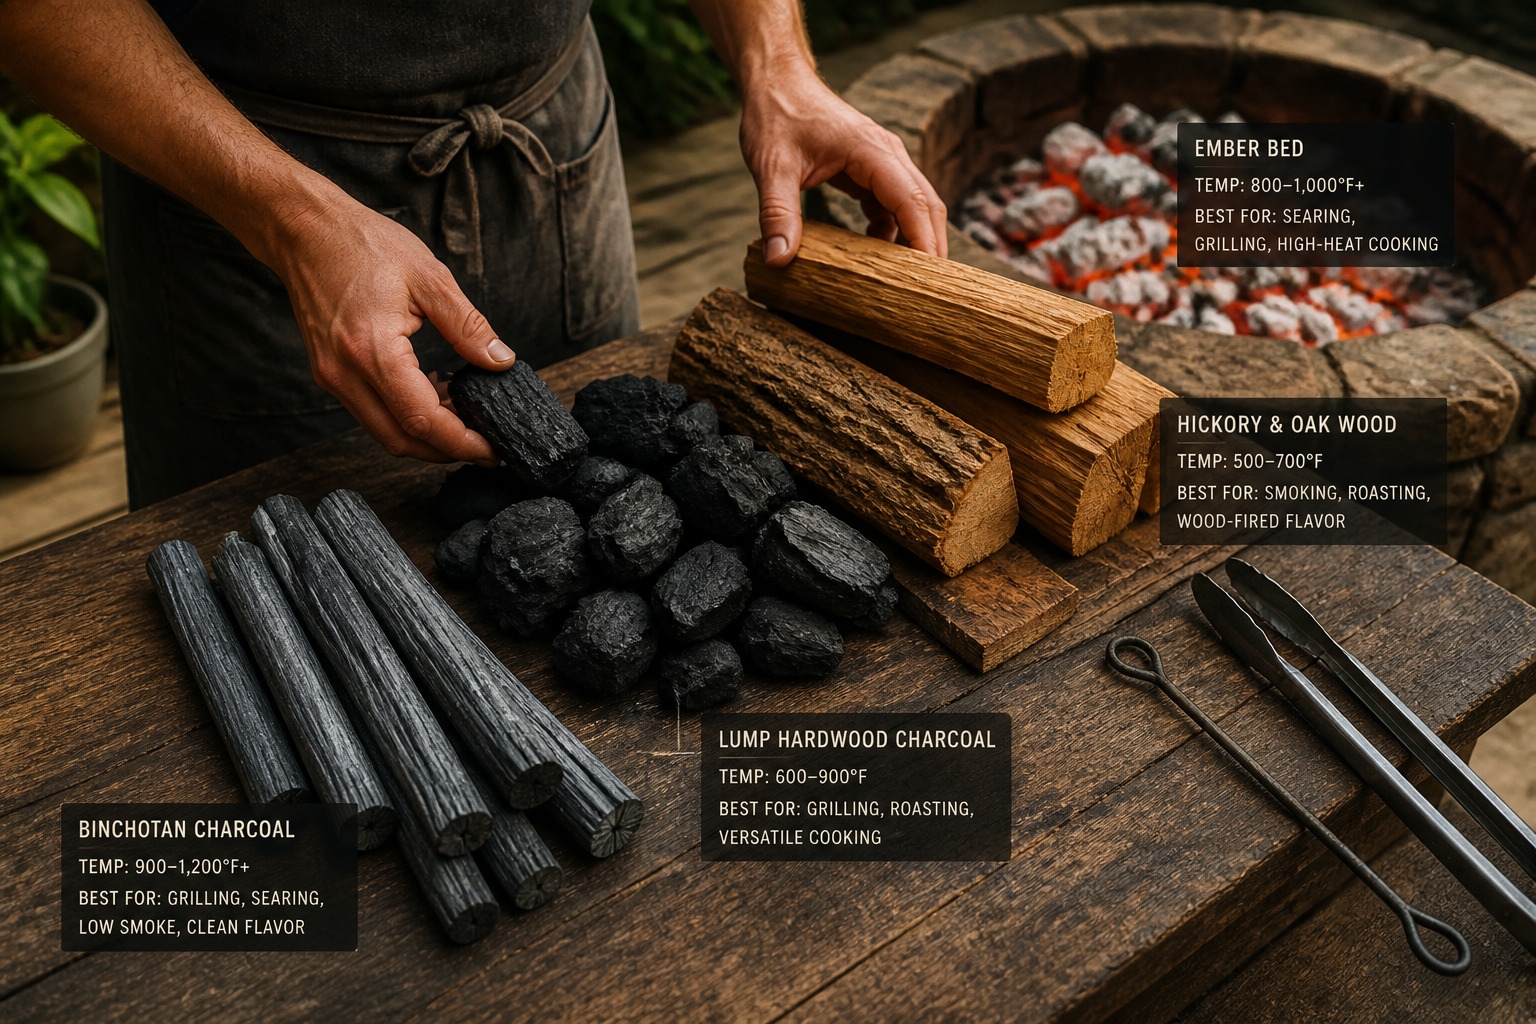
- Binchotan charcoal: Japanese white charcoal burning at 1,800°F+ for professional-grade searing
- Lump hardwood charcoal: Natural wood pieces without additives, ideal for clean smoke flavor
- Hardwood logs: Oak, hickory, maple for long smoking sessions
- Fruitwoods: Apple, cherry, peach for delicate smoke with poultry and pork
Cooking surface choices:
- Kettle grill (22-inch) for versatile two-zone cooking
- Kamado-style ceramic grill for temperature stability and fuel efficiency
- Fire pit with adjustable grate for traditional open-fire cooking
- Portable fire bowl for compact outdoor spaces [5]
Choose binchotan charcoal if you’re cooking thin cuts like skirt steak or fish that benefit from intense, quick searing. Use lump hardwood for general grilling and smoking where you want wood flavor without overpowering the food.
How Do You Build and Manage Different Fire Types?
Building the right fire foundation determines cooking success more than any other factor. A hearty fire provides consistent heat, while poorly constructed fires create hot spots, flare-ups, and uneven cooking [2].
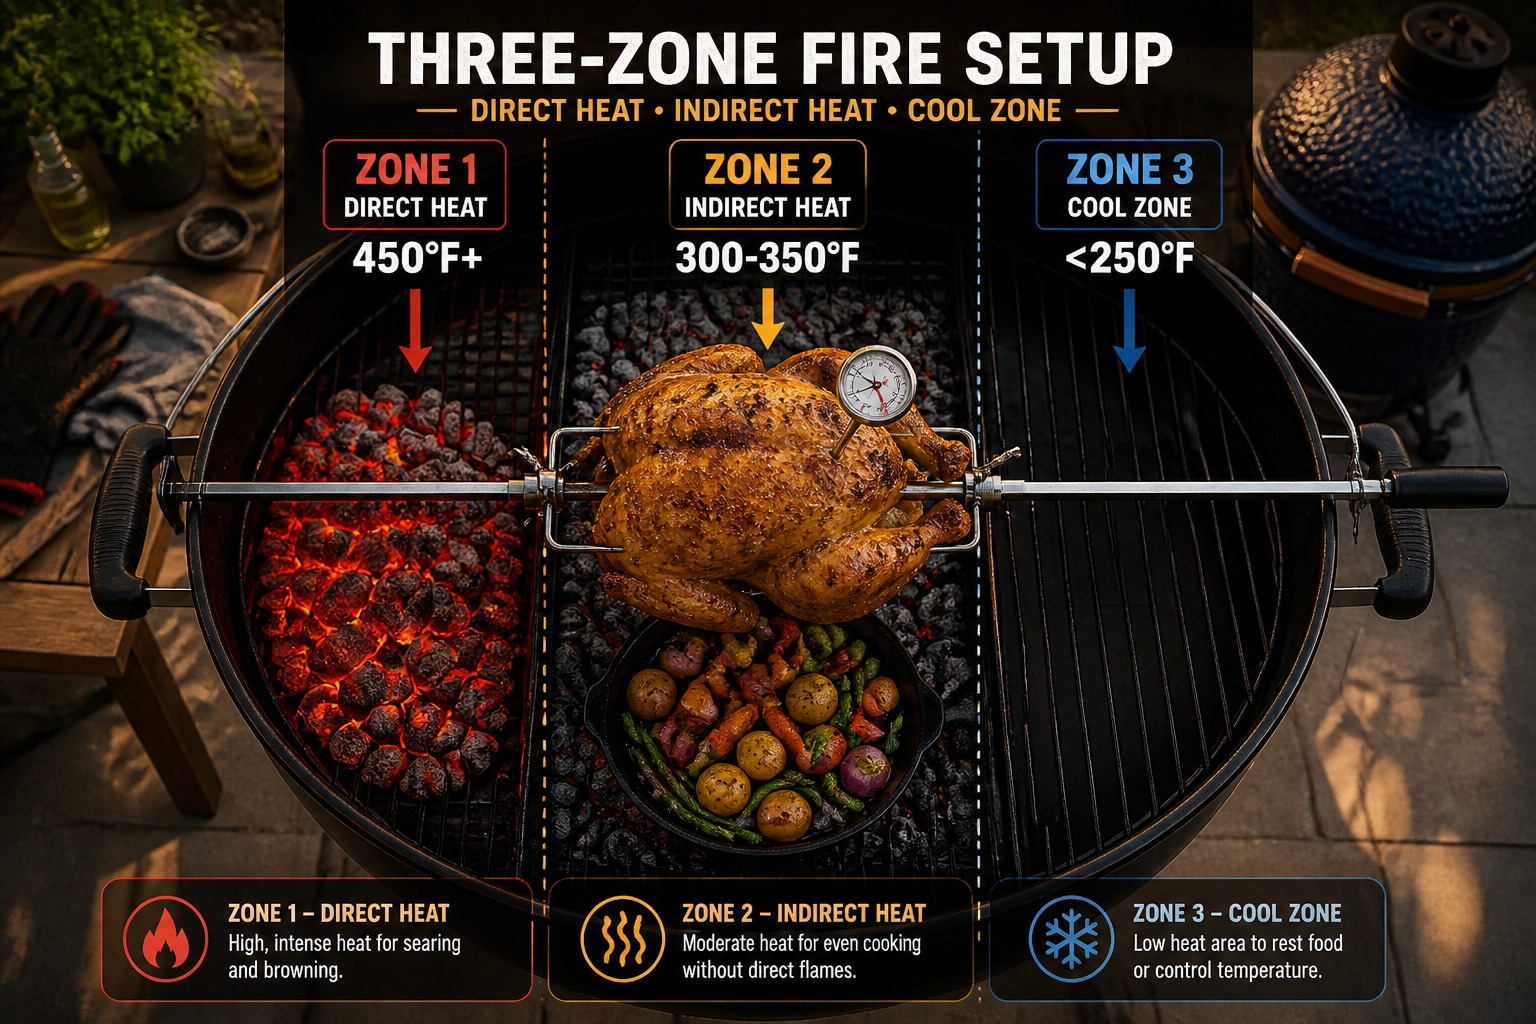
Two-Zone Fire Setup (Most Versatile)
This configuration creates both direct and indirect heat zones on a single grill, enabling multiple cooking techniques simultaneously [3]. Even for simple cooks, this setup provides temperature control comparable to a professional kitchen.
Step-by-step construction:
- Light charcoal in chimney starter until top coals show white ash (15-20 minutes)
- Pour coals to cover two-thirds of grill bottom in double layer
- Leave one-third empty for the cool zone
- Add wood chunks (2-3 pieces) to coal side for smoke
- Position grate and let it preheat for 5 minutes
- Test zones with hand: 2-second tolerance = high heat, 5-6 seconds = medium, 8+ seconds = low
Temperature targets by zone:
- Direct zone: 450-550°F for searing and char
- Indirect zone: 300-350°F for roasting and finishing
- Cool zone: Under 250°F for resting and holding
Ember Bed for Direct Coal Cooking
This traditional method places food directly on hot coals for maximum char and rustic flavor. The coal surface is actually cleaner than most cutting boards once fully ashed over [2].
Building an ember bed:
- Burn hardwood logs or lump charcoal until flames subside
- Wait for coals to develop white ash coating (indicates sterile surface)
- Spread coals in even layer 2-3 inches deep
- Brush ash from cooking area with rosemary bundle or metal brush
- Place food directly on coals (works for thick steaks, whole onions, peppers)
Common mistake: Adding coals mid-cook without proper ashing time. New coals release smoke and chemicals that taint food flavor. Always add fresh fuel to the side and move ashed coals to the cooking zone.
What Are the Step-by-Step Techniques for Char, Smoke, and Flame?
Each fire-cooking technique follows specific protocols that professional chefs use to achieve consistent results. These methods work across different equipment types, from basic fire pits to advanced kamado grills.
Char Technique: High-Heat Searing
Best for: Steaks, chops, fish fillets, vegetables like asparagus and peppers
- Prepare protein by patting completely dry (moisture prevents char formation)
- Season generously with coarse salt 30 minutes before cooking
- Heat grate over direct coals until it reaches 500°F+ (use infrared thermometer)
- Oil food, not grate to prevent sticking and flare-ups
- Place food and resist moving for 3-4 minutes until crust forms
- Flip once when food releases easily from grate
- Move to cool zone to finish cooking to target temperature
Pro tip: For perfect grill marks, rotate food 45 degrees halfway through each side’s cooking time. This creates the diamond crosshatch pattern seen in steakhouses.
Smoke Technique: Low and Slow
Best for: Brisket, ribs, pork shoulder, whole chickens, salmon
- Set up indirect heat with coals on one side only
- Add water pan under food to maintain moisture
- Soak wood chunks for 30 minutes, then place on coals
- Maintain 225-275°F by adjusting vents (close to lower, open to raise)
- Apply rub or marinade 2-24 hours before cooking
- Cook to internal temperature, not time (brisket to 203°F, ribs to 195°F)
- Rest 30-60 minutes wrapped in foil before serving
Wood pairing guide:
- Beef: Oak, hickory, mesquite
- Pork: Apple, cherry, maple
- Poultry: Pecan, apple, alder
- Fish: Cedar, alder, light fruit woods
For more guidance on achieving juicy results with poultry, check out our guide to grilling chicken breast.
Flame Technique: Open Fire Roasting
Best for: Vegetables, sausages, kebabs, whole fish, marshmallows
- Whittle stick end to sharp point for skewering [2]
- Build medium flame with hardwood (not softwood like pine)
- Position food 6-12 inches from flames depending on desired char
- Rotate constantly for even cooking
- Watch for flare-ups from dripping fat and move food as needed
- Test doneness with thermometer or visual cues
Safety note: Keep water bucket or fire extinguisher within reach. Never leave open flames unattended, and ensure complete extinguishing before leaving the area [2].
How Do You Control Temperature and Smoke Levels?
Temperature and smoke control separate amateur fire-cooking from professional results. Mastering these variables requires understanding airflow, fuel management, and equipment-specific techniques.
Temperature Control Methods
Vent management (for kamado and kettle grills):
- Bottom vent controls oxygen supply and overall temperature
- Top vent controls draft and smoke flow
- Open both vents fully for high heat (450°F+)
- Close bottom vent halfway and top vent three-quarters for medium heat (300-350°F)
- Nearly close both vents for low smoking temperatures (225-250°F)
Fuel arrangement:
- Snake method: Arrange unlit coals in C-shape around grill perimeter, light one end for 4-6 hour slow burn
- Minion method: Place lit coals on top of unlit pile for gradual ignition and steady temperature
- Two-zone: All coals on one side for maximum temperature flexibility [3]
Distance adjustment (for adjustable-height grills):
- Raise grate 6-8 inches above coals for low heat
- Lower to 2-3 inches for high-heat searing
- This method provides more intuitive control than vent adjustments
Smoke Management
Light smoke (thin blue wisps) indicates clean combustion and desirable flavor. Heavy white smoke signals incomplete burning and creates bitter, acrid taste.
Achieving clean smoke:
- Use dry, seasoned wood (moisture content below 20%)
- Allow wood to ignite fully before adding food
- Maintain consistent temperature to prevent smoldering
- Add small amounts of wood frequently rather than large chunks at once
Smoke intensity by cooking time:
- Short cooks (under 30 minutes): Minimal smoke, focus on char
- Medium cooks (30-90 minutes): Moderate smoke for balanced flavor
- Long cooks (2+ hours): Light continuous smoke to avoid over-smoking
Common mistake: Over-smoking by adding too much wood. Food absorbs most smoke flavor in the first hour; additional smoke beyond that point often creates bitter, overwhelming taste.
What Are the Most Common Fire-Cooking Mistakes and How Do You Avoid Them?
Even experienced grill masters make preventable errors when transitioning to live-fire cooking. Recognizing these mistakes early accelerates skill development and prevents wasted ingredients.
Critical Errors to Avoid
Not using a meat thermometer consistently: Visual cues and timing fail with variable fire temperatures. Insert an instant-read thermometer into the thickest part of meat, away from bone, to verify doneness [3]. Target temperatures: chicken breast 165°F, pork 145°F, beef medium-rare 130-135°F.
For more details on safe chicken temperatures, see our chicken breast temperature guide.
Skipping the two-zone setup: Even simple cooks benefit from having both hot and cool zones available. This setup provides insurance against flare-ups and allows finishing thick cuts without burning exteriors [3].
Moving food too frequently: Constant flipping prevents proper crust formation and extends cooking time. Let food sit undisturbed for 3-4 minutes before checking for release from grate.
Using lighter fluid or match-light charcoal: Chemical accelerants impart petroleum flavors that persist throughout cooking. Use a chimney starter with newspaper or natural fire starters instead.
Cooking cold meat: Food straight from refrigerator cooks unevenly, with overcooked exteriors and raw centers. Let meat rest at room temperature for 30-45 minutes before fire-cooking.
Neglecting fire safety: Keep fire extinguisher or water source within 10 feet of cooking area. Clear 10-foot radius of flammable materials. Never use water on grease fires; smother with lid or baking soda instead [2].
Troubleshooting Common Issues
Problem: Meat sticks to grate
- Solution: Preheat grate longer, oil food instead of grate, wait for natural release before flipping
Problem: Uneven cooking
- Solution: Arrange coals more evenly, rotate food halfway through, use two-zone method
Problem: Too much smoke flavor
- Solution: Reduce wood quantity, ensure wood is fully dry, switch to milder wood varieties
Problem: Flare-ups
- Solution: Trim excess fat, keep spray bottle handy, move food to cool zone temporarily
How Do You Apply Restaurant Techniques to Specific Foods?
Professional chefs adapt fire-cooking methods to different proteins and vegetables, optimizing technique for each ingredient’s characteristics. These applications demonstrate how to combine char, smoke, and flame for specific dishes.
Asado-Style Meat (Traditional Argentine Method)
This technique uses indirect heat and extended cooking time to develop deep flavor while maintaining tenderness [6].
Process:
- Apply all-purpose rub (salt, pepper, garlic, paprika) generously
- Brush meat with warm water base to help rub adhere
- Position meat on grate 12-18 inches above medium coals
- Cook for approximately 2 hours, flipping at 1-hour mark
- Monitor internal temperature, pulling at 135°F for medium-rare beef
- Rest 15 minutes before slicing against the grain
Best cuts: Beef short ribs, flank steak, whole chickens, pork shoulder
Direct Coal Steak (Maximum Char)
This dramatic technique places thick steaks directly on hot coals for intense crust development [2].
Requirements:
- Steaks at least 1.5 inches thick (thinner cuts burn)
- Fully ashed-over lump charcoal or binchotan
- Coarse salt only (other seasonings burn)
Method:
- Season steak with coarse salt 30 minutes before cooking
- Place directly on white-hot coals
- Cook 3-4 minutes per side for medium-rare
- Brush off ash with rosemary sprig
- Let rest 5 minutes before serving
Ember-Roasted Vegetables
Whole vegetables cooked directly in embers develop sweet, smoky flavor impossible to achieve on grates.
Best vegetables: Onions, bell peppers, eggplant, sweet potatoes, beets
Technique:
- Leave vegetables whole and unpeeled
- Nestle into hot embers, covering partially
- Rotate every 10 minutes for even cooking
- Cook until completely soft (20-40 minutes depending on size)
- Remove, let cool slightly, peel away charred skin
- Season with olive oil, salt, and herbs
If you’re working with chicken and want to avoid common texture issues, our guide on why chicken breasts get tough offers helpful insights.
What Advanced Fire-Cooking Techniques Should You Learn Next?
Once basic char, smoke, and flame techniques become comfortable, several advanced methods unlock new flavor possibilities and expand your fire-cooking repertoire.
Binchotan Charcoal Grilling
Japanese binchotan charcoal burns at temperatures exceeding 1,800°F, creating the intense heat professional yakitori chefs use for perfect searing. This premium fuel produces minimal smoke and ash while maintaining steady heat for hours.
When to use binchotan:
- Thin cuts requiring quick, intense searing (skirt steak, fish fillets)
- Delicate proteins where smoke would overpower (scallops, white fish)
- Extended cooking sessions where consistent heat matters
Lighting technique: Binchotan requires 30-40 minutes to fully ignite. Use a chimney starter or torch, and wait until charcoal develops white coating before cooking.
Planking and Wrapping
Cooking on cedar planks or wrapping in banana leaves, corn husks, or grape leaves adds aromatic compounds while protecting delicate foods from direct heat.
Cedar plank salmon:
- Soak plank 2 hours in water
- Place salmon skin-side down on plank
- Position plank over indirect heat
- Close lid and cook 15-20 minutes until salmon reaches 125°F
- Plank chars slightly, infusing cedar aromatics
Rotisserie Cooking
Constant rotation over indirect heat bastes meat in its own juices while developing even browning. This technique works exceptionally well for whole chickens, pork loins, and leg of lamb.
Setup requirements:
- Rotisserie attachment for grill
- Balanced weight distribution (use counterweights if needed)
- Drip pan beneath meat to prevent flare-ups
- Two-zone fire with coals on sides, empty center
For perfectly cooked rotisserie-style chicken at home, check out our rotisserie chicken breast guide.
Hay Smoking
Burning dried hay creates unique aromatic smoke that pairs beautifully with beef and game meats. This technique requires careful attention to prevent excessive smoke.
Method:
- Soak small handful of hay in water for 10 minutes
- Squeeze out excess water
- Place damp hay directly on hot coals
- Add food immediately as hay begins smoking
- Close lid to capture smoke (5-10 minutes maximum)
What Resources Help You Continue Mastering Fire-Cooking?
Continuous improvement in fire-cooking requires ongoing learning from expert sources, recipe experimentation, and community engagement with other enthusiasts.
Recommended Learning Resources
Over The Fire Cooking provides daily campfire recipes, specialized grill spices developed by Derek Wolf, and a newsletter covering advanced techniques [7]. This resource bridges traditional methods with modern equipment.
Key learning areas to focus on:
- Temperature management across different equipment types
- Wood and charcoal selection for specific flavor profiles
- Seasonal ingredient adaptation for fire-cooking
- Safety protocols and fire management
- Equipment maintenance and longevity
Building Your Technique Library
Start a fire-cooking journal documenting:
- Fuel types and quantities used
- Temperature readings throughout cook
- Timing for different proteins and cuts
- Flavor notes and adjustments for next time
- Weather conditions affecting fire behavior
This record accelerates learning by identifying patterns in successful cooks and revealing areas needing improvement.
Community and Practice
Join local grilling clubs or online communities focused on live-fire cooking. Sharing experiences, troubleshooting challenges, and learning regional techniques from other practitioners provides insights no book or video can match.
Practice progression:
- Master basic two-zone grilling with chicken and vegetables
- Advance to low-and-slow smoking with pork shoulder or ribs
- Experiment with direct coal cooking for steaks
- Try specialty fuels like binchotan or specific hardwoods
- Develop signature recipes combining multiple techniques
For more chicken-specific techniques and recipes, explore our collection of chicken breast recipes to expand your fire-cooking repertoire.
Frequently Asked Questions
What’s the difference between grilling and fire-cooking? Grilling typically uses gas or standard charcoal briquettes with consistent heat, while fire-cooking emphasizes live flames, wood smoke, and variable heat management using natural fuels like lump charcoal and hardwood logs. Fire-cooking produces more complex flavors through smoke infusion and char development.
Can you fire-cook in an apartment or condo? Most apartments prohibit open flames on balconies due to fire codes. Check local regulations before attempting fire-cooking in multi-unit housing. Some areas allow electric smokers or pellet grills as alternatives that provide smoke flavor without open flames.
How long does binchotan charcoal last compared to regular charcoal? Binchotan burns 3-4 times longer than standard lump charcoal at the same temperature. A full load can maintain cooking temperatures for 4-6 hours, making it cost-effective despite higher initial price. It also produces minimal ash and can be extinguished and reused.
Is food cooked directly on coals safe to eat? Yes, when coals are fully ashed over (white coating), the surface temperature exceeds 1,000°F, which sterilizes the surface. This method is actually cleaner than many cutting boards and has been used safely for thousands of years across cultures worldwide.
What’s the best wood for smoking chicken? Apple, cherry, and pecan woods provide mild, slightly sweet smoke that complements chicken without overpowering its delicate flavor. Avoid strong woods like mesquite or hickory, which can make poultry taste bitter. Use 2-3 small chunks for a 4-pound chicken.
How do you know when to add more charcoal? Add fresh charcoal when temperature drops 25-50°F below target or when existing coals show mostly gray ash with minimal red glow. For long smoking sessions, add new coals every 45-60 minutes using the minion method to maintain steady temperature.
Can you use fire-cooking techniques on a gas grill? Gas grills can create char through high direct heat but cannot replicate true smoke flavor or ember cooking. Add wood chips in smoker boxes for light smoke, but results will differ significantly from live-fire methods. Consider a charcoal grill or fire pit for authentic fire-cooking.
What internal temperature should chicken breast reach when fire-cooking? Chicken breast must reach 165°F internal temperature for food safety. Insert thermometer into thickest part without touching bone. For juicier results, remove at 160°F and let carryover cooking bring it to 165°F during 5-minute rest period.
How do you prevent flare-ups when fire-cooking fatty meats? Trim excess fat before cooking, maintain a cool zone for moving food away from flames, keep a spray bottle of water handy for spot control, and avoid pressing meat with spatula (which releases fat). Position drip pans under meat when using indirect heat.
What’s the best way to clean cast iron after fire-cooking? Scrub with coarse salt and water while still warm, using chainmail scrubber or stiff brush. Rinse, dry completely over heat, and apply thin layer of cooking oil. Never use soap or soak cast iron, as this removes seasoning and can cause rust.
How much does it cost to start fire-cooking at home? Basic setup costs $150-300: kettle grill ($100-150), cast iron skillet ($30-50), chimney starter ($20-30), thermometer ($15-25), and initial fuel supply ($20-40). Premium equipment like kamado grills starts at $500-800 but offers superior temperature control and fuel efficiency.
Can you fire-cook in winter or cold weather? Yes, but cold weather requires 25-50% more fuel to maintain target temperatures and extends cooking times by 15-30%. Position grill in wind-protected area, keep lid closed as much as possible, and monitor temperature more frequently. Kamado grills perform better in cold than kettle grills due to ceramic insulation.
Conclusion
Mastering char, smoke, and flame techniques at home transforms ordinary meals into restaurant-quality experiences through the primal power of live fire. The three core methods—high-heat char for crusty exteriors, low-and-slow smoke for deep flavor infusion, and open flame cooking for rustic authenticity—provide the foundation for countless dishes across cuisines and cultures.
Success in fire-cooking comes from understanding temperature control through two-zone setups, selecting appropriate fuels for different techniques, and using proper tools like cast iron cookware and reliable thermometers. The 2026 surge in fire-cooking popularity has made specialized equipment more accessible than ever, from affordable kettle grills to premium kamado cookers and traditional fire pits.
Start your fire-cooking journey today by setting up a basic two-zone fire and practicing with forgiving proteins like chicken thighs or pork chops. Document your results, adjust techniques based on outcomes, and gradually incorporate advanced methods like binchotan grilling or ember roasting. The skills you develop will elevate every outdoor meal and connect you to cooking traditions spanning millennia.
Remember that fire-cooking rewards patience, observation, and willingness to learn from both successes and mistakes. Each cook builds experience that no recipe can fully capture—the feel of proper coal temperature, the look of clean smoke, the sound of a perfect sear. These intuitive skills separate competent fire-cooks from true masters.
For additional techniques and recipes to expand your skills, explore our guides on preparing chicken thighs and grilling timing to complement your fire-cooking repertoire.
References
[1] The Ultimate Guide To The Fire Cooking Trend 2026 Why Traditional Cooking Methods Are Back 5cnc – https://dev.to/pankaj_kumar_835927c14845/the-ultimate-guide-to-the-fire-cooking-trend-2026-why-traditional-cooking-methods-are-back-5cnc
[2] An Introduction To Open Fire Cooking – https://barebonesliving.com/blogs/recipes-cooking/an-introduction-to-open-fire-cooking
[3] 5 Grilling Habits To Master In 2026 – https://www.kamadojoe.com/blogs/kamado-joe-blog/5-grilling-habits-to-master-in-2026
[4] A Beginner S Take On Live Fire Cooking Mastering The Art Of Live Fire Cooking – https://ddrbbqsupply.com/blogs/news/a-beginner-s-take-on-live-fire-cooking-mastering-the-art-of-live-fire-cooking
[5] Latest Trends In Outdoor Cooking With Fire Bowls 2026 – https://co-fire.eu/en/blogs/artikelen/latest-trends-in-outdoor-cooking-with-fire-bowls-2026
[6] Watch – https://www.youtube.com/watch?v=azDPufEuHZI
[7] overthefirecooking – https://overthefirecooking.com


