
What Is the Best Way to Prepare Chicken Thighs: Methods, Cuts, and Pro Tips
You want juicy, flavorful chicken thighs with crisp skin and reliable results every time.
Pan-searing skin-on, bone-in thighs to render and brown the skin, then finishing them in a hot oven gives you the best texture and moisture balance. Other methods like baking, grilling, braising, or pressure-cooking work well when you need convenience or a specific flavor profile.

Choose bone-in, skin-on thighs when possible. Season or marinate to taste, sear skin-side down until deeply browned, and finish in the oven until the internal temperature reaches your preferred level of tenderness.
Types of Chicken Thighs and Selecting the Right Cut

Choose thighs based on cooking time, texture, and whether you want crispy skin or quick weeknight protein.
Match bone and skin presence to the method: bone for slow heat and flavor, skin for crisping, boneless for speed and consistent slicing.
Bone-In, Skin-On Thighs
Bone-in, skin-on thighs deliver the deepest flavor and the most forgiving texture. The bone conducts heat and helps the meat stay moist during long roasts, braises, or high-heat searing.
The skin renders fat as it cooks, which bastes the meat and produces a crisp exterior when you roast, grill, or pan-sear. Use them when you want crispy skin and strong flavor, such as oven-roasting at 400°F, grilling over medium-high, or pan-roasting then finishing in the oven.
Season well and pat the skin dry to promote browning. Expect longer cook times than boneless cuts and rest the thighs 5–10 minutes after cooking to let juices redistribute.
Boneless, Skinless Thighs
Boneless, skinless thighs cook faster and cut into even pieces for stir-fries, curries, or skewers. They’re leaner on the surface but still relatively fatty internally, so they remain forgiving compared with white meat.
Trim excess fat, then marinate or brine for 20–60 minutes to boost tenderness and flavor. Use high-heat methods (sauté, grill, air-fry) for quick, juicy results or braise briefly in saucy dishes.
Monitor internal temperature and remove from heat at 165°F; carryover will finish the cook. These thighs slice easily for sandwiches or salads and save time when you don’t need skin crisping or bone-driven depth.
Bone-In, Skinless and Other Variants
Bone-in, skinless thighs and hybrid trims work for specific needs. Bone-in, skinless gives you the moisture and flavor benefits of the bone without the crisping step, making them good for stews or slow cooker recipes where skin would turn soggy.
Boneless, skin-on thighs offer quicker cooking than bone-in but still let you crisp skin for sandwiches or pan-fried dishes. Other variants include air-chilled processing (drier surface for better browning) and value packs with mixed sizes.
When selecting, check for uniform thickness and a fresh, slightly rosy color. Avoid thighs with strong odors or excessive liquid in the package; those signs indicate lower quality or compromised texture.
How to Prep and Season Chicken Thighs
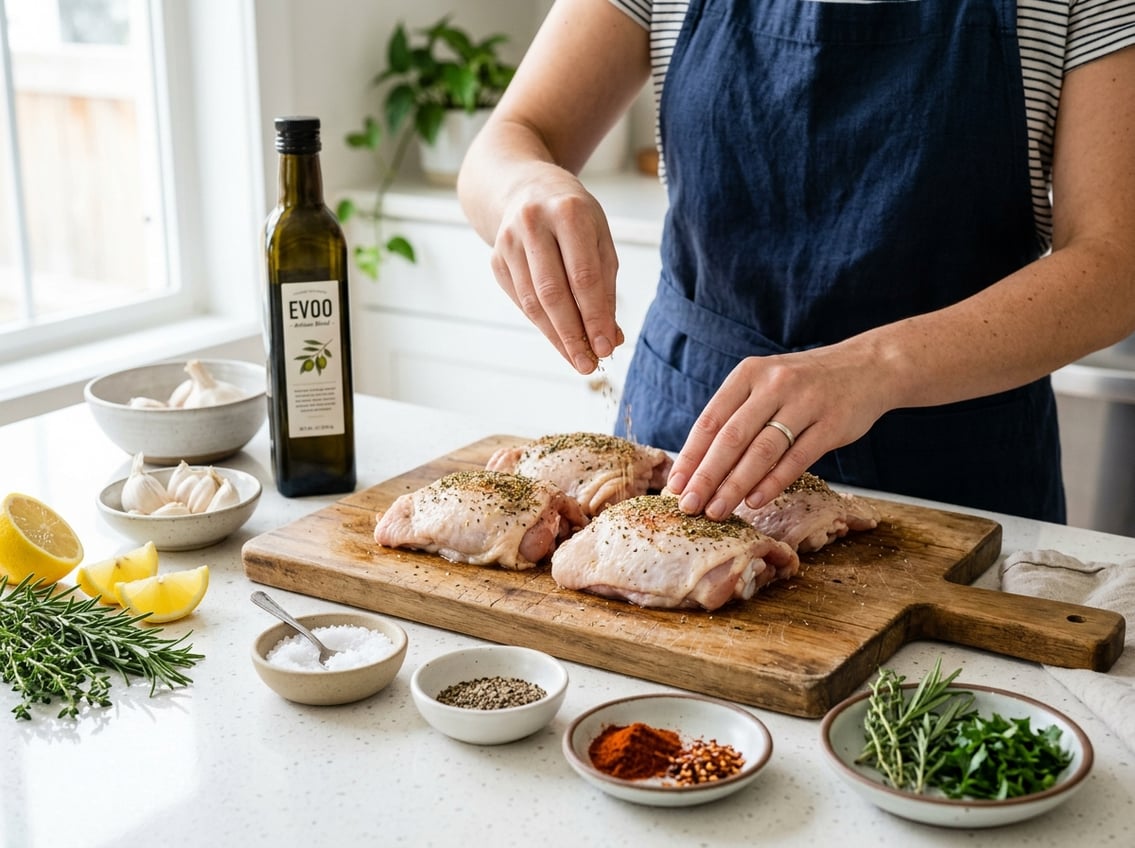
Trim excess fat, pat skin very dry, and bring thighs toward room temperature before seasoning. Use a simple salt-first approach, then add oil, herbs, and spices so flavors stick and skin crisps.
Trimming and Removing Skin or Bone
Use kitchen shears to remove loose fat and any ragged edges of skin. Trim the fat flap at the thigh joint and cut away visible pockets of fat that can cause flare-ups or greasy pan juice.
If you prefer boneless thighs, remove the bone with a short, sharp knife by slicing along the bone and working it free; save bones for stock. For skin removal, grasp the skin at one edge, pull while running the knife between skin and meat to avoid tearing the flesh.
Pat each thigh dry with paper towels; moisture prevents browning. Let thighs sit 15–20 minutes at room temperature before cooking to promote even doneness.
Line a tray with a rack if you plan to bake so air circulates and skin crisps.
Essential Seasonings and Marinades
Start with kosher salt—about 1 teaspoon per pound—applied evenly and early; it seasons through and improves texture. Add freshly ground black pepper to taste; grind it over both sides for immediate flavor impact.
Use 1 tablespoon oil per pound to help spices adhere and to promote browning. For a quick marinade, mix oil with 1–2 teaspoons acid (lemon juice or vinegar) and a crushed garlic clove; marinate 30 minutes to 4 hours.
Avoid very acidic marinades longer than 4 hours as they can start to break down the meat. If you plan to roast, dry-brine by salting and refrigerating uncovered for up to 24 hours to dry the skin and concentrate flavor.
For stovetop and grill, apply seasoning just before cooking to keep the surface drier for better sear.
Herbs and Spices for Maximum Flavor
Use paprika (regular or smoked) for color and mild sweetness; 1 teaspoon per pound brightens the crust. Combine with 1 teaspoon garlic powder and 1/2 teaspoon onion powder for base savory notes.
Add 1/2–1 teaspoon dried oregano and 1/2–1 teaspoon dried thyme per pound for herbaceous depth. Rub these into the skin so oils release during cooking.
For extra aroma, scatter fresh thyme sprigs into the pan or under the skin before roasting. Adjust black pepper to preference; coarse grind yields a sharper bite.
If you like a touch of sweetness, mix 1/2 teaspoon brown sugar with the paprika to boost caramelization without overpowering the herbs.
Pan-Searing and Oven Roasting
This method combines a high-heat contact sear to build a crisp, brown skin with a controlled oven finish to cook the meat through without drying it. It works especially well for bone-in, skin-on chicken thighs and gives you reliably juicy, flavorful results.
Pan-Searing for Crispy Skin
Start with skin-on, bone-in chicken thighs, patted very dry and lightly salted 20–30 minutes before cooking. Heat a heavy skillet (cast iron preferred) over medium-high until the pan is hot and shimmering; add a thin layer of oil with a smoke point above 400°F.
Place thighs skin-side down and press gently so the skin makes full contact. Leave them undisturbed for 6–8 minutes, or until the skin is deep golden-brown and releases easily.
That direct contact creates the Maillard crust that delivers texture and flavor. After the skin browns, transfer the skillet to the oven or flip the thighs briefly to brown the other side for 30–60 seconds.
Use tongs and avoid piercing the meat to keep juices inside.
Oven Finishing for Juicy Meat
Preheat your oven to a moderate temperature so the thighs cook through without toughening. For bone-in thighs, 375–400°F gives a balance of steady internal carryover and preserved juices.
Place the seared thighs on a wire rack set over a rimmed sheet pan or keep them in the oven-safe skillet. Roast until the internal temperature reaches the target.
Roasting on a rack promotes even air circulation and keeps the skin crisp all around. If you want extra flavor, add aromatics like smashed garlic, thyme sprigs, or a knob of butter to the skillet during the last 5 minutes.
Let the thighs rest 5–10 minutes before slicing to redistribute juices.
Recommended Cooking Temperatures
Use an instant-read thermometer for accuracy. Insert it into the thickest part without touching bone.
- Target internal temperature: 165°F (74°C) for safe consumption of chicken.
- For slightly more tender, edge-to-edge pink with safety confirmed, you can remove bone-in thighs at 170–175°F (77–79°C); carryover heat will stabilize them.
- Oven temp guidance: 375–400°F (190–205°C) for bone-in, skin-on thighs; bake time after searing typically runs 15–25 minutes depending on size.
If you use boneless thighs, shorten oven time and aim for the same internal temps. Adjust times for crowding, pan size, and starting temperature of the meat.
Alternative Cooking Methods for Chicken Thighs
These methods focus on maximizing crisp skin, concentrated flavor, or fast cooking. Choose based on equipment, desired texture, and how much hands-on time you want.
Grilling and Broiling
Grilling gives you smoke and char. Set up two-zone heat so you can sear over direct heat and finish over indirect.
For charcoal, sear skin-side down for about 6–8 minutes, then move to the cooler side to reach 165°F, turning once. Gas grills work the same: start on high, then lower the heat or move to an unlit burner.
Broiling replicates that top-heat sear indoors. Place thighs skin-side up on a foil-lined rimmed pan about 6–8 inches from the broiler.
Broil 6–10 minutes to brown, then reduce heat or move rack down and finish until internal temp reaches 165°F. Watch closely; sugar in marinades burns quickly.
Always rest thighs 5–10 minutes to redistribute juices.
Air Frying for Extra Crispiness
An air fryer produces very crisp skin fast by circulating hot air around elevated thighs. Preheat to 400°F if your model recommends it.
Arrange thighs skin-side up in a single layer with space between pieces; cook about 20–25 minutes, flipping halfway if your basket blocks airflow. Use a light spray of oil on the skin for better browning.
Because air fryers keep thighs above rendered fat, check internal temp at the thickest point and watch for dryness. If you prefer juicier meat, reduce time slightly and allow a short rest on a warm rack so some juices reabsorb.
For sticky glazes, add them in the last 3–5 minutes to avoid burning.
Frying Techniques—Deep, Shallow, and Skillet
Deep frying gives the fastest, crispiest exterior. Heat oil to 350–375°F and fry skin-on thighs 10–14 minutes depending on size, turning once, until 165°F internal.
Use a thermometer and work in small batches to maintain oil temp. Drain on a rack, not paper, to keep skin crisp.
Shallow frying (pan-fry) uses less oil and relies on contact with the hot pan. Brown skin-side down over medium-high heat for several minutes until deeply golden, then finish in the oven at 375°F or flip and lower heat to cook through.
Skillet frying (cast iron preferred) combines searing and oven finishing. Preheat skillet until shimmering, add a tablespoon of oil, sear skin-side down until deeply browned, then transfer to a 400–425°F oven to finish.
This method balances crispness and juiciness while keeping splatter manageable.
Best Practices and Common Mistakes to Avoid
Follow precise temperature targets, use a thermometer, and rest thighs after cooking to lock in juices. Avoid overcrowding the pan or frying at the wrong oil temperature, and choose the correct thigh type for your recipe.
Checking for Doneness and Juiciness
Use an instant-read thermometer to check doneness: insert into the thickest part of the thigh without touching bone. Target 165°F (74°C) as the safe minimum; for bone-in thighs you can cook slightly higher (170–175°F) to render fat and soften connective tissue without drying the meat.
Look for these visual and tactile cues: juices should run clear with a slight pink tinge near the bone for dark meat, and the meat should feel firm but springy when pressed.
For grilled or pan-seared thighs, check multiple pieces because heat zones vary. If using a recipe (braise, roast, air fryer), rely on time plus temperature rather than time alone.
Avoid cutting into the thigh to check doneness, as this drains juices. Guessing temperature by touch or color alone leads to under- or overcooking.
Always calibrate your thermometer and probe several pieces for consistent results.
Resting and Serving Tips
Let thighs rest 5–10 minutes after cooking. Tent them loosely with foil to maintain surface crispness while juices redistribute.
Rested thighs retain more moisture and slice cleaner for dishes like chicken thigh salads or sandwiches. Serve skin-on thighs skin-up so the crispness stays intact.
For sauced recipes, spoon sauce over the thigh after resting to avoid softening the crust. If you plan to shred thighs for tacos or stew, rest them briefly and pull while still warm for easier shredding.
Transfer thighs to a wire rack or paper-towel-lined tray briefly to keep crusts crisp. For recipes that need fast service, slice against the grain after resting to maximize tenderness.


