
What Do Chicken Thighs Look Like Cooked: A Complete Visual Guide
You want to know at a glance whether chicken thighs are done and safe without overcooking them.
Perfect chicken thighs have golden-brown, crisp skin (when skin-on), opaque meat that flakes easily, clear juices, and an internal temperature of 165°F (74°C) in the thickest part. These cues show the thigh is cooked through and still juicy.

You’ll learn the specific visual signs, thermometer technique, texture checks, and how different cooking methods change appearance and flavor.
This will help you judge doneness confidently whether you’re grilling, roasting, pan-searing, or braising.
Essential Visual Characteristics of Cooked Chicken Thighs
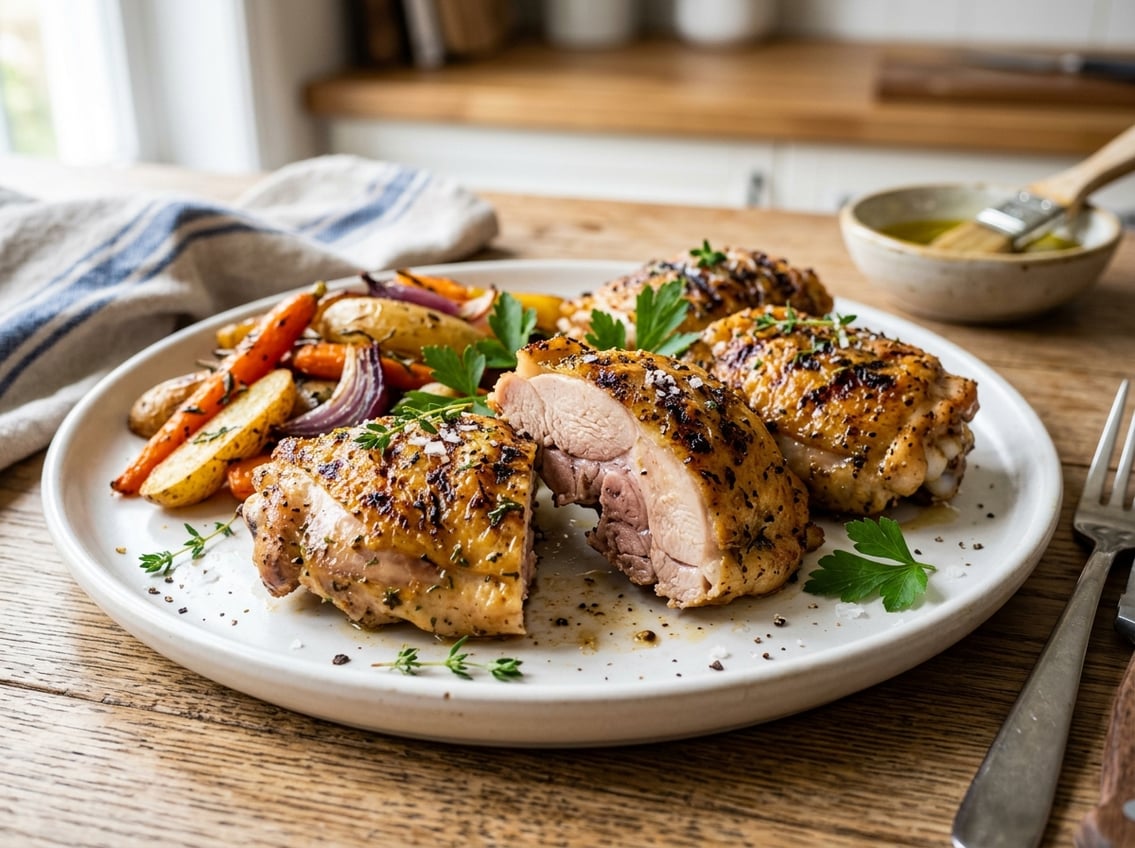
Look for clear signs that indicate doneness: evenly browned skin or uniformly opaque meat, juices that aren’t pink, and possibly a faint pink near the bone on bone-in cuts.
Inspect skin, interior color, and juices together instead of relying on one sign.
Skin Color and Texture
For skin-on chicken thighs, look for golden-brown to deep amber skin that’s lightly blistered.
Crispy, slightly taut skin shows proper browning and rendered fat. Pale, limp skin means the pan or oven wasn’t hot enough.
If the skin is charred or blackened, the exterior overcooked while the interior may still be underdone. Adjust heat or cook time next time.
For skinless thighs, even browning on the surface and a glossy sheen from rendered fat show proper cooking.
Overly dry, matte meat signals excessive high heat or overcooking.
Interior Meat Appearance
Cut into the thickest part away from the bone and check for opaque, light beige meat, not translucency.
Boneless thighs should look uniformly cooked. Bone-in thighs may show slightly different coloring near the bone but should be opaque farther from it.
Properly cooked thighs pull apart easily and flake slightly under a fork, remaining moist and tender.
If fibers look tight and dry, the meat is overcooked.
Juice Clarity
When you pierce the thigh, clear or faintly tinted juices should appear, not bright pink or bloody.
Clear juices mean proteins have coagulated and the interior reached safe temperatures.
Brined or heavily seasoned thighs can produce clearer-looking juices even if not fully done, so combine this check with temperature or texture tests.
Pink Near the Bone
A faint pink ring close to the bone on bone-in chicken thighs can occur even when the meat is safe.
Myoglobin and bone marrow pigments sometimes remain pink after bacteria-killing temperatures are reached.
Verify doneness with an instant-read thermometer (165°F / 74°C in the thickest part, avoiding the bone).
If you prefer no pink at all, cook slightly longer but watch for dryness in boneless or skinless thighs.
Confirming Doneness: Temperature and Thermometer Techniques
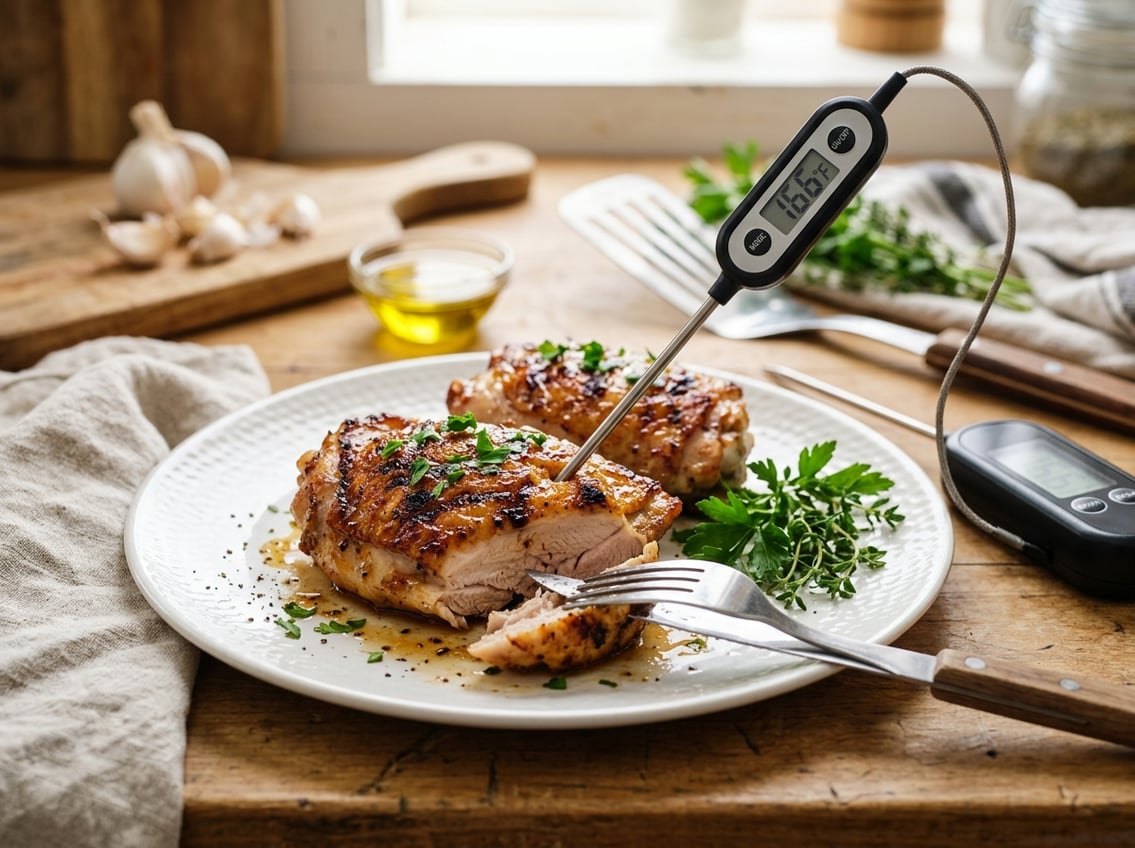
Use a precise internal temperature to know thighs are safe and to achieve the texture you want.
Use the right thermometer, insert it correctly, and watch for carryover cooking to avoid overcooking.
Safe Internal Temperature
The USDA minimum safe temperature for poultry is 165°F (74°C).
Reaching this temperature destroys harmful bacteria like Salmonella and Campylobacter.
For texture, many cooks remove thighs at higher targets: 175–195°F (79–91°C) yields more collagen breakdown and a more tender bite.
If you want juicy but intact thighs, aim for 175°F (79°C). For shreddable results, target 190–195°F.
Check the thickest part of the thigh and avoid touching bone, which reads hotter.
Factor in a 2–5°F carryover rise during resting when deciding the pull temperature.
How to Use a Meat Thermometer
Choose an instant-read or a leave-in probe depending on cooking method and timing.
For quick checks, a digital instant-read thermometer works best. Insert and wait for a stable reading in seconds.
Insert the probe into the thickest part of the thigh perpendicular to the bone.
If testing bone-in thighs, push the probe alongside the bone without touching it.
For boneless thighs, probe straight into the center of the meat.
Check multiple pieces when cooking a batch. Use the lowest reading found to judge doneness.
Clean the probe between checks with hot, soapy water.
If you plan to rest meat, remove thighs about 2–5°F below your final target to account for carryover cooking.
Types of Thermometers
Instant-read thermometers give fast, accurate readings and are ideal for finishing checks.
Look for models with a thin probe and a response time under 10 seconds.
Leave-in probe thermometers work well for oven or smoker use. They let you monitor temperature continuously without opening the oven.
Wireless or Bluetooth probes provide remote monitoring and alerts.
Recommended options include the Lavatools Javelin (instant-read) and other digital models with quick response times and thin probes.
Avoid dial thermometers with slow response or large probe tips that miss the true core temperature.
Keep thermometers calibrated. Test in an ice bath (32°F / 0°C) or boiling water adjusted for altitude to verify accuracy.
Avoiding Overcooked Chicken
Overcooked chicken thighs become dry, stringy, or excessively soft if collagen fully breaks down past the desired point.
Use a thermometer and set a clear pull temperature to prevent this.
Remove thighs when the probe reads your target, then rest them 5–10 minutes uncovered or loosely tented.
Resting equalizes juices and lets carryover cooking finish the final degrees without direct heat.
For boneless thighs, use conservative oven temps; they dry faster.
For bone-in pieces, avoid prolonged exposure to temperatures above 205°F, which can make meat stringy.
If skin browning is a concern, crisp in short bursts under a broiler once the internal temp is nearly reached, then monitor with your instant-read tool.
Textural and Physical Signs of Properly Cooked Thighs
Look for a balance of resistance and give when you press the meat, visible moisture without pooling juices, and slight separation at the bone for bone-in cuts.
These signs together show the thigh reached a safe temperature while retaining juiciness.
Firmness and Tenderness
Press the thickest part of the thigh with your finger or tongs.
A properly cooked chicken thigh feels springy and yields slightly under pressure. It should not be floppy (undercooked) or rock-hard (overcooked).
Use a fork to test: it should slide into the meat with minimal resistance and the fibers should part easily into soft strands.
If the meat resists or feels gummy, it needs more time. If it flakes into dry, stringy pieces, you’ve passed the ideal point.
Pair this tactile test with an instant-read thermometer. When the thigh reads 165°F (74°C) in the thickest area (probe avoiding bone), the firmness you feel matches safe doneness.
Juiciness and Moisture Content
A perfect chicken thigh retains visible moisture without releasing cloudy or bloody liquid.
When you cut or pierce the meat, juices should run clear and glisten on the surface. This indicates proteins have set and moisture remains trapped inside.
Avoid thighs that look dull or dry on the cut surface; that signals overcooking and lost fat.
Excessive pooling of liquid after resting can mean the thigh wasn’t allowed to rest long enough to reabsorb juices.
Rest bone-in thighs 5–10 minutes to help the meat retain moisture and improve mouthfeel.
Meat Separation from Bone
Check how the meat sits around the bone in bone-in thighs.
Properly cooked thighs often pull back slightly from the bone, creating a small gap at the joint.
This shows connective tissue has softened and some shrinkage has occurred during cooking.
Some well-cooked thighs show minimal separation depending on cut and age of the bird.
Use separation as a supporting clue along with firmness, clear juices, and an accurate internal temperature reading.
Appearance Across Popular Cooking Methods
Expect differences in color, skin texture, and interior juiciness depending on cooking method, heat level, and whether the thigh is bone-in or boneless.
Look for a golden-brown exterior, opaque interior meat, and clear juices as primary cues.
Baking Chicken Thighs
Baked chicken thighs develop an even golden-brown skin when roasted at 400–425°F (205–220°C).
The skin crisps while the meat beneath remains moist. Bone-in thighs often show slight separation at the joint when fully cooked.
Inside, the meat should be opaque and springy to the touch.
If you pierce the thickest part, juices should run clear rather than pink.
If you brine or use a sugar-forward glaze, expect deeper caramelization and darker edges.
For oven-baked chicken thighs finished under the broiler, watch closely to avoid charred spots while achieving extra crispness.
Grilling Chicken Thighs
Grilled chicken thighs show pronounced browning and char marks from direct heat.
High heat creates a deeply caramelized exterior. Thin areas or skin edges can blacken quickly, so monitor flare-ups.
The interior should still be uniformly opaque. A slightly pink tint near the bone can occur in dark meat but must reach 165°F (75°C) at the thickest point.
For bone-in grilled chicken thighs, grill over medium heat after initial sear to prevent the outside from overbrowning while the inside cooks through.
Stir-Frying and Other Methods
In a chicken stir-fry, bite-sized thigh pieces brown quickly and develop small, caramelized edges.
You should see a glossy coating from sauces and short cooking time keeps the interior juicy.
Stir-fried thigh meat cooks fast. Look for no translucency and slightly firm texture.
Pieces that feel stringy indicate dryness.
Other quick methods like pan-searing then finishing in the oven produce a crisp crust and moist interior.
Slow braising yields darker, fall-apart meat with no crisp skin.
Safety Considerations When Cooking Chicken Thighs
Cook chicken thighs to a safe internal temperature, avoid cross-contamination, and use reliable tools like an instant-read thermometer.
Pay special attention when starting from frozen and when juices or meat color seem unclear.
Dangers of Undercooked Poultry
Undercooked chicken thighs can carry bacteria that cause severe gastrointestinal illness.
Eating meat that hasn’t reached a safe internal temperature risks infection, dehydration, and, in vulnerable people, hospitalization.
Use an instant-read thermometer inserted into the thickest part of the thigh without touching bone.
The USDA recommends 165°F (74°C) for all poultry.
Hold the probe steady until the reading stabilizes.
Visual checks — color or clear juices — are not reliable alone, because thighs can remain slightly pink even when safe.
Prevent cross-contamination by washing hands, utensils, and surfaces after raw chicken contact.
Keep raw chicken separate from ready-to-eat foods and store it below other items in the fridge.
Common Pathogens in Chicken
Salmonella and Campylobacter are the two most common bacteria found in raw chicken and are the main causes of foodborne illness from poultry.
Symptoms include diarrhea, fever, and abdominal cramps, typically appearing 1–3 days after exposure.
Proper cooking to 165°F (74°C) kills both pathogens.
Temperature matters more than color. Even dark meat can show a pink tinge due to myoglobin or bone marrow pigments.
Use a thermometer and, for larger pieces, allow carryover cooking by resting the thigh 3–5 minutes after removing it from heat.
If you suspect contamination (sour smell, slimy texture), discard the chicken.
Marinating, brining, or seasoning does not eliminate bacteria. Only adequate cooking does.
Cooking Chicken Thighs from Frozen
You can cook chicken thighs from frozen safely, but adjust time and technique to ensure even cooking.
Thawing in the refrigerator overnight is best.
If you cook from frozen, expect about 50% longer cooking time than for thawed thighs.
Use methods that transfer heat efficiently: oven roasting at 400°F (204°C) or simmering in sauce works well.
Insert an instant-read thermometer into the thickest part once the exterior is browned. Confirm an internal temperature of 165°F (74°C).
For bone-in thighs, check near the bone but avoid touching it.
Avoid cooking frozen thighs in a slow cooker from frozen, because low temperatures can keep meat in the bacterial danger zone too long.
If you microwave-thaw, finish cooking immediately on the stovetop or in the oven.
Flavor and Color Science
The chemical browning that occurs when you sear or roast thighs creates new aroma molecules and darker pigments.
Those changes shape the savory notes you taste and the brown crust you expect on well-cooked chicken.
Role of Browning in Flavor
When you apply heat above roughly 285°F (140°C), amino acids in the meat react with reducing sugars through the Maillard reaction.
This network of reactions produces hundreds of volatile compounds such as aldehydes, pyrazines, and ketones. These compounds add roasted, nutty, and meaty aromas.
The drier, high-heat surface speeds up the reaction, so a well-dried and salted thigh develops more flavor.
Longer exposure and higher temperatures increase complexity, but going too far can create bitter or burnt notes.
Practical tips:
- Pat thighs dry to promote surface browning.
- Use moderate-high heat for a short sear, then finish in the oven to develop deeper flavors without burning.
- Salt early to enhance protein-sugar interactions and improve crust formation.
Visual Signs of the Maillard Reaction
You can identify the Maillard reaction by three clear visual cues on cooked thighs. Look for a uniform golden-brown crust, small dark flecks where sugars caramelize, and a firmed surface texture.
These signs show that the surface has reacted extensively and that flavor has concentrated. Color changes from pale tan to deep mahogany as reaction products build up.
A glossy, slightly crisp skin with darker mottling usually means you achieved productive non-enzymatic browning. This is different from simple dehydration.
Check these specifics while cooking:
- Browning appears on exposed surfaces and edges.
- Avoid large areas of black char, which means burnt compounds.
- Even browning across similar-sized pieces shows consistent heat and better flavor development.


