
Silicone Kitchen Bags: 15 Meal Prep, Sous Vide, and Freezer Hacks Revolutionizing Home Cooking
Last updated: May 23, 2026
Quick Answer
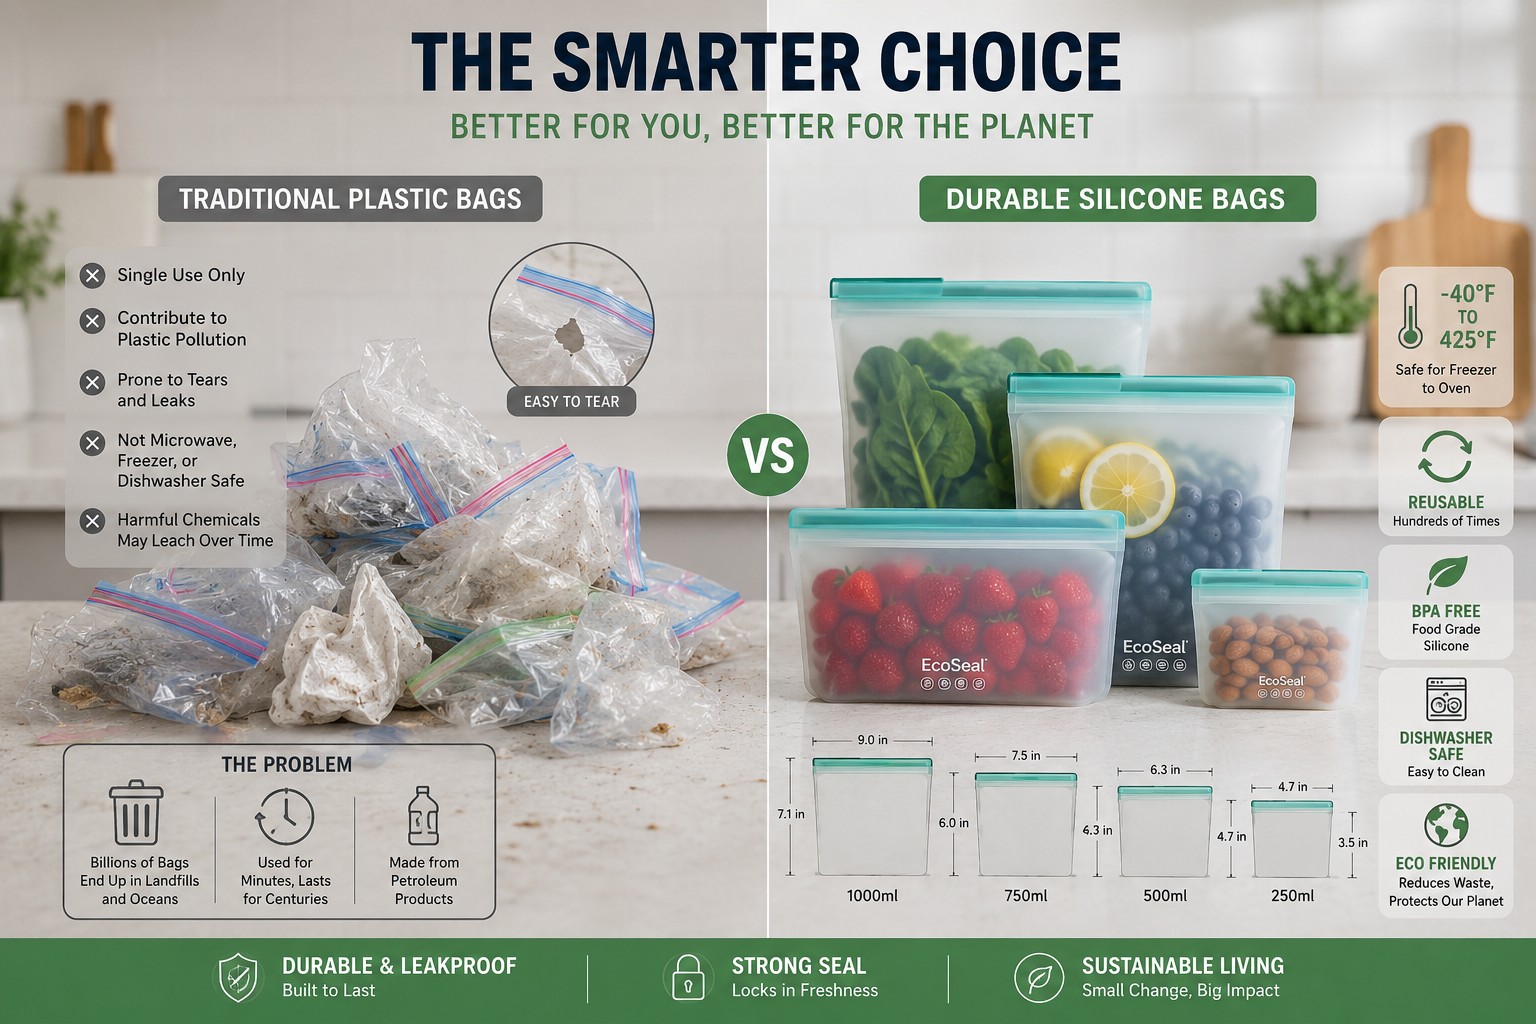
Silicone kitchen bags are reusable, food-grade storage containers made from platinum-grade silicone that can withstand temperatures from -40°F to 425°F, making them suitable for freezing, sous vide cooking, microwaving, and oven use. They replace single-use plastic bags with an airtight, leak-resistant alternative that lasts for years and works across multiple cooking methods. The 15 hacks covered here focus on meal prep efficiency, sous vide protein cooking, and space-saving freezer organization that keeps food fresh longer.
Key Takeaways
- Silicone bags handle extreme temperatures: Safe from freezer (-40°F) to oven (up to 425°F), plus microwave and dishwasher use
- Airtight pinch-press seals prevent leaks: Suitable for liquids, marinades, soups, and sous vide cooking without water infiltration
- Cost ranges from $12-$40 per bag: Higher upfront investment compared to $0.10 plastic bags, but 5+ year lifespan offsets the difference
- Meal prep becomes more efficient: Pre-portion proteins, marinate overnight, freeze in flat stacks, and reheat directly in the same bag
- Sous vide cooking works reliably: Bags withstand boiling water temperatures and maintain vacuum-like seals when air is pressed out
- Proper cleaning extends lifespan: Turn inside-out, wash with bottle brush, air-dry completely before storage to prevent odor and mold
- Not ideal for every food: Avoid storing highly acidic foods long-term or foods with strong odors that may absorb into silicone
- Break-even point is roughly 18 months: For households replacing about 3 plastic bags per week, based on industry estimates
What Are Silicone Kitchen Bags and How Do They Work?
Silicone kitchen bags are flexible, reusable food storage containers made from food-grade platinum silicone that seal with a pinch-press closure along the top edge. Unlike plastic bags that rely on zip tracks or twist ties, silicone bags use a thick, reinforced lip that you press together to create an airtight seal. The material itself is heat-stable, non-porous, and doesn’t leach chemicals at high or low temperatures.
The bags work by combining three features: material durability, temperature tolerance, and seal integrity. Food-grade silicone remains stable across a wide temperature range, which means you can move the same bag from freezer to boiling water to microwave without degradation. The pinch-press seal creates an airtight barrier that keeps air out during freezer storage and water out during sous vide cooking.
Key functional characteristics:
- Made from platinum-cured silicone (not cheaper peroxide-cured versions)
- Transparent or translucent for easy content identification
- Available in multiple sizes: snack (1-2 cups), sandwich (3-4 cups), half-gallon, and gallon
- Seal requires firm pressure along the entire edge to close properly
- Bags are flexible when empty but hold their shape when filled
Common mistake: Assuming all silicone bags are identical. Check for FDA food-grade certification and avoid bags with thin seals or strong chemical odors when new, which can indicate lower-quality silicone.
Silicone Bags vs Plastic Ziplock Bags: Which Is Better?
Silicone bags outperform plastic ziplock bags in durability, temperature range, and reusability, but plastic bags cost less upfront and are more convenient for single-use scenarios. For households that meal prep regularly, freeze in bulk, or cook sous vide, silicone bags offer better long-term value. For occasional storage or one-time transport, plastic bags remain more economical.
Direct comparison:
| Feature | Silicone Bags | Plastic Ziplock Bags |
|---|---|---|
| Temperature range | -40°F to 425°F | Freezer-safe only; melts above ~195°F |
| Reusability | 5+ years (1,500+ uses) | 1-3 uses before degradation |
| Cost per bag | $12-$40 | $0.10-$0.25 |
| Dishwasher safe | Yes | No (warps and tears) |
| Sous vide compatible | Yes | No (not heat-rated) |
| Microwave safe | Yes | Limited (some bags only) |
| Leak resistance | High (when sealed correctly) | Moderate (zippers can fail) |
| Environmental impact | Lower over lifespan | High (single-use waste) |
Choose silicone bags if:
- You meal prep 3+ times per week
- You cook sous vide or reheat food in the bag
- You want to reduce single-use plastic waste
- You freeze liquids like soups, sauces, or marinades
Choose plastic bags if:
- You need storage for occasional leftovers
- Budget is the primary constraint
- You’re packing food for travel and won’t bring the bag back
- You need very small snack-size portions (silicone options are limited)
According to NBC News, top-rated silicone bags like Stasher can go in the freezer, oven up to 425°F, and are suitable for sous vide cooking, making them a clear all-in-one option for temperature-flexible storage.[1]
Can You Put Silicone Bags in Boiling Water for Sous Vide?
Yes, food-grade silicone bags are safe for sous vide cooking in boiling water as long as they’re rated for temperatures above 212°F. Most quality silicone bags are rated up to 425°F, which provides a significant safety margin for sous vide cooking that typically occurs between 130°F and 185°F. The key is ensuring the bag is fully sealed and doesn’t float, which can cause uneven cooking.
How to use silicone bags for sous vide:
- Remove as much air as possible: Use the water displacement method by slowly submerging the sealed bag in the water bath, allowing water pressure to push air out before fully sealing
- Seal firmly: Press the pinch-seal closed along the entire edge, checking for gaps
- Clip to the side: Use a binder clip or sous vide weight to keep the bag submerged and in contact with circulating water
- Avoid overfilling: Leave at least 1 inch of space at the top to ensure a proper seal
Silicone bags work well for sous vide proteins like chicken breast cooked to safe, juicy results, pork chops, and fish fillets. They’re less ideal for large roasts or bone-in cuts that may puncture the seal.
Common mistake: Overfilling the bag, which prevents a complete seal and allows water to seep in during cooking. Fill bags no more than two-thirds full for sous vide use.
How Much Do Reusable Silicone Food Bags Cost?
Reusable silicone food bags typically cost between $12 and $40 per bag, depending on size, brand, and features. A starter set of 3-4 bags in mixed sizes usually runs $30-$60. While this is significantly more expensive than plastic ziplock bags (roughly $0.10 each), the lifespan of 5+ years means the per-use cost drops to a few cents after the first year.
Typical price ranges by size:
- Snack size (1-2 cups): $10-$15
- Sandwich size (3-4 cups): $12-$20
- Half-gallon: $18-$28
- Gallon: $25-$40
- Starter sets (3-5 bags): $30-$70
According to industry estimates, a single silicone bag can replace over 1,500 disposable plastic bags during its lifespan.[6] For a household that uses 10 plastic bags per week, switching to silicone bags can eliminate over 1,000 single-use plastics annually, though these figures come from commercial guides rather than independent life-cycle assessments.
Break-even calculation example:
- Silicone bag cost: $20
- Plastic bag cost: $0.10
- Break-even point: 200 uses
- At 3 uses per week: break-even in ~18 months
Choose premium brands ($25-$40) if:
- You need guaranteed sous vide performance
- You want thicker silicone for heavy-duty freezer storage
- Brand warranty and customer support matter to you
Choose mid-range options ($12-$25) if:
- You’re testing silicone bags for the first time
- You primarily need freezer and microwave use
- You want multiple sizes without a large upfront investment
Are Silicone Bags Safe for Freezer Storage Long-Term?
Yes, silicone bags are safe and effective for long-term freezer storage, with temperature ratings down to -40°F that prevent cracking, brittleness, or seal failure. The airtight seal prevents freezer burn better than plastic bags, and the material doesn’t become brittle or tear after repeated freeze-thaw cycles. Silicone bags can safely store food in the freezer for 3-6 months without quality loss.
Advantages for freezer storage:
- No freezer burn: Airtight seal keeps moisture in and air out
- Flat stacking: Bags lay flat when frozen, maximizing freezer space
- Easy labeling: Write directly on the bag with dry-erase marker or use removable labels
- Portion control: Pre-portion meals, proteins, or ingredients before freezing
- Reheat directly: Move from freezer to microwave or sous vide without transferring
Best practices for freezer use:
- Cool food completely before sealing to prevent condensation inside the bag
- Press out excess air using the water displacement method or manual pressing
- Lay flat to freeze for the first 24 hours, then stack vertically to save space
- Label with contents and date using a dry-erase marker on the bag surface
- Leave 1 inch of headspace for liquids that expand when frozen
Foods that freeze well in silicone bags:
- Pre-cooked proteins: chicken breast portions, ground meat, shredded chicken
- Soups and stews (fill only two-thirds full)
- Marinated meats ready for cooking
- Pre-chopped vegetables and herbs
- Smoothie ingredient packs
- Cookie dough portions
Common mistake: Freezing hot or warm food directly in the bag, which creates condensation that turns to ice crystals and reduces seal effectiveness over time.
Best Silicone Bags for Meal Prep and Sous Vide Cooking
The best silicone bags for meal prep and sous vide cooking are those rated for high heat (425°F+), with reinforced seals, and available in multiple sizes for portion flexibility. Stasher bags remain the most widely tested and recommended brand across independent reviews, but several alternatives offer similar performance at lower price points.
Top-rated features to look for:
- Temperature rating: Minimum 400°F for oven and sous vide use
- Seal design: Wide, reinforced pinch-press closure that’s easy to open and close
- Transparency: Clear or translucent material for easy content identification
- Size variety: At least 3 sizes (snack, sandwich, half-gallon) for different meal types
- Dishwasher-safe: Top-rack safe without warping or seal degradation
According to Food & Wine, top silicone bags are “almost indestructible” and microwave-safe up to 425°F, reinforcing their use for reheating, batch cooking, and hot-food storage.[2] Consumer Reports has also tested silicone food storage bags and published a dedicated best-of list, indicating the category has moved from niche eco-product to mainstream kitchen staple.[3]
Recommended bag sizes for specific uses:
- Snack size (1-2 cups): Nuts, cut fruit, small portions of leftovers
- Sandwich size (3-4 cups): Single protein portions, marinated chicken thighs, vegetables
- Half-gallon: Soups, stews, 2-3 servings of grains or pasta
- Gallon: Whole rotisserie-style chicken breast, large batch marinades, family-size meal prep
For sous vide specifically:
- Choose bags with flat bottoms for better water circulation
- Avoid bags with decorative patterns that may trap air
- Test the seal by filling with water and inverting before first use
How to Clean Silicone Food Storage Bags Properly
Clean silicone bags by turning them inside-out, washing with warm soapy water and a bottle brush, rinsing thoroughly, and air-drying completely before storage. Proper cleaning prevents odor absorption, mold growth, and seal degradation. Most silicone bags are dishwasher-safe on the top rack, but hand-washing extends their lifespan and ensures thorough cleaning of corners and seals.
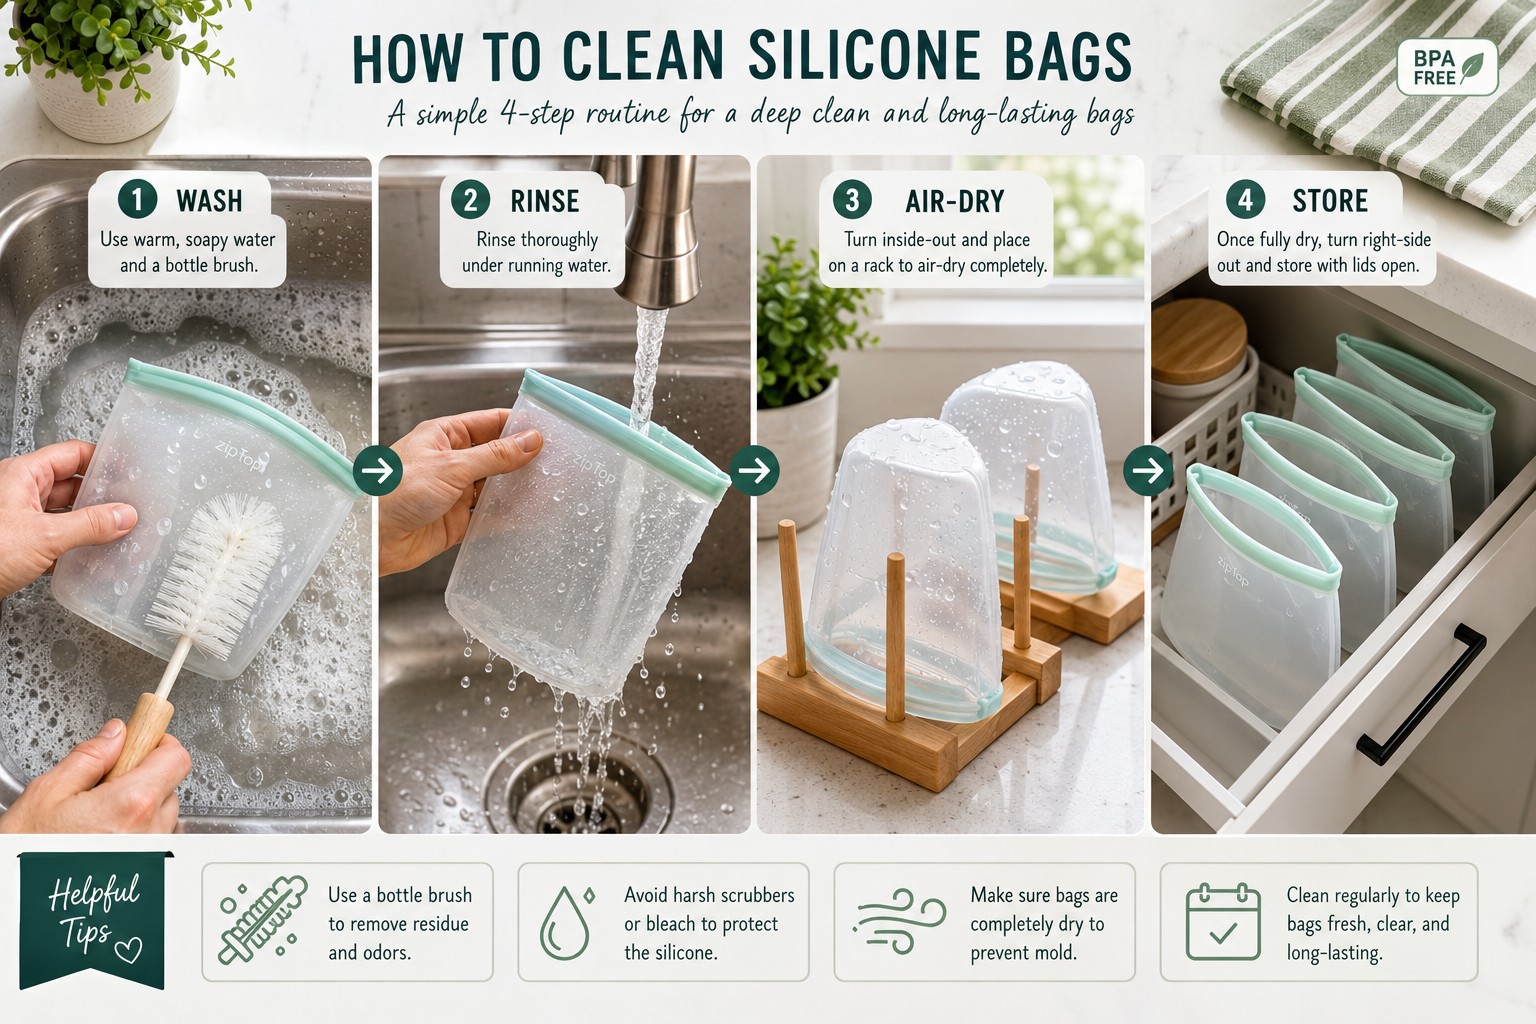
Step-by-step cleaning process:
- Empty and rinse immediately: Don’t let food residue dry inside the bag
- Turn inside-out: Flip the bag completely to expose all interior surfaces
- Wash with bottle brush: Use a long-handled bottle brush to scrub corners, seams, and the seal area
- Use warm soapy water: Dish soap and warm (not hot) water work best
- Rinse thoroughly: Remove all soap residue, which can affect taste in future uses
- Air-dry completely: Place upside-down on a drying rack or over a glass to allow full air circulation
- Store open or loosely closed: Never store bags sealed while damp
Dishwasher method:
- Place bags on the top rack only
- Turn inside-out or use a dishwasher cage to keep bags open
- Use a gentle cycle to prevent seal warping
- Remove immediately after cycle and air-dry completely
For stubborn odors or stains:
- Soak in a solution of 1 tablespoon baking soda per cup of warm water for 30 minutes
- For grease: Add a drop of dish soap and massage the bag while submerged
- For strong odors: Soak in white vinegar solution (1:1 vinegar to water) for 1 hour
- Sun-dry: UV light naturally deodorizes and sanitizes silicone
Common mistake: Storing bags while still damp, which creates a breeding ground for mold and mildew. Always ensure bags are bone-dry before putting them away.
Do Silicone Bags Leak When Storing Liquids Like Soup?
Silicone bags do not leak when storing liquids if the seal is properly closed along the entire edge and the bag is not overfilled. The pinch-press seal creates an airtight, watertight barrier that holds soups, sauces, marinades, and other liquids without leakage. However, improper sealing, overfilling, or seal damage can cause leaks, so it’s important to test the seal before storing liquids in the freezer or refrigerator.
How to prevent leaks:
- Press the seal firmly: Run your fingers along the entire edge, applying even pressure
- Check for gaps: Visually inspect the seal line for any openings
- Test with water first: Fill a new bag with water, seal it, and invert over the sink to verify
- Don’t overfill: Leave at least 1 inch of space at the top for liquids
- Store upright initially: Keep bags upright in the fridge or freezer until contents are fully frozen or chilled
According to Richly Rooted, Stasher-style bags are reusable thousands of times and feature seals that are both airtight and leak-resistant, making them suitable for freezer marinating, soups, and pre-portioned meals.[5]
Best practices for liquid storage:
- Cool liquids completely before sealing to prevent steam buildup
- Freeze flat on a baking sheet for the first 24 hours
- Stack vertically once frozen to save space
- Label clearly with contents and date
- Thaw in the refrigerator or use the defrost setting in the microwave
Foods that work well:
- Soups and broths
- Pasta sauces and curry
- Smoothie bases
- Marinades for proteins
- Salad dressings (small portions)
Common mistake: Sealing the bag while it’s lying flat with liquid inside, which makes it difficult to achieve a complete seal. Instead, hold the bag upright, press out air, then seal from one corner to the other.
Are Silicone Bags Worth It for Someone Who Doesn’t Meal Prep Much?
Silicone bags may not be worth the investment for someone who rarely meal preps, cooks sous vide, or freezes food in bulk. The higher upfront cost ($12-$40 per bag) is justified by frequent reuse, but occasional users won’t reach the break-even point of 200+ uses within a reasonable timeframe. For light kitchen use, a small set of 2-3 bags for leftovers and snacks may be sufficient, or plastic bags may remain more practical.
You’ll benefit from silicone bags if you:
- Store leftovers 3+ times per week
- Pack lunches regularly
- Freeze individual portions of proteins or grains
- Want to reduce single-use plastic waste
- Reheat food in the microwave frequently
- Cook sous vide even occasionally
Silicone bags may not be worth it if you:
- Order takeout or eat out most meals
- Have minimal freezer space
- Rarely store leftovers
- Prefer rigid containers for organization
- Need storage for non-food items (silicone absorbs odors)
Minimal investment option:
Start with a 2-bag set (one sandwich size, one half-gallon) for around $25-$35. Use them for a month to evaluate whether the convenience and reusability fit your cooking habits before expanding your collection.
Alternative use cases that add value:
- Travel: TSA-approved for liquids, reusable for toiletries
- Snacks: Replace plastic bags for kids’ lunches
- Organization: Store small kitchen items like spice packets or tea bags
- Marinating: Even if you don’t freeze, marinating chicken breast for juicy results in a sealed bag improves flavor
Can Silicone Bags Go in the Dishwasher and Microwave?
Yes, food-grade silicone bags are both dishwasher-safe and microwave-safe, with temperature ratings that typically reach 425°F. For dishwasher use, place bags on the top rack, turn them inside-out, and use a gentle cycle to prevent seal warping. For microwave use, leave the bag partially open to allow steam to escape and avoid overheating liquids that may cause pressure buildup.
Dishwasher guidelines:
- Top rack only: Bottom rack heat can warp seals over time
- Turn inside-out: Ensures thorough cleaning of interior surfaces
- Use a dishwasher cage: Keeps bags open and prevents them from flipping closed
- Gentle cycle preferred: High-heat drying can reduce seal lifespan
- Air-dry after: Remove bags immediately and finish drying on a rack
Microwave guidelines:
- Leave seal partially open: Prevents steam pressure buildup
- Use microwave-safe power levels: 50-70% power for even reheating
- Avoid superheating liquids: Stir liquids halfway through heating
- Don’t microwave empty bags: Always have food or liquid inside
- Check temperature rating: Verify your specific bag is rated for microwave use (most are)
According to NBC News, Stasher bags can go in the freezer, oven up to 425°F, and are suitable for sous vide cooking, which confirms their multi-appliance compatibility.[1]
Reheating meal prep directly in the bag:
- Remove bag from freezer and partially open the seal
- Microwave on 50% power for 2-3 minutes
- Stir or flip contents
- Continue heating in 1-minute intervals until hot
- Let stand for 1 minute before eating
Common mistake: Sealing the bag completely before microwaving, which can cause steam pressure to build up and potentially burst the seal or create hot spots in the food.
Common Mistakes People Make When Using Silicone Bags for Freezing
The most common mistakes when freezing food in silicone bags are sealing the bag while food is still warm, overfilling, not removing enough air, and storing bags sealed while damp after cleaning. These errors lead to freezer burn, ice crystal formation, seal failure, and mold growth. Proper technique ensures food stays fresh for 3-6 months without quality loss.
Top mistakes and how to avoid them:
1. Freezing hot or warm food
- Problem: Creates condensation inside the bag that turns to ice crystals
- Solution: Cool food to room temperature or refrigerate before sealing and freezing
2. Overfilling the bag
- Problem: Prevents proper seal closure and makes stacking difficult
- Solution: Fill bags no more than two-thirds full, leaving 1 inch of headspace
3. Not removing air
- Problem: Air pockets cause freezer burn and take up unnecessary space
- Solution: Use water displacement method or press air out manually before sealing
4. Storing bags sealed after washing
- Problem: Trapped moisture leads to mold and mildew
- Solution: Air-dry completely, then store open or loosely closed
5. Freezing bags upright immediately
- Problem: Uneven freezing and wasted space
- Solution: Freeze flat on a baking sheet for 24 hours, then stack vertically
6. Not labeling contents
- Problem: Difficult to identify frozen food after a few weeks
- Solution: Use dry-erase marker or removable labels with contents and date
7. Using damaged seals
- Problem: Leaks and freezer burn
- Solution: Inspect seals regularly and replace bags with tears or warping
8. Freezing highly acidic foods long-term
- Problem: Can degrade silicone over time
- Solution: Limit storage of tomato sauce, citrus, and vinegar-based foods to 1-2 months
How Long Do Silicone Kitchen Bags Last Before Needing Replacement?
Silicone kitchen bags typically last 5 years or longer with proper care, equating to 1,500+ uses before showing signs of wear like seal degradation, tears, or permanent staining. The lifespan depends on frequency of use, cleaning method, and exposure to extreme temperatures. Bags used primarily for freezer storage last longer than those used daily for sous vide or oven cooking.
Signs it’s time to replace a silicone bag:
- Seal no longer closes completely: Gaps or warping prevent airtight closure
- Tears or punctures: Especially near seams or corners
- Permanent discoloration: Deep stains that don’t wash out (cosmetic but may indicate material breakdown)
- Persistent odor: Smell that doesn’t go away after cleaning and airing
- Sticky or tacky texture: Indicates silicone degradation
- Visible mold: If mold returns after thorough cleaning, the bag may have microscopic damage
How to extend lifespan:
- Hand-wash instead of dishwasher when possible
- Avoid sharp utensils inside the bag
- Don’t expose to temperatures above the rated maximum
- Store bags open or loosely closed
- Rotate bags in your collection to distribute wear
- Clean immediately after use to prevent staining
According to industry estimates, a single silicone bag can replace over 1,500 disposable plastic bags during its lifespan, making the per-use cost comparable to or lower than plastic bags after the first year.[6]
Warranty and replacement:
Many premium brands offer 1-3 year warranties against manufacturing defects. Check your specific brand’s policy before discarding a bag that fails prematurely.
Can You Marinate Meat in Silicone Bags Overnight?
Yes, silicone bags are excellent for marinating meat overnight because the airtight seal keeps the marinade in constant contact with the protein while preventing oxidation and odor transfer in the refrigerator. The bags are safe for acidic marinades (vinegar, citrus, wine) and can be used for marinating times ranging from 30 minutes to 24 hours. After marinating, you can cook the meat directly in the bag using sous vide or transfer it to a pan or grill.
Advantages of marinating in silicone bags:
- Even coverage: Flat storage ensures marinade coats all surfaces
- Less marinade needed: Bag conforms to meat shape, reducing waste
- No cleanup: No bowls or containers to wash
- Fridge organization: Bags stack flat and don’t leak
- Portion control: Marinate individual servings separately
How to marinate effectively:
- Place protein in bag: Chicken breast, chicken thighs, pork chops, or steak
- Add marinade: Pour enough to coat the meat (usually 1/4 to 1/2 cup)
- Remove air: Press out excess air to ensure marinade contact
- Seal completely: Check the entire seal edge for gaps
- Massage gently: Distribute marinade evenly around the protein
- Lay flat in refrigerator: Place on a plate or tray to catch any potential leaks
- Flip halfway through: For even marinating, flip the bag after a few hours
Marinating time guidelines:
- Fish and seafood: 30 minutes to 2 hours (longer can make texture mushy)
- Chicken breast: 2-8 hours
- Chicken thighs and drumsticks: 4-12 hours
- Pork chops: 4-12 hours
- Beef steaks: 6-24 hours
- Tough cuts (flank, skirt): 12-24 hours
Common mistake: Marinating for too long in highly acidic marinades, which can break down protein structure and create a mushy texture. For citrus or vinegar-heavy marinades, limit marinating time to 4-6 hours for poultry and 8-12 hours for beef.
What Foods Should Not Be Stored in Silicone Bags?
Avoid storing foods with very strong odors (raw onions, garlic, fish), highly acidic foods for extended periods (tomato sauce, citrus), and foods with sharp edges (bone-in cuts, hard candies) in silicone bags. While silicone is non-porous, it can absorb persistent odors over time, and acidic foods may degrade the material with prolonged contact. Sharp objects can puncture or tear the bag, reducing its lifespan.
Foods to avoid or use with caution:
Strong-smelling foods:
- Raw onions and garlic (odor absorption)
- Fish and seafood (persistent smell)
- Strong cheeses (odor transfer)
- Solution: Use these foods in silicone bags designated for strong flavors, or choose rigid containers instead
Highly acidic foods (long-term storage):
- Tomato-based sauces
- Citrus juice or segments
- Vinegar-heavy dressings
- Pickled vegetables
- Solution: Limit storage to 1-2 months instead of 3-6 months
Sharp or hard foods:
- Bone-in meat cuts
- Hard candies or nuts in shells
- Frozen items with sharp edges
- Solution: Wrap sharp edges in parchment paper before placing in the bag
Very hot liquids:
- Boiling soups or sauces
- Freshly cooked stews
- Solution: Cool to room temperature before sealing
Oily or greasy foods (repeated use):
- Deep-fried foods
- Bacon grease
- Solution: Clean immediately and thoroughly to prevent residue buildup
Foods that work best in silicone bags:
- Cooked proteins: chicken, beef, pork, tofu
- Grains and pasta
- Chopped vegetables
- Smoothie ingredients
- Baked goods (cookies, muffins)
- Soups and stews (cooled)
- Marinated meats
Common mistake: Using the same bag for fish or strong-smelling foods and then for mild foods like bread or fruit, which can transfer odors even after washing.
15 Meal Prep, Sous Vide, and Freezer Hacks Using Silicone Kitchen Bags
These 15 practical hacks demonstrate how silicone kitchen bags streamline meal prep, enable precise sous vide cooking, and maximize freezer organization. Each hack addresses a specific cooking challenge and provides a concrete solution that saves time, reduces waste, or improves food quality.
Meal Prep Hacks
1. Pre-Portion Protein for the Week Divide cooked chicken breast into 4-6 oz portions, seal in sandwich-size bags, and freeze flat. Grab one bag per meal and reheat directly in the microwave.
2. Smoothie Freezer Packs Combine fruit, greens, and protein powder in gallon bags, freeze flat, then blend with liquid when ready. Each bag becomes one smoothie.
3. Marinate and Freeze Simultaneously Place raw chicken thighs in marinade, seal, and freeze. The meat marinates as it thaws in the refrigerator overnight.
4. Flat-Stack Soups and Stews Pour cooled soup into half-gallon bags, freeze flat on a baking sheet, then stack vertically like books to save 60% of freezer space.
5. Pre-Chopped Vegetable Kits Prep stir-fry vegetables (peppers, onions, broccoli) in one bag, seal, and refrigerate for 3-4 days. Dump directly into the pan when cooking.
Sous Vide Hacks
6. Perfect Chicken Breast Every Time Seal chicken breast at safe internal temperature (165°F) by cooking sous vide at 150°F for 90 minutes. The bag ensures even heat distribution.
7. Batch-Cook Proteins for Meal Prep Cook 4-6 chicken breasts or pork chops simultaneously in separate bags at the same temperature, then refrigerate or freeze for the week.
8. Infuse Flavor During Sous Vide Add herbs, garlic, and butter to the bag with your protein. The sealed environment intensifies flavor absorption.
9. Egg Bites Without Special Equipment Whisk eggs with cheese and vegetables, pour into snack-size bags, seal, and cook sous vide at 172°F for 1 hour. Instant meal-prep egg bites.
10. Reheat Sous Vide Leftovers Store cooked sous vide proteins in the same bag, refrigerate, then reheat in a 140°F water bath for 30 minutes without overcooking.
Freezer Organization Hacks
11. Label-Free Identification Use different colored silicone bags for different food categories: clear for proteins, blue for vegetables, green for fruits.
12. Freeze Individual Cookie Dough Portions Scoop cookie dough into snack bags, freeze, and bake directly from frozen. Each bag holds 2-3 cookies.
13. Prevent Freezer Burn on Bread Store bread loaves or bagels in gallon bags, press out air, and freeze. The airtight seal keeps bread fresh for 3 months.
14. Create Instant Meal Kits Combine raw protein, vegetables, and sauce in one bag, freeze, then dump into a pan or slow cooker when ready to cook.
15. Freeze Leftover Wine or Broth Pour leftover wine, broth, or stock into snack bags in 1/2-cup portions. Freeze flat, then use for cooking without thawing an entire container.
Frequently Asked Questions
Can silicone bags replace all plastic bags in my kitchen? Silicone bags can replace most plastic bags for food storage, meal prep, and freezing, but they’re not ideal for single-use scenarios like packing food for others or storing non-food items. A combination of silicone bags for regular use and a small supply of plastic bags for occasional needs works best for most households.
Do silicone bags contain BPA or other harmful chemicals? Food-grade platinum-cured silicone bags do not contain BPA, phthalates, or other harmful plasticizers. Always verify that bags are labeled as FDA food-grade and made from platinum-cured (not peroxide-cured) silicone.
Can you boil silicone bags directly on the stove? No, silicone bags should not touch direct heat sources like stovetop burners or open flames. They’re designed for use in boiling water (sous vide), ovens, and microwaves, but not for direct contact with heating elements.
How do you get rid of the smell in silicone bags? Soak bags in a 1:1 solution of white vinegar and water for 1-2 hours, then wash with dish soap and air-dry in direct sunlight. Baking soda paste (3 parts baking soda to 1 part water) also works for stubborn odors.
Are silicone bags better for the environment than plastic? Silicone bags have a lower environmental impact over their lifespan because they replace hundreds of single-use plastic bags. However, silicone production is energy-intensive, so the environmental benefit depends on using the bags for their full 5+ year lifespan.
Can you use silicone bags in an air fryer? No, silicone bags should not be used in air fryers because the high-speed air circulation can cause the bag to move and touch the heating element, potentially melting or damaging the bag.
Do silicone bags work for vacuum sealing? Silicone bags don’t create a true vacuum seal like vacuum sealers, but the water displacement method removes most air and creates a near-vacuum environment suitable for sous vide and freezer storage.
Can you put silicone bags in the oven? Yes, most silicone bags are oven-safe up to 425°F. Place bags on a baking sheet and avoid direct contact with oven racks or heating elements.
How many silicone bags do you need for meal prep? A starter set of 6-8 bags in mixed sizes (2 snack, 3 sandwich, 2 half-gallon, 1 gallon) covers most meal prep needs for a household of 2-4 people.
Can silicone bags be recycled? Silicone bags are not recyclable in standard municipal recycling programs. Some manufacturers offer take-back programs, or you can repurpose old bags for non-food storage before disposal.
Do silicone bags stain easily? Silicone can stain from foods with strong pigments (tomato sauce, curry, berries), but stains are cosmetic and don’t affect food safety. Soaking in baking soda solution or sun-drying can reduce staining.
Can you use silicone bags for raw meat? Yes, silicone bags are safe for raw meat storage and marinating. Clean bags thoroughly after use and consider designating specific bags for raw meat to prevent cross-contamination.
Conclusion
Silicone kitchen bags have evolved from eco-friendly novelty to essential meal prep tool, offering temperature flexibility from -40°F to 425°F that makes them suitable for freezing, sous vide cooking, microwaving, and oven use. The 15 hacks covered here demonstrate how these reusable bags streamline weekly meal prep, enable restaurant-quality sous vide proteins at home, and maximize freezer space through flat-stack organization.
The investment of $12-$40 per bag pays off within 18 months for households that meal prep regularly, replacing over 1,500 single-use plastic bags during a 5+ year lifespan. While silicone bags aren’t ideal for every kitchen task—avoid strong-smelling foods, highly acidic long-term storage, and direct heat sources—they excel at the core functions that matter most: leak-proof liquid storage, even marinating, freezer burn prevention, and multi-temperature reheating.
Next steps to get started:
- Start small: Purchase a 2-3 bag starter set in mixed sizes to test fit with your cooking habits
- Choose one hack: Pick one of the 15 hacks that solves your biggest meal prep pain point and use it consistently for two weeks
- Master the seal: Practice the pinch-press closure and test with water before storing food
- Establish a cleaning routine: Turn bags inside-out, wash immediately after use, and air-dry completely
- Track your savings: Note how many plastic bags you avoid using in the first month to calculate your break-even timeline
For home cooks who batch-cook proteins like juicy chicken breast, freeze soups and sauces, or experiment with sous vide techniques, silicone bags deliver measurable improvements in food quality, kitchen organization, and long-term cost savings. The key is consistent use—these bags work best when they become your default storage solution rather than a special-occasion tool.
References
[1] Stasher Reusable Bags – https://www.nbcnews.com/select/shopping/stasher-reusable-bags-ncna1264064
[2] Best Reusable Storage Bags – https://www.foodandwine.com/best-reusable-storage-bags-7499492
[3] Best Silicone Food Storage Bags – https://www.consumerreports.org/health/reusable-silicone-bags/best-silicone-food-storage-bags-a9831141508/
[4] Stasher Official Site – https://www.stasherbag.com
[5] Silicone Stasher Bag Uses – https://richlyrooted.com/2017/07/silicone-stasher-bag-uses.html
[6] Silicone Food Storage Bags Buying Guide – https://www.theexaminernews.com/buying-guides/silicone-food-storage-bags/
[7] Best Reusable Food Storage Bags – https://www.seriouseats.com/best-reusable-food-storage-bags-6648106
SEO Meta Title: Silicone Kitchen Bags: 15 Meal Prep & Sous Vide Hacks


