
How to Get Chicken Thighs Crispy in the Oven: Complete Guide
You want crispy oven-baked chicken thighs that stay juicy inside and crackle on the outside. Start with bone-in, skin-on thighs, dry the skin thoroughly, season well, and bake at a high temperature on a wire rack so hot air circulates around each piece.
Pat the skin dry, lightly coat with oil and a little baking powder, space the pieces on a rack, and roast at about 425°F (220°C) until the skin is golden and the internal temperature reaches 165°F (74°C).

Choose the right thighs, use smart prep techniques, set the oven for high heat, and use equipment that encourages air flow. Spice blends, dry rubs, and small tricks like baking powder or a finishing broil can make the skin even crisper.
Choosing the Right Chicken Thighs for Crispiness
Pick thighs with skin and some fat. Decide whether bones will help your timing and texture.
Your choice between bone-in or boneless and skin-on or skinless changes cook time, moisture retention, and how easily the skin crisps.
Bone-In vs. Boneless Thighs
Bone-in chicken thighs hold heat and cook more slowly than boneless thighs. The bone helps the meat stay juicier during high-heat roasting, so you can get crisp skin without drying the interior.
Bone-in thighs need about 10–15 minutes longer in a 425°F (220°C) oven than boneless. If you want the fastest crisping, use boneless thighs because they cook through sooner and let you finish at high heat without overcooking.
Boneless thighs often have less insulating fat, so pat the surface very dry and consider a brief pan-sear first to render fat and jump-start browning. Arrange bone-in skin-on chicken thighs skin-side up on a rack so hot air circulates and the underside doesn’t steam.
Skin-On vs. Skinless Thighs
Skin-on chicken thighs are essential for true crispiness because the skin renders fat and browns into a crunchy layer. Leave the skin intact and trim only loose flaps that might blister unevenly.
Pat skin completely dry and, if marinating, remove excess surface moisture before cooking. Skinless chicken thighs can still develop a browned exterior but won’t achieve the same crunch.
If you must use skinless, coat lightly with oil and consider a panko or flour crust to create texture. For skin-on results, prioritize dry skin, high heat (425°F/220°C), and airflow for the best crackle.
Why Dark Meat Enhances Results
Dark meat in thighs contains more connective tissue and intramuscular fat than breast, which helps keep the meat moist at the high temperatures needed for crisp skin. That extra fat renders during roasting and bastes the underside of the skin, promoting even browning without drying the meat.
The collagen in dark meat breaks down into gelatin during cooking, which improves mouthfeel and juiciness even at higher oven temperatures.
Essential Preparation Techniques

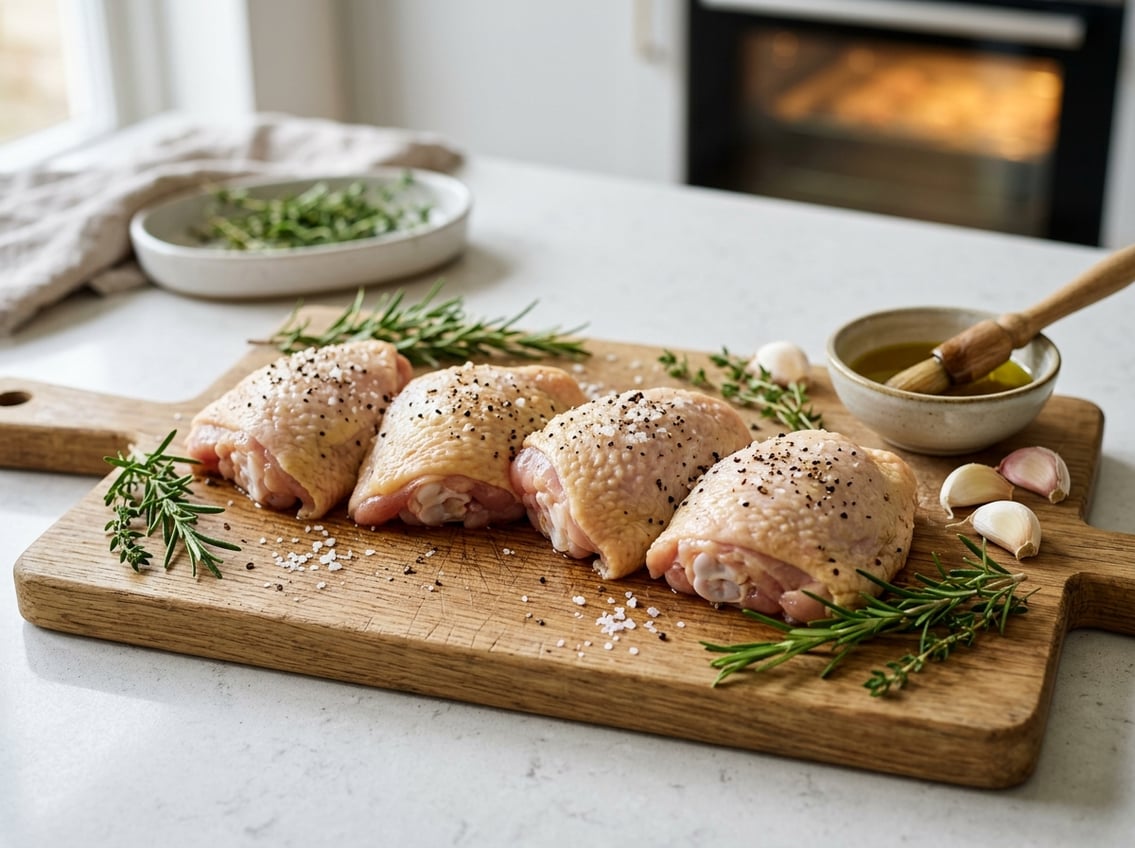
Trim excess fat and loose skin, and dry the thighs thoroughly. Season with salt and aromatics that penetrate the skin and flesh, then give the thighs a short rest so the surface dries further and flavors settle.
Trimming and Patting Chicken Dry
Remove loose skin flaps and excessive pockets of fat around the bone. Use kitchen shears or a sharp knife to trim ragged edges so the skin lays flat against the meat.
This prevents uneven rendering and large oily pools in the pan that soften the skin. Pat each thigh completely dry with paper towels, pressing firmly around the joint and under the skin where possible.
Aim for no visible moisture; even slight dampness will steam the skin and reduce crisping during baking. If you’re making a chicken thigh recipe with bone-in pieces, tuck the skin back over the meat after drying so it adheres.
For skinless recipes, drying still improves browning of the surface.
Seasoning for Maximum Flavor
Salt is the most important seasoning. Sprinkle kosher salt evenly on both sides at least 20–30 minutes before baking, or salt overnight in the refrigerator for deeper penetration and drier skin.
This step boosts flavor and helps draw surface moisture out for crispier chicken skin. Add black pepper and a dry rub of smoked paprika, garlic powder, and onion powder for a basic, balanced profile.
Brush a light coat of oil only if the skin is unusually dry; typically the thigh’s fat renders enough to crisp the skin without added fat. For herb-forward recipes, scatter chopped rosemary or thyme over the thighs just before they go into the oven.
Avoid heavy wet marinades immediately before baking; they reintroduce moisture and prevent a crisp texture.
Letting Chicken Rest Before Baking
After seasoning, let the thighs sit uncovered in the refrigerator for at least 30 minutes. This air-dry period firms the skin and removes surface moisture that would otherwise steam during baking.
If you salt overnight, leave the thighs uncovered in the fridge on a rack over a sheet pan. For shorter timelines, keep them at room temperature for 20–30 minutes to reduce chilling, which promotes even cooking.
Before sliding the pan into a preheated oven, give the thighs a final pat to remove any condensation. This improves contact between skin and hot surface for crispier results.
Optimal Oven Settings and Equipment
Choose a high, dry heat and sturdy cookware that lets air circulate around the thighs. Use tools that encourage even browning and collect drips without steaming the skin.
Best Oven Temperatures
Set your oven between 400°F and 450°F for skin-on thighs to render fat quickly and crisp the skin without drying the meat. 425°F is a reliable middle ground: it browns the skin in about 25–35 minutes for bone-in thighs while keeping the interior juicy.
If you prefer faster browning and a slightly shorter cook time, push to 450°F but watch closely; thinner pieces and boneless thighs can overcook. For gentle cooking that still produces crisp edges, start at 425°F and finish under the broiler for 1–3 minutes by moving the pan to the top rack and monitoring to avoid burning.
Use an instant-read thermometer to confirm 165°F at the thickest part near the bone for bone-in pieces, or near the center for boneless thighs.
Rack vs. Baking Sheet vs. Skillet
A rimmed baking sheet with a wire rack lifts thighs so hot air circulates under the skin, producing crisp, even browning. Line the sheet with foil for easier cleanup and place the rack so thighs don’t sit in their rendered fat.
A heavy skillet, preferably cast iron, conducts heat intensely and works well if you start on the stovetop and finish in the oven. Sear skin side first, then transfer to a preheated 425°F oven to finish for best results.
If you skip the rack, arrange thighs skin-side up on a rimmed sheet and space them at least 1 inch apart. Crowding traps steam and softens the skin.
Convection vs. Conventional Ovens
Convection ovens circulate hot air with a fan, which accelerates moisture evaporation and crisps skin faster. Reduce the temperature by about 25°F from conventional recipes or shorten the cook time.
Set a convection oven to 400°F instead of 425°F and check earlier. Conventional ovens can still deliver excellent results using higher temperatures (425°F–450°F) and positioning the thighs on the upper-middle rack for better browning.
If your oven runs hot, rotate the baking sheet once halfway through to promote even color. Preheat thoroughly and use a thermometer for precise internal temperature.
The Role of Spices and Marinades
Spices and marinades both add flavor and change surface texture, which affects browning and crisping. Use dry rubs to draw moisture from the skin and oils or butters to promote even heat transfer and caramelization.
Go-To Seasoning Combinations
Choose blends that balance salt, savory, and a little sugar to encourage browning. A reliable mix: 1 tsp kosher salt, 1 tsp smoked paprika, 1/2 tsp black pepper, 1/2 tsp garlic powder, and 1/4 tsp brown sugar per pound of thighs.
Salt seasons and helps tighten the skin. Sugar aids caramelization but use sparingly for oven temperatures above 425°F to avoid burning.
For herb-forward profiles, combine 1 tsp salt, 1/2 tsp black pepper, 1 tsp dried oregano, and 1 tsp dried thyme. Pat thighs dry first, then rub the dry mix into skin and crevices.
If using a wet marinade, briefly air-dry the skin in the fridge for 30–60 minutes before roasting to restore surface dryness for crisping.
How Paprika, Black Pepper, and Oregano Boost Crispiness
Paprika contributes more than color. Its natural sugars and fine texture promote even browning and a deeper crust when exposed to high heat.
Smoked paprika adds a roasted flavor that mimics charring from the grill. Black pepper creates tiny surface abrasions and increases friction between skin and pan, encouraging moisture escape and a crisper finish.
Coarser cracked pepper gives more texture, while finely ground pepper distributes flavor without burning as quickly. Oregano and thyme are low-moisture herbs that add aromatic oils without making the skin wet.
Sprinkle them dry into rubs so their oils heat and bloom in the oven, enhancing perceived crispness.
Benefits of Olive Oil and Compound Butter
Olive oil acts as a heat conductor and flavor carrier. A light brush of oil on the skin helps seasonings adhere and promotes browning across the surface.
Use about 1 tablespoon per pound of thighs and choose extra-virgin for flavor, or a neutral oil for higher-temp roasting. Compound butter—soft butter mixed with minced garlic, chopped thyme, oregano, and a pinch of salt—builds both flavor and crispness when dotted under skin and over the surface.
The butter melts, bastes the meat, and its milk solids brown quickly, creating a golden, crisp skin. Combine a light oil coating with small pats of compound butter placed after initial high-heat roasting to finish and deepen color without burning.
Secrets for Achieving Ultra-Crispy Skin
Focus on removing surface moisture, giving air room to circulate, and finishing with high, direct heat when needed. Small technique changes—drying, a light alkaline dusting, and a brief broil—make the biggest difference for crispy oven-baked chicken thighs.
Drying and Space in the Pan
Pat each thigh thoroughly with paper towels, inside and out, until the skin feels almost tack-free. Moisture is the enemy of crispness; even a few extra minutes of drying at room temperature (20–30 minutes) helps the skin render and brown better.
Use a wire rack set on a rimmed sheet pan so air circulates under and around each thigh. Arrange thighs skin-side up with at least 1 inch between pieces; crowded pans steam and produce limp skin.
If you don’t have a rack, flip the pan once during roasting to expose the bottoms to hotter air. Season the skin just before roasting to avoid drawing out moisture.
Lightly coat with 1 teaspoon oil per thigh to promote even browning and help salt cling.
Baking Powder Trick for Crunch
Mix 1/2 teaspoon baking powder with 1/4 teaspoon fine salt per pound of thighs to create a very light dusting. Baking powder raises skin pH and speeds protein browning, improving crispness without tasting metallic if you use small amounts and aluminum-free baking powder.
Rub the powder-salt mix under and over the skin, then let the thighs rest uncovered in the fridge for at least 2–4 hours, ideally overnight. The fridge both dries the surface and gives the powder time to work.
Use sparingly on thin-skinned pieces and avoid combining with large amounts of extra salt. If you notice any off-flavor, reduce baking powder next time and increase air-drying time.
Finishing With the Broiler
Roast thighs at 425°F (218°C) until the internal temperature reaches about 155–160°F (68–71°C). This gives you a short window to finish with high heat without overcooking the meat.
Move the oven rack 6–8 inches from the broiler element and switch to broil for 2–4 minutes, watching constantly. The broiler crisps and darkens the skin quickly; stop once you see deep golden-brown patches and hear an audible crackle.
If any areas brown unevenly, rotate the pan instead of broiling longer. Let the thighs rest 5 minutes after broiling so residual heat finishes the cooking and helps the skin set into a crisp, crackly texture.
Serving Suggestions and Storage Tips
Perfect Side Dishes Like Mashed Potatoes
Mashed potatoes pair well with the rich, crispy skin and juicy interior of chicken thighs. Prepare simple mashed potatoes with butter, warm milk, salt, and a touch of garlic powder so they stay smooth and don’t compete with the chicken’s seasoning.
Add a bright vegetable for contrast. Roasted broccoli or steamed green beans with lemon zest balance the dish and cut through the fat.
For a starch alternative, try herbed rice or quinoa if you want a lighter texture.
Finish the plate with a pan sauce or quick gravy made from the roasting pan drippings. A spoonful of sauce over mashed potatoes ties flavors together and makes the meal feel intentional and polished.
Incorporating Into Your Dinner Rotation
Use crispy chicken thighs as the anchor for an easy dinner you can reuse throughout the week. Roast a tray of bone-in, skin-on thighs on Sunday and plan three meals: whole thighs with sides, shredded in tacos or burritos, and sliced over salads.
Rotate accompaniments to keep things fresh. Week one: mashed potatoes and roasted carrots. Week two: rice pilaf and steamed greens.
Week three: add leftover meat to a grain bowl with roasted veggies and a mustard vinaigrette.
If you also cook baked chicken breast, alternate thighs and breasts by meal type. Choose thighs when you want more flavor and crispness, and breasts when you want lower fat and quicker slicing for sandwiches.
Storing and Reheating Leftovers
Let cooked thighs cool to room temperature for no longer than two hours. Then refrigerate them in an airtight container for up to 4 days.
For longer storage, freeze portions in labeled bags or containers for up to 3 months. Remove excess air to prevent freezer burn.
To preserve crisp skin, reheat in a preheated oven at 375°F (190°C) for 10–15 minutes from refrigerated or 20–25 minutes from frozen. Make sure the internal temperature reaches 165°F (74°C).
For quicker reheating, finish the thighs in a hot skillet skin-side down for 2–3 minutes after oven warming to restore crispness.
If you plan to shred the meat for other dishes, reheat gently in a covered pan with a splash of broth to keep it moist. Avoid microwaving without a cover, as it softens the skin and can dry the meat.


