
What Is the Best Way to Fix Chicken Thighs: Proven Techniques for Juicy, Flavorful Results
You want juicy chicken thighs with crisp skin and minimal guesswork. Use bone-in, skin-on thighs and combine a hot pan sear with a brief finish in the oven to lock in moisture while rendering the skin to a golden crisp.
Pan-searing first, then oven-roasting until the meat reaches a safe, tender temperature gives a reliable balance of juicy interior and crispy exterior.

You’ll learn how to pick the right thighs, prep and season them for maximum flavor, use the sear-to-oven technique, check doneness for ideal texture, and rescue thighs that have dried out.
Follow these steps to consistently fix chicken thighs that stay juicy and taste intentional.
Choosing the Right Type of Chicken Thighs
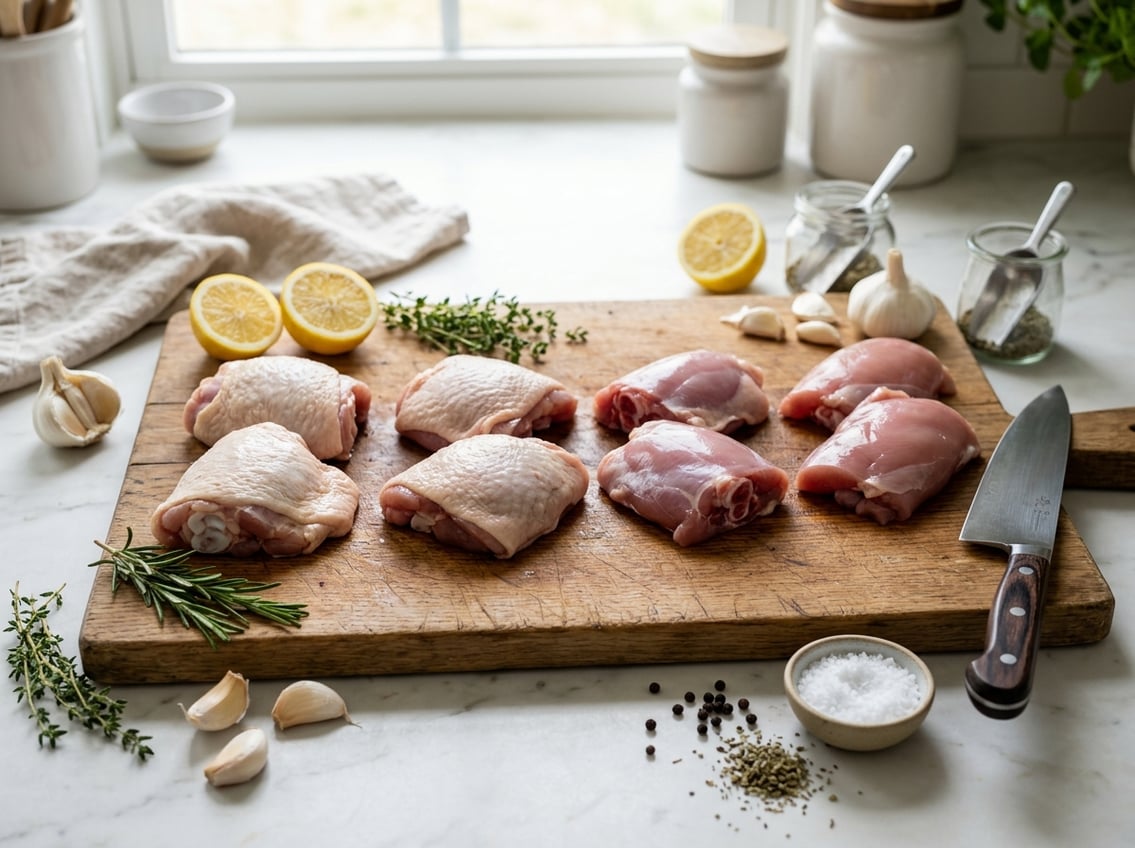
Pick thighs that match how you want to cook them and how much hands-on time you’ll spend. Think about bones, skin, and whether you want fresh or frozen, since each choice changes flavor, texture, and cook times.
Bone-In vs. Boneless Thighs
Bone-in chicken thighs hold more moisture during longer cooking and deliver richer flavor because the bone slows heat transfer and retains juices. Choose bone-in for braises, roasts, or slow-cooked dishes where you want tender, fall-apart meat and a deeper savory profile.
Expect slightly longer cook times and check temperature near the bone. Boneless chicken thighs cook faster and are easier to slice or cube for stir-fries, tacos, and quick pan-searing.
They absorb marinades more uniformly and shorten resting time. If you’re pressed for time or need uniform pieces for even browning, boneless thighs make a practical choice.
Skin-On vs. Skinless Thighs
Skin-on chicken thighs create crisp, browned surfaces when seared or roasted because the rendered fat bastes the meat. Use skin-on for high-heat roasting or pan-searing to get crackling texture and extra fat for flavor.
Keep the skin dry and well-seasoned; start skin-side down in a hot pan to render fat and crisp evenly. Skinless thighs reduce fat and crispness but cut calories and work well in saucy or breaded preparations where skin texture isn’t needed.
Choose skinless for curries, braises, or quick sautés where sauces need to cling to the meat. They also shorten cook time slightly and make portioning easier.
Fresh, Frozen, and Sizing Considerations
Fresh thighs offer the best texture if used within two days of purchase; look for pale pink flesh and firm texture. Thaw frozen thighs completely in the refrigerator for 24 hours for even cooking and better skin crisping.
Avoid refreezing previously frozen meat if possible. Consider size when timing recipes: small thighs (about 3–4 oz each) finish faster than large ones (6–8 oz).
For bone-in pieces, add 5–15 minutes depending on size. When substituting boneless for bone-in, reduce oven time and check internal temperature at the thickest part to avoid overcooking.
Preparing Chicken Thighs for Cooking
Handle thighs with deliberate steps that set you up for crispy skin and moist, tender meat. Drying, trimming, and either a short brine or a longer marinade make a big difference in texture and flavor.
How to Pat Chicken Thighs Dry
Use paper towels or a clean kitchen towel to blot skin and exposed meat thoroughly. Pat until the surface is matte and no beads of moisture remain; this helps the skin render fat and crisp when searing or roasting.
Work one thigh at a time and press gently rather than rubbing to avoid tearing the skin. Dry them first, then salt the skin—salt sticks better to a dry surface and draws moisture out for crisping.
For air-dry crisping, place thighs uncovered on a rack in the fridge for 1–12 hours after patting dry. That extra drying step enhances skin texture and concentrates flavor.
Trimming and Handling
Trim large excess fat and loose skin flaps with a sharp knife or kitchen shears, but leave most skin intact because it protects the meat and crisps nicely. Remove any stray cartilage or bone fragments felt by touch to prevent chewy bits after cooking.
Keep raw thighs cold and work on a clean cutting board to avoid cross-contamination. Wash hands and sanitize surfaces after handling raw poultry and always transfer trimmed pieces to a separate plate.
If you buy bone-in, skin-on thighs, leave the bone for moisture and flavor unless a recipe specifies boneless. For very uneven thighs, make small incisions or butterfly to promote even cooking.
Marinating and Brining for Tenderness
Choose a short brine (30–90 minutes) or a marinade (1–12 hours) depending on time and flavor goals. A basic brine—1/4 cup kosher salt per quart of water—improves juiciness and texture by allowing muscle fibers to hold more moisture during cooking.
Acidic marinades with vinegar or citrus add flavor but can firm the surface if left too long. Limit acidic marinades to 1–4 hours.
Combine oil, salt, aromatics, and a moderate acid (like yogurt or buttermilk) and marinate up to 8–12 hours for tender, flavorful thighs. After brining or marinating, pat thighs dry again before cooking to ensure crisp skin.
Discard used marinade or boil it if you plan to use it as a sauce to avoid contamination.
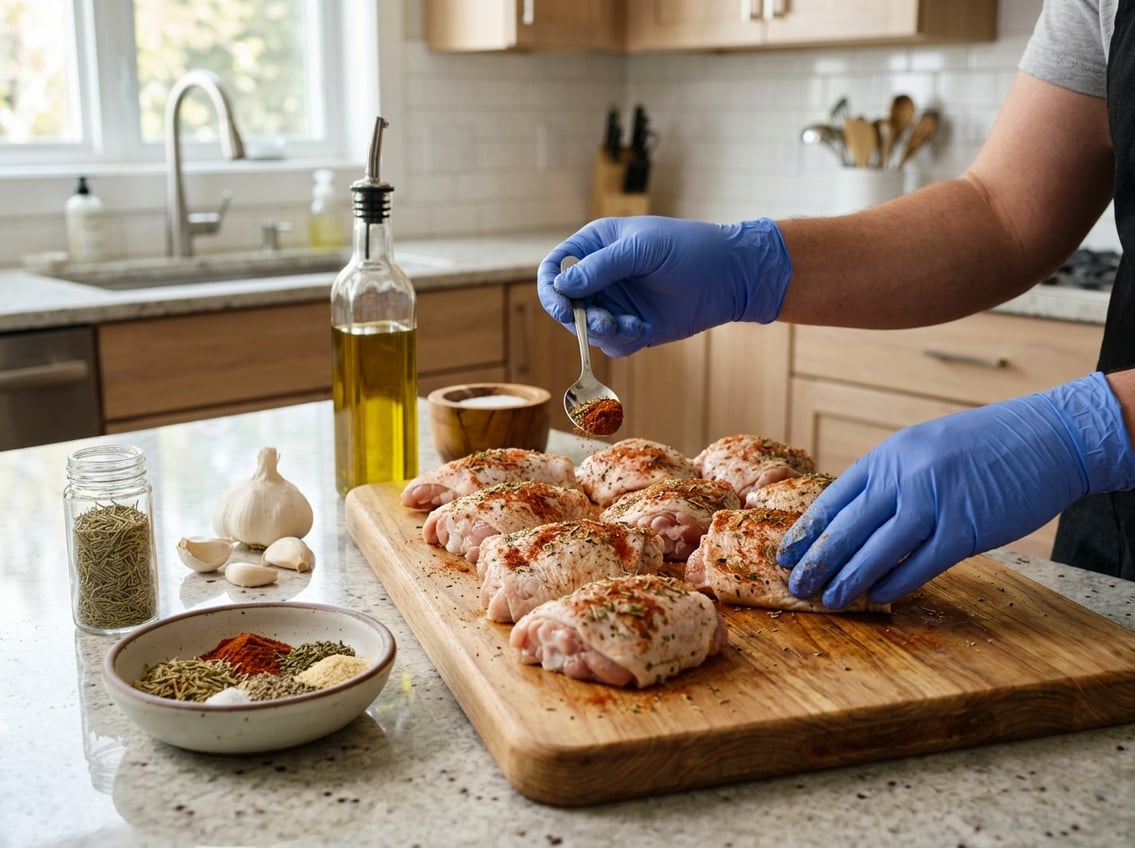
Essential Seasonings and Flavor Boosters
You want chicken thighs that taste bold, balanced, and juicy. Use reliable spice blends, fresh herbs, and simple techniques that help seasoning stick and penetrate the meat.
Classic Spice Blends for Chicken Thighs
Use blends built around salt, paprika, garlic powder, and black pepper as your baseline. For a simple all-purpose rub, mix 1 part kosher salt, 1 part garlic powder, 1 part paprika, and 1/2 part black pepper.
Apply about 1–1.5 tablespoons per pound of thighs. For a smoky profile, swap in smoked paprika and add 1/2 teaspoon cumin per pound.
For a spicy rub, add cayenne (start at 1/8–1/4 teaspoon per pound). If you prefer a Mediterranean thigh, use dried oregano and thyme with lemon zest—1 teaspoon each per pound works well.
Keep mixes in a jar and label them. That saves time and keeps your chicken thigh recipes consistent.
Herbs and Aromatics to Use
Fresh herbs lift the finished dish; dried herbs work for rubs and long cooks. Use fresh thyme sprigs or chopped rosemary under the skin when roasting for direct aromatic transfer into the meat.
Sprinkle dried thyme and oregano into dry rubs at about 1/2–1 teaspoon per pound. Aromatics like minced garlic, grated ginger, and lemon zest help the spice blend penetrate and add brightness.
If you marinate, include an acid—lemon juice, vinegar, or yogurt—plus oil to carry flavors into the meat. For pan-seared or grilled thighs, finish with chopped parsley or a squeeze of lemon to cut richness.
Use whole aromatics (garlic cloves, onion quarters) in braises to flavor the cooking liquid for longer cooks.
Tips for Even Seasoning
Pat thighs dry with paper towels before seasoning so dry skin crisps better and spices adhere more evenly. Rub seasoning under the skin when possible to protect flavor during cooking and ensure seasoning actually flavors the meat.
Salt early (30 minutes to overnight) for deeper penetration; if short on time, salt right before cooking. Distribute rubs evenly by massaging with your fingers and letting thighs rest at room temperature 15–30 minutes to hydrate the exterior.
For even cooking, use similar-sized pieces and don’t overcrowd the pan or grill. Spacing allows consistent browning and flavor development.
Fixing Chicken Thighs in the Oven
Use a hot oven and a roomy rimmed baking sheet to get crisp skin and even cooking. Control time and temp to hit the right internal temperature, and finish under the broiler for extra color if needed.
Baking on a Rimmed Baking Sheet
Place bone-in, skin-on thighs skin-side up on a rimmed baking sheet lined with foil or parchment for easier cleanup. Leave at least 1 inch between pieces so hot air circulates and the skin dries rather than steams.
Pat the thighs very dry with paper towels and season liberally. Salt, pepper, and a light brush of oil help the skin brown.
Use the sheet’s rim to catch juices. If you prefer crisper bottoms, set a wire rack on the sheet and elevate the thighs so air moves under them.
A preheated sheet straight into the oven speeds browning. Rotate the pan once halfway through the bake time for even cooking.
How Long to Bake Chicken Thighs
Set the oven to 400°F (205°C) for a balance of crispy skin and moist meat. Bone-in, skin-on thighs generally take 30–45 minutes at this temperature, depending on size and pan crowding.
Check doneness with an instant-read thermometer inserted into the thickest part without touching bone. Aim for 175–185°F (79–85°C) for tender thighs where connective tissue has softened.
Rest the thighs 5–10 minutes after baking so juices redistribute. For boneless, skinless thighs, start checking around 18–22 minutes.
Finishing With the Broiler
If the skin isn’t as browned as you want, place the pan under a hot broiler for 1–3 minutes. Watch constantly; broilers brown quickly.
Position the rack 6–8 inches from the element and leave thighs skin-side up. Remove immediately when the skin reaches an even golden-brown and bubbling texture.
Let the meat rest briefly after broiling to avoid squeezing out juices when cutting. Spoon excess fat off the pan before broiling if there’s a lot of accumulated juices.
Adding Roasted Vegetables for a Complete Meal
Toss vegetables that roast at similar temperatures—carrots, potatoes, Brussels sprouts, and onions—with oil, salt, and pepper. Spread them in a single layer on the same rimmed sheet but not crowded around the thighs.
Give each piece room to caramelize. Start root vegetables on the sheet at 400°F for 10–15 minutes before adding the thighs if they need longer cooking.
Alternatively, cut vegetables into uniform pieces so they finish at the same time as the chicken. Stir or flip vegetables once during roasting to develop even browning.
Finish both under the broiler for 1–2 minutes if you want extra color. Rest the thighs briefly before serving alongside the roasted vegetables.
Pan-Searing and Oven Finishing Techniques
Use a hot, heavy skillet to get a deeply browned, crisp skin, then finish the thighs gently in the oven until connective tissue breaks down. Focus on temperature control, timing, and using an oven-safe pan so you can move directly from stovetop to oven.
Using a Cast-Iron or Oven-Safe Skillet
Choose a heavy skillet that can go from stovetop to oven without warping. A cast-iron skillet holds heat evenly and creates sustained searing temperature.
Stainless-steel oven-safe pans also work if they’re thick-bottomed. Make sure the skillet is large enough to hold thighs without crowding.
Preheat the pan over medium-high heat for several minutes until it’s hot but not smoking. Use a small amount of oil with a high smoke point (vegetable, canola, or grapeseed) to help transfer heat to the skin and promote even browning.
Stovetop Sear for Crispy Skin
Pat thighs thoroughly dry and season just before cooking to avoid drawing moisture. Place skin-side down in the hot skillet and press gently to ensure full contact.
This helps render fat and crisps the skin evenly. Sear without moving the pieces for 5–8 minutes for bone-in, skin-on thighs, or until the skin is deeply golden and releases easily from the pan.
If fat accumulates, tilt the pan and spoon off excess to prevent splatter while preserving crisping. Flip once and brown the second side briefly—about 2–4 minutes—to develop color without overcooking the interior.
Transferring to the Oven
Preheat the oven to 350–400°F (175–205°C) depending on how quickly you want the interior to reach temperature. Slide the entire skillet into the oven to finish cooking.
This avoids transferring heat loss and preserves the crust you just built. Cook until the internal temperature reaches your target: 165°F for safe doneness, or 175–185°F if you prefer extra-tender thighs.
Use an instant-read thermometer in the thickest part without touching bone. Let the thighs rest 5 minutes uncovered in the skillet or on a wire rack so juices redistribute and the skin stays crisp.
Ensuring Perfect Doneness and Texture
Control temperature, timing, and resting to get tender, juicy chicken thighs with no guesswork. Use an instant-read meat thermometer, aim for the right internal range for dark meat, and rest the thighs so juices redistribute before serving.
Using a Meat Thermometer Effectively
Use an instant-read meat thermometer as your primary doneness tool. Insert the probe into the thickest part of the thigh, avoiding bone because bone reads hotter and will give a false high temperature.
Take readings near the center of the meat, not the surface. If you’re braising or roasting multiple thighs, check a couple of pieces to account for variability.
For sous-vide or low-and-slow methods, probe after the hold time, then finish with a quick sear for texture. Calibrate or check your thermometer periodically with an ice-water test (32°F / 0°C) or boiling-water check (adjust for altitude).
Clean and dry the probe between uses to prevent cross-contamination and ensure accurate contact with the meat.
Ideal Internal Temperatures
Aim for 185–195°F (85–90°C) when you want fall-apart, gelatin-rich thighs. This higher range converts connective tissue into gelatin, producing tender chicken thighs that shred easily and taste richer.
If you prefer a slightly firmer, sliceable texture, pull thighs at 175–180°F (79–82°C). Avoid stopping at 165°F for dark meat if your goal is maximum tenderness; 165°F is safe but often still a bit chewy for thighs because of remaining collagen.
For sous-vide, hold thighs at 165–170°F (74–77°C) for 1–4 hours to get reliable juiciness, then sear briefly to crisp skin. Always factor in carryover heat, since the meat can rise 2–5°F after you remove it from the heat source.
Resting for Maximum Juiciness
Let thighs rest 8–10 minutes after cooking for small pieces. Rest 10–15 minutes for larger bone-in thighs.
Rest time allows the juices to redistribute and the temperature to stabilize, which keeps meat juicy when you cut into it. Keep resting thighs loosely tented with foil to maintain warmth without steaming the skin.
For braised thighs, rest in the cooking liquid briefly to let gelatin reabsorb into the meat. Then briefly crisp the skin if you want a crunchy finish.
Slice or shred only after resting. Cutting too soon forces juices onto the plate, leaving the meat drier.
Reviving Overcooked or Dry Chicken Thighs
You can bring moisture and flavor back to dry or overcooked chicken thighs using gentle heat, sauces, or by shredding and repurposing the meat. Each approach targets moisture restoration and texture improvement so the thighs become usable in baked chicken thighs dishes, sandwiches, or bowls.
Gentle Reheating With Moisture
Reheat slowly to avoid further drying. Preheat your oven to 275–300°F (135–150°C).
Place thighs in a single layer in a baking dish. Add 2–4 tablespoons of chicken broth or stock per thigh, and cover tightly with foil.
Heat 15–25 minutes until internal temperature reaches 160–165°F. The low heat lets the meat reabsorb liquid without tightening proteins.
Stovetop works for smaller portions. Simmer gently in a skillet with 1/4–1/2 cup broth, turn once, and keep the pan covered until heated through.
For microwave reheating, cover with a damp paper towel and use medium power in 30–45 second bursts. Flip between bursts to keep juices even.
Serving With Sauces or Gravy
A sauce adds immediate moisture and improves perceived juiciness. Choose a sauce that complements the seasoning of your thighs, such as pan gravy from drippings, a lemon-garlic butter sauce, or a tomato-based ragù for baked chicken thighs.
To make a quick pan gravy, pour off excess fat. Deglaze with 1/3 cup wine or broth, stir in 1 tablespoon flour to form a roux, then whisk in 1 cup stock until smooth.
Simmer until thickened. Spoon generously over each thigh and let rest 5 minutes so juices redistribute.
Serve sliced over rice or mashed potatoes to keep bites moist.
Shredding and Repurposing
Shredding disguises dryness and helps distribute moisture across other ingredients.
Use two forks or a stand mixer to shred cooled thighs. Toss the meat immediately with 2–4 tablespoons of warm sauce, stock, or mayo to add fat and softness.
Repurpose shredded chicken in tacos, enchiladas, casseroles, chicken salad, or soups.
For tacos, mix shredded thighs with salsa and a splash of lime. For a baked casserole, combine the chicken with cream soup, vegetables, and cheese before baking.


