
What Do Chicken Thighs Look Like When Cooked: A Clear Guide to Appearance, Doneness, and Safe Cooking
You want to know what cooked chicken thighs should look like and how to tell at a glance whether they’re done. Perfect chicken thighs often show golden-brown, crisped skin (if skin-on), firm but springy meat, and clear juices. The only reliable check for safety is an internal temperature of 165°F (74°C).
Visual cues help guide you, but temperature confirms doneness.

This guide explains the visual signs you can trust, when color can mislead (especially near the bone or with smoked or brined thighs), how bone-in and skinless cuts differ in appearance, and practical ways to assess doneness if you lack a thermometer.
Visual Signs of Properly Cooked Chicken Thighs
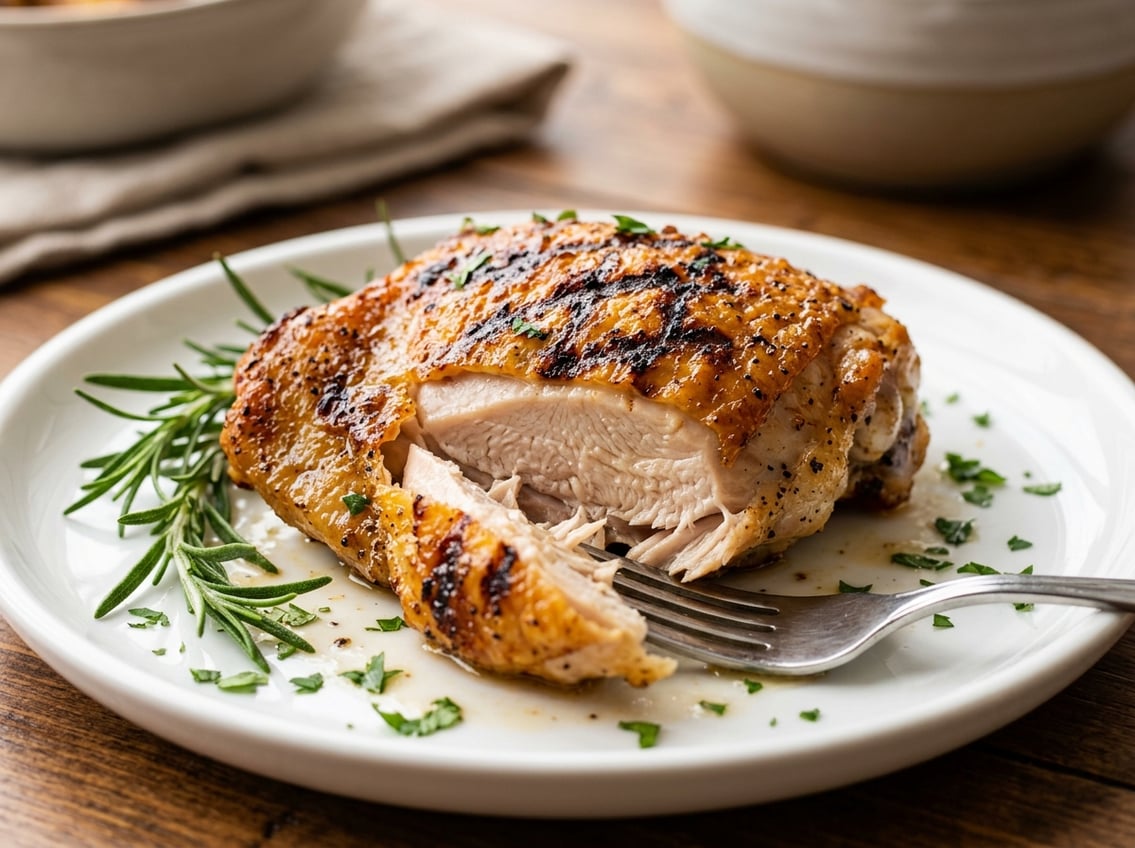
Look for clear, specific cues: uniform opacity of the meat, juices that run clear (not bloody), flesh that yields but still springs back, and skin that matches the cooking method. Skin should be crispy if that was your goal, or soft and tender if braised.
Color Change and Appearance
The interior of a cooked chicken thigh should be opaque and off-white to light tan away from the bone.
If you see translucent or glassy spots in the thickest part, keep cooking the thigh. Bone-in chicken thighs can retain a faint pink hue near the bone. That alone doesn’t prove undercooking if the rest of the meat is opaque and the internal temperature reads 165°F (74°C).
Surface color depends on method. Roasted or pan-seared skin-on thighs turn golden to deep brown, while braised or slow-cooked thighs show an even, muted tan without browning.
Check juices by piercing the thickest area. They should be clear, not red or bloody. Use a thermometer when in doubt.
Juiciness and Meat Texture
Properly cooked thighs feel firm but springy when pressed, not mushy or rock-hard.
Boneless skinless thighs often feel more uniform and give faster than bone-in cuts. Bone-in chicken thighs will feel slightly firmer around the bone.
When you pull the meat with a fork it should flake easily into strands but remain moist, not stringy or dry.
If meat resists flaking and feels gelatinous, it’s underdone. If it falls apart into dry fibers, it’s overcooked.
Skin Differences: Crispy Versus Soft
For skin-on thighs, crispy skin appears evenly browned, slightly blistered, and has a firm, crackling texture when you bite.
Render fat with high initial heat or finish under a broiler to achieve this. Avoid overcrowding so air circulates and skin crisps instead of steams.
Soft skin, typical of braised or slow-cooked thighs, will be uniformly colored and tender to the touch, often separating easily from the meat.
Both results can be perfectly cooked inside. Use the internal temperature and meat texture cues rather than skin alone to judge doneness.
Using Temperature to Ensure Doneness
Temperature gives you the most reliable way to tell when chicken thighs are safe and at your desired tenderness. Use a thermometer, probe the thickest part, and let the thighs rest briefly to allow carryover cooking.
Safe Internal Temperature Standards
The USDA recommends a minimum internal temperature of 165°F (74°C) for poultry safety.
Chicken thighs, being dark meat with more connective tissue, tolerate and often benefit from higher internal temps. Many cooks prefer 175°F–195°F (79°C–90°C) for more tender, gelatinized thighs.
Avoid relying on time or color alone. Insert the thermometer into the thickest part of the thigh, away from bone, to get a true reading.
How to Use a Meat Thermometer
Pick a clean, calibrated probe and insert it straight into the center of the thickest part of the thigh.
Angle the probe so the tip sits at least 1/4 inch from bone and does not touch fat. Wait for the thermometer display to stabilize before you record the temperature.
For bone-in thighs, take readings in multiple spots if the first is close to your target.
Clean the probe between uses to prevent cross-contamination.
Choosing Between Instant-Read and Digital Thermometers
Instant-read meat thermometers give fast readings and work well for frequent spot checks.
They are handy if you’re grilling or finishing thighs in a pan.
Digital probe thermometers with wired probes allow continuous monitoring inside an oven or grill.
They suit slow roasting or smoking where you want to maintain a target range.
Differences Between Bone-In, Skin-On, and Skinless Thighs
You can spot visible and tactile cues that tell you how each thigh was cooked: skin color and crispness, meat pull-apart, and how close the flesh sits to the bone.
Appearance Variations
Bone-in, skin-on thighs usually show a golden-brown to deep mahogany skin when properly cooked.
The skin will look puckered and blistered where fat rendered. You’ll often see darker juices pooling near the bone on the underside.
Skinless thighs present a uniform surface color—pale tan to light brown—with no blistering.
They may develop browned sear marks but lack the reflective sheen of rendered skin.
The bone’s presence alters shape. Bone-in thighs look plumper and hold a curved silhouette around the femur.
Boneless versions lay flatter and more even, which affects browning patterns and presentation.
Cooking Behavior and Texture
Bone-in, skin-on thighs retain heat and moisture longer thanks to the bone and skin acting as insulators.
This yields meat that pulls away from the bone and stays tender even after higher-heat finishes.
Skinless thighs cook faster and more evenly through the center because there’s no bone or insulating skin.
They respond well to quick, high-heat methods like grilling or pan-searing and to marinades that penetrate the meat.
If you remove the bone but keep the skin, expect a middling behavior.
Choose cut type based on whether you want crisp skin, faster cook time, or maximal juiciness.
Effect of Cooking Methods on Appearance
Different methods change skin color, surface texture, and meat juiciness.
Pay attention to browning, char, and any residual pink inside to judge doneness and visual appeal.
Baking Chicken Thighs
Baked thighs usually show even, golden-brown skin when roasted at 400–425°F (200–220°C).
The surface develops uniform crisping and small, evenly distributed fat bubbles under the skin.
If you use a sheet pan, spacing matters.
Crowding traps steam and yields paler, softer skin. A single layer with room between pieces promotes browning.
Internal meat appears opaque and slightly darker than breast meat.
Use a thermometer—165°F (75°C)—inserted into the thickest part away from bone.
Grilling Chicken Thighs
On a hot grill, thighs acquire distinct cross-hatch or parallel char marks and a deeper mahogany to nearly blackened edge where sugars caramelize.
Direct high heat gives rapid surface browning but can leave the center underdone if you don’t control flare-ups.
Move pieces between direct and indirect heat to balance appearance and doneness.
Start on direct heat for a few minutes per side to get sear marks, then finish over indirect heat.
Marinades and sugar-heavy sauces will intensify color and can burn.
Apply them late in cooking to avoid overly dark, bitter spots while keeping glossy, flavorful skin.
Pan-Frying and Alternative Techniques
Pan-searing in an oven-safe skillet gives the crispiest skin-to-meat contrast: deeply golden, blistered skin from rendered fat and a moist interior from finishing in the oven.
Sear skin-side down without moving until dark golden, then transfer to the oven to reach target temperature.
Other techniques—air-frying, shallow frying, or slow braising—produce different looks.
Air-frying mimics deep crispness with an even golden crust and minimal oil sheen.
Shallow frying yields a uniform, crunchy exterior.
Braising softens skin and creates a glossy, sauced appearance rather than crispness.
In all these methods, look for golden to deep-brown skin, clear juices, and meat that is opaque with a slight give when pressed.
Assessing Doneness With and Without a Thermometer
You can rely on clear visual and tactile cues, or use an instant-read meat thermometer for precise results.
Juices and Bone Separation
Cut into the thickest part of the thigh or pierce it with a skewer.
If the juices run clear—no pink or reddish tint—the meat is likely cooked.
For bone-in thighs, check where the meat meets the bone.
Cooked meat will pull back slightly from the bone and may show a thin white line of rendered fat.
If you have a meat thermometer, insert it into the thickest part without touching bone.
The safe minimum is 165°F (74°C).
Texture and Pull Test
Press the thigh with your finger or a fork.
Raw meat feels soft and squishy; done meat feels firm and springs back.
Try the pull test: twist a fork at the thickest part and pull.
Cooked thigh meat will separate easily into fibers and shred without resistance.
Combine these cues with temperature checks when possible.
Working With Frozen and Thawed Chicken Thighs
You can safely thaw chicken thighs in the refrigerator or cook them straight from frozen if you adjust time and temperature.
Thawing Chicken Thighs Safely
Thaw chicken thighs in the refrigerator on a plate or tray to catch drips.
Allow 24 hours for a full package of thighs.
For faster safe thawing, submerge sealed thighs in cold water, changing the water every 30 minutes.
Plan on about 30 minutes per pound.
After thawing, pat thighs dry with paper towels before seasoning to improve browning.
Use thawed thighs within 1–2 days for best quality and safety.
Cooking Chicken Thighs From Frozen
You can cook frozen chicken thighs without thawing. They will take roughly 50% longer than thawed thighs.
Bake at 375–400°F (190–200°C) on a rimmed sheet or in a baking dish. Bone-in thighs often need 35–45 minutes from frozen, and boneless may need 25–35 minutes, depending on size.
Use a probe thermometer to check that the thickest spot reaches 165°F (74°C). Check several pieces to ensure even doneness.
Do not sear frozen thighs directly in a pan. The exterior may brown too much before the center cooks.
If you want sauce or seasoning to stick, partially cook the thighs until the surface moisture reduces. Then finish with glaze or rub.


