
What Do Chicken Thighs Look Like When Done: Visual and Safety Cues
You want to know at a glance whether chicken thighs are safe and perfectly cooked. Look for opaque meat that yields to gentle pressure, clear juices when pierced, and an internal temperature of 165°F (74°C) in the thickest part.

Trust your eyes and touch, but verify with a thermometer to avoid guesswork. Appearance, texture, and cooking method all influence what “done” looks like so you can cook juicy, safe chicken thighs every time.
Visual Appearance of Properly Cooked Chicken Thighs
Expect clear signs that a thigh is done: consistent color through the meat, clear juices when pierced, and skin or surface texture that matches the cooking method and cut. These cues help you judge doneness and keep the meat juicy and safe.
Color Changes After Cooking
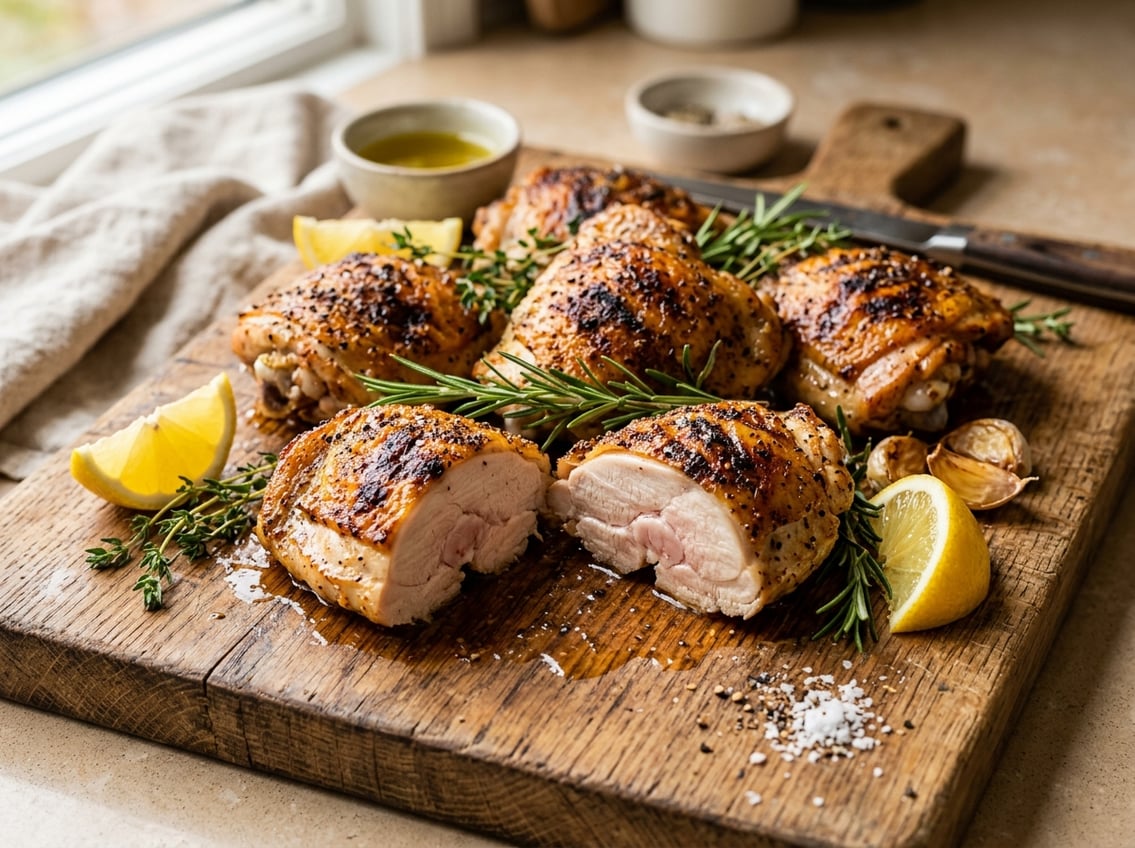
Cooked chicken thighs become opaque throughout. The flesh away from the bone will look light beige to pale white rather than translucent.
Skinless chicken thighs show this opacity, though they may brown less on the surface than skin-on pieces. A faint pink tint near the bone can persist in bone-in thighs due to myoglobin and bone marrow effects.
That pinkness does not prove undercooking if the internal temperature has reached 165°F (74°C). Focus on the thickest part of the meat, not the area immediately adjacent to the bone, when judging color.
When overcooked, the meat takes on a dry, stringy look and loses the slight sheen of rendered fat. Properly cooked thighs maintain a moist appearance with slight separation of muscle fibers when you pull them apart.
Signs of Clear Juices
Pierce the thickest part with a knife or skewer and watch the liquid that runs out. Clear or lightly translucent juices indicate the proteins have coagulated and the thigh is cooked through.
Cloudy, pink, or bloody juices point to undercooking and require more time. If you brined or marinated the thighs, juices may appear clearer than usual even when slightly underdone; use this test along with the color and a thermometer.
Confirm with an instant-read probe in the thickest section, avoiding the bone. 165°F (74°C) shows the juices and meat are safe to eat.
Skin and Surface Texture
For skin-on chicken thighs, look for golden-brown to deep-amber skin that is crisp and slightly blistered. Proper browning signals sufficient surface heat and flavor development from the Maillard reaction.
The skin should snap or resist slightly when pressed, not bend like rubber. Skinless thighs lack that crisp exterior but should still show even browning and a glossy surface from rendered fat.
The meat should yield to gentle pressure and pull apart into tender flakes with minimal resistance. If the surface is charred while the interior resists flaking, the outside cooked too fast and the inside needs more time.
Checking Internal Temperature Accurately
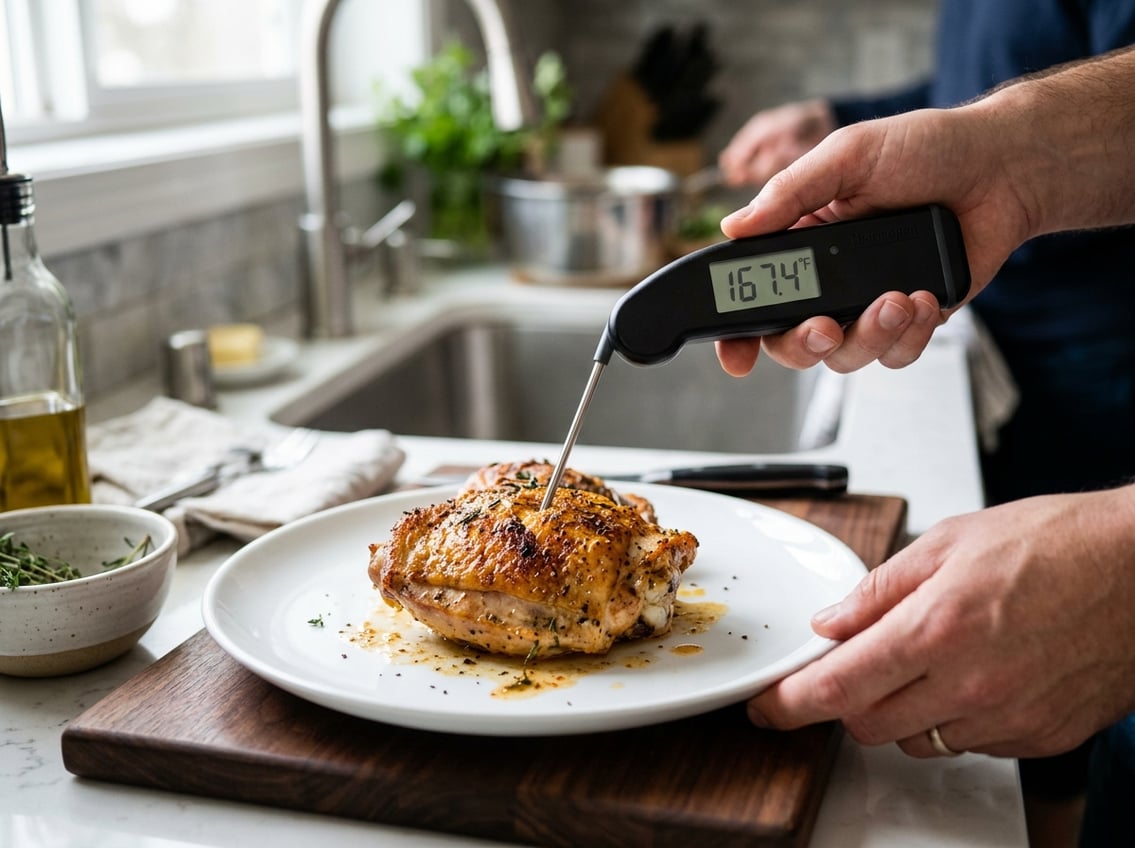
Use a reliable temperature reading to judge chicken thigh doneness. Measure in the thickest part, avoid bone contact, and use a quick, accurate thermometer.
How to Use a Meat Thermometer
Insert the probe into the thickest part of the thigh, stopping short of the bone by about 1/4 inch. Hold the probe steady until the thermometer reading stabilizes.
If you use an oven probe, place it before cooking and route the wire out of the oven door. For an instant-read, test toward the end of cooking and check multiple spots on larger pieces.
Clean the probe with hot, soapy water between uses to prevent cross-contamination. Aim for a safe minimum of 165°F (74°C) but consider texture; many cooks prefer 175–195°F for thigh meat to break down collagen and become more tender.
Digital and Instant-Read Thermometers
Digital thermometers include both leave-in probes and handheld instant-read units. Instant-read thermometers give near-immediate results and are best for spot-checking doneness just before serving.
Look for models with fast response time (under 5 seconds), accuracy ±1–2°F, and a foldable probe for safety and storage. Waterproof and backlit displays help in kitchen conditions.
Calibrate occasionally by checking in ice water (should read 32°F/0°C) and boiling water (adjusted for altitude). Avoid slow dial thermometers for quick checks.
A quality instant-read digital thermometer reduces guesswork and helps you hit the temperature that matches your texture goal.
Where to Measure for Best Results
Place the probe in the thickest, meatiest part of the thigh without touching bone or gristle. Bone conducts heat and gives falsely high readings, so keep the tip at least 1/4 inch away from bone tissue.
If cooking bone-in thighs, test near the center of the thigh cap or the deepest part perpendicular to the bone. For boneless thighs, insert probe into the center along the thickest axis.
Check a couple of individual thighs when cooking a batch to account for size differences. Allow for 5–10 minutes resting time after removing from heat; carryover cooking raises internal temperature a few degrees and redistributes juices.
Texture and Tenderness Indicators
Look for how the meat responds to pressure and how easily it separates. These tactile cues tell you whether the thigh is cooked through, still underdone, or overcooked.
Firmness and Springiness
Press the thickest part of the thigh with your fingertip or a fork. It should feel firm but slightly springy—not soft like raw meat and not rock-hard from overcooking.
If the meat compresses easily and does not rebound, it’s likely undercooked. If it barely yields and feels dry, collagen and fat have over-rendered and the thigh will be stringy.
Use the bone as a guide for bone-in thighs: the meat should pull back slightly from the bone when done. For boneless thighs, check the center; a probe should meet moderate resistance and then pull away cleanly.
Juicy and Tender Chicken Thighs
A fork or knife should slide through cooked thigh meat and allow the fibers to separate without excessive force. When you twist a piece with a fork, properly cooked thighs will flake or pull apart in strands rather than tear.
Look for clear juices when you pierce the thickest spot. Clear—not bloody—juices plus meat that flakes indicate safety and tenderness.
Slight pink near the bone can be acceptable in larger bone-in thighs if juices are clear and texture matches. If the meat feels rubbery or resists flaking, return it to the heat and retest.
If it dries out and becomes stringy when pulled, shorten future cook times or lower finishing temperature.
Doneness Differences by Cut and Cooking Method
Visual and texture cues differ depending on whether the thigh has bone or skin, and on how you cook it. Temperature targets, color, and how the meat separates from the bone all change with cut and method.
Bone-In Versus Boneless Thighs
Bone-in thighs heat more slowly because the bone draws heat away. Expect a longer cook time and check temperature near the thickest meat but not touching bone.
Aim for 175–185°F (79–85°C) for tender results; 165°F (74°C) is the safe minimum but may feel firmer and less yielding. Bone-in thighs often show slight meat pullback from the bone and the joint area loosens.
Slice into the thickest spot: cooked meat looks opaque with a consistent tan-pink to white color, and juices run clear. Use an instant-read thermometer inserted laterally into the muscle, avoiding the bone.
If you don’t have a thermometer, look for firm-yet-springy texture and easy separation from the bone.
Skin-On Versus Skinless Varieties
Skin-on chicken thighs develop visible browning and crispness on the exterior when cooked over medium-high heat or roasted at 400–425°F. The skin should be golden-brown and tight; underdone skin appears pale and rubbery.
Underneath, cooked skin-on meat will be opaque and moist; juices should be clear when pierced. If skin is crisp but the interior still shows glossy or translucent meat near the bone, continue cooking and check with a probe.
Skinless thighs cook faster and brown less; they will look uniformly opaque throughout and have a firmer surface. To avoid drying skinless thighs, pull them at 170–175°F for juicier texture and rest 5–10 minutes to allow juices to redistribute.
How Cooking Technique Affects Appearance
Different cooking methods change skin color, surface texture, and internal juiciness. Golden, crisp skin comes from high dry heat, while open flames create localized char and grill marks.
Searing and finishing in the oven creates an even brown crust and tender meat.
Baking Chicken Thighs
Baking gives even browning across the skin and consistent doneness through the meat. Set the oven to 400–425°F (200–220°C) for skin-on thighs to encourage Maillard browning; the skin should turn golden-brown to deep amber without large black spots.
Juices collect beneath the thigh during baking, so check for clear juices and an internal temperature of 165°F (75°C) in the thickest part, away from bone. If you want extra crispness, broil for 1–3 minutes at the end, watching closely.
If you bake at lower temperatures or cover the pan, the skin will be paler and softer, while the meat remains tender but less caramelized.
Grilling Chicken Thighs
Grilling produces pronounced grill marks and a smoky surface color that ranges from golden to darkly charred at contact points. Use direct high heat for skin-side searing (about 450–500°F / 230–260°C at the grate) to get visible crosshatch marks, then move thighs to indirect heat to finish cooking.
Properly grilled skin shows a mix of caramelized brown and darker sear lines. The interior should reach 165°F (75°C) with clear juices.
Watch for flare-ups from fat drips; they cause uneven dark spots and can mask the underlying golden color.
Pan-Frying and Roasting Methods
Searing in an oven-safe skillet first gives an even, deep-brown crust and a more pronounced texture contrast between skin and meat. Heat the pan until hot, sear skin-side 4–6 minutes until deep golden, then transfer to a 375–400°F (190–200°C) oven to finish.
This method yields a uniform browned exterior and juicy interior. Shallow-frying or pan-frying fully on the stovetop creates a uniformly golden crust but less even interior cooking unless you control flame and time carefully.
Roasting without prior sear produces more uniform but lighter browning. Finishing with a quick high-heat blast improves color and crispness.
Special Considerations for Frozen Chicken Thighs
Frozen thighs need longer cooking time and reliable temperature checks. Plan for extra time, use a meat thermometer, and choose methods that move heat evenly through the thickest part of the meat.
How to Cook Chicken Thighs From Frozen
You can cook thighs from frozen in the oven, Instant Pot, air fryer, or on the grill. Timings differ by method and whether the thighs are bone-in.
For oven baking, set 375–400°F, place thighs in a single layer, cover for the first phase to retain moisture, then uncover near the end to crisp skin. Bone-in pieces typically take about 45–55 minutes total.
In an Instant Pot, use high pressure for roughly 13–15 minutes with a natural release. Air fry at 360°F for about 20–25 minutes, flipping once.
Always check the internal temperature in the thickest part; 165°F (74°C) is the minimum safe target. If you see gray or pink near the bone, continue cooking and recheck.
Space pieces so hot air or liquid circulates evenly and separate any thighs stuck together before or during cooking.
Thawing and Safety Practices
If you prefer to thaw, thaw safely in the refrigerator for 24 hours per 1–2 pounds. Smaller individual thighs may thaw overnight.
For quicker thawing, use sealed packaging in cold water, changing the water every 30 minutes until pliable. Never thaw at room temperature.
Always use a calibrated instant-read thermometer and check the thickest part without touching bone. Cooked thighs should register 165°F; for dark meat you can hold 170–175°F briefly for more tender texture, but 165°F is the safety minimum.
Clean surfaces and hands after handling raw frozen thighs to prevent cross-contamination. Refrigerate leftovers within two hours in shallow containers.
Best Practices for Safe and Even Cooking
Control heat, space, and timing to get thighs that are both safe and juicy. Use a thermometer, avoid crowding, and account for residual heat so the thickest part reaches a safe temperature without drying out.
Not Overcrowding the Pan
Give each thigh at least 1 inch of space so air and heat circulate. If thighs touch, steam builds and skin won’t crisp.
Spacing lets oil or rendered fat evaporate and promotes even browning. Work in batches for stovetop or oven-skillet methods.
Preheat the pan until it shimmers, then place thighs skin-side down. You want a steady sizzle, not a roar.
If you cook 6–8 bone-in thighs, use two pans or roast the extras in the oven to maintain surface temperature. Overcrowding also lengthens cook time and raises the risk of uneven internal temperatures.
When searing then roasting, move the chicken from a hot skillet to a preheated oven. This keeps exterior color consistent while the interior cooks through.
Understanding Carryover Cooking
Carryover cooking raises internal temperature after you remove the thighs from heat.
You can expect an increase of about 5–10°F (3–6°C) for typical bone-in thighs, depending on size and resting time.
Pull the thighs from heat at 160°F (71°C) if you plan to rest them for 5–10 minutes.
They will climb to the safe 165°F (74°C) while juices redistribute.
Use an instant-read thermometer in the thickest part and avoid the bone to measure before resting.
Rest the thighs on a rack or tent them loosely with foil for even cooling and juice retention.
Resting prevents you from cutting into meat that’s still cooking and reduces the chance of overcooking while you plate the rest of the meal.

