
Local Beef Mastery: Sourcing, Grilling, and Slow-Cooking Recipes for 2026’s Premium Proteins
Last updated: July 4, 2026
More than 60% of home cooks who switch to locally sourced beef report better flavor and texture compared to supermarket options, but most struggle with where to find it and how to cook premium cuts properly. Local Beef Mastery: Sourcing, Grilling, and Slow-Cooking Recipes for 2026’s Premium Proteins combines practical sourcing strategies with cooking techniques that bring out the best in grass-fed ribeyes, grain-finished sirloins, and tough braising cuts. Whether grilling a weeknight steak or slow-cooking a Sunday roast, understanding your beef’s origin and proper cooking methods transforms everyday meals into restaurant-quality experiences.
Key Takeaways
- Local beef typically costs $8-18 per pound depending on cut and farm, with bulk purchases (quarter or half cow) reducing cost to $6-10 per pound
- Find local farms through farmers markets, CSA programs, online directories like LocalHarvest, and direct farm websites
- Quality markers include marbling, deep red color, firm texture, and transparent feeding practices (grass-fed vs. grain-finished)
- Grilling premium steaks requires high heat (450-500°F), minimal seasoning, and resting for 5-10 minutes after cooking
- Slow-cooking tough cuts (chuck, brisket, short ribs) for 6-8 hours at low temperature breaks down collagen into tender, flavorful results
- Storage best practices include vacuum-sealing portions, labeling with cut and date, and freezing at 0°F for up to 12 months
- Common mistakes include overcooking lean grass-fed beef, skipping the rest period, and using high heat for tough cuts
- Equipment needs are minimal: reliable meat thermometer, cast iron or grill, and basic slow cooker or Dutch oven
What Does Local Beef Mastery Mean for Home Cooks
Local beef mastery means understanding how to find, select, and cook beef from nearby farms to maximize flavor, support regional agriculture, and gain control over meat quality. For home cooks, this approach shifts focus from convenience to connection, knowing the farm, the feeding practices, and the specific cuts that work best for different cooking methods.
Mastering local beef involves three core skills:
- Sourcing knowledge: Identifying reputable farms, understanding pricing structures, and navigating bulk purchases
- Quality assessment: Recognizing marbling, color, and texture differences between grass-fed and grain-finished beef
- Cooking adaptation: Adjusting techniques for leaner grass-fed cuts and maximizing flavor in premium grain-finished steaks
The payoff goes beyond taste. Local beef often comes from smaller herds with better animal welfare standards, shorter supply chains that reduce environmental impact, and direct relationships that let you ask questions about feeding, processing, and aging. Home cooks who master these elements report greater satisfaction with their meals and better understanding of what they’re serving their families.
Choose local beef mastery if you value transparency in your food supply, enjoy experimenting with different cuts, and have freezer space for bulk purchases. Stick with supermarket beef if convenience and lower upfront costs matter more than sourcing details.
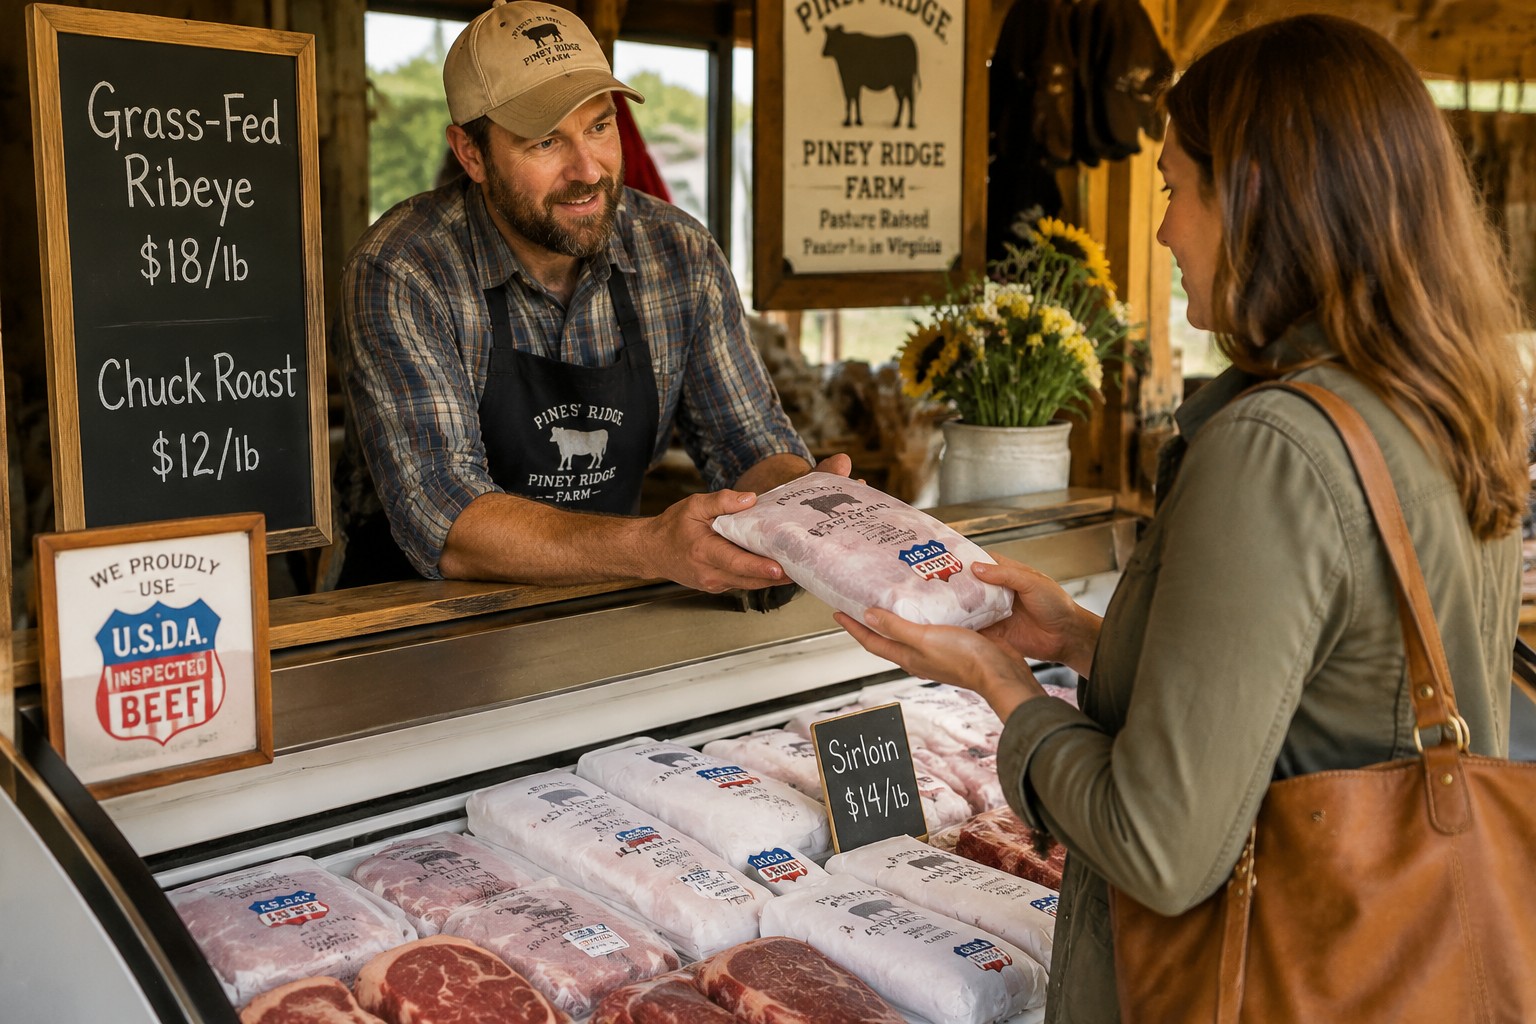
How to Find Local Beef Farms Near Me That Sell Directly
Start with farmers markets in your area, most vendors selling beef offer direct farm sales and can provide contact information for ordering larger quantities. Many farms maintain waiting lists for quarter, half, or whole cow purchases, so inquire early if you’re planning bulk orders.
Top resources for finding local beef farms:
- LocalHarvest.org: Search by zip code for farms, farmers markets, and CSAs offering beef
- Eat Wild directory: Focuses specifically on grass-fed and pasture-raised meat producers
- State agriculture department websites: Many maintain directories of licensed meat sellers
- Social media and farm websites: Search “[your county] grass-fed beef” or “local beef [your city]”
- Word of mouth: Ask at butcher shops, farm-to-table restaurants, and local food co-ops
When contacting farms, ask about:
- Available cuts and whether they sell individual cuts or bulk only
- Pricing structure (per pound hanging weight vs. packaged weight)
- Processing schedule and pickup/delivery options
- Feeding practices (100% grass-fed, grass-fed grain-finished, or grain-fed)
- USDA inspection status and processing facility location
Most farms require advance orders, especially for specific cuts or bulk purchases. Expect to place orders weeks or months ahead during peak seasons (spring and fall). Some farms offer monthly pickup days at central locations, while others deliver directly to your home for an additional fee.
Common mistake: Assuming all “local” beef is grass-fed. Many local farms grain-finish their cattle for the last 90-120 days to increase marbling. Always ask about feeding practices if this matters to you.
Local Beef vs Grocery Store Beef Quality Differences
Local beef from small farms typically offers superior marbling, deeper flavor, and better texture compared to commodity beef found in supermarkets, primarily due to differences in aging, handling, and breed selection. Grocery store beef often comes from large feedlots where cattle are bred for rapid growth rather than flavor, then processed quickly to maximize volume.
Key quality differences:
| Factor | Local Farm Beef | Grocery Store Beef |
|---|---|---|
| Aging | 14-28 days dry or wet aged | 7-10 days minimal aging |
| Marbling | Variable; depends on breed and finish | Standardized; USDA Choice/Select |
| Fat color | Yellow (grass-fed) or white (grain-finished) | Bright white |
| Flavor | More pronounced, mineral notes | Milder, more neutral |
| Texture | Firmer (grass-fed) or tender (grain-finished) | Consistent, moderately tender |
| Price per lb | $8-18 for individual cuts | $5-12 for similar cuts |
Grass-fed local beef tends to be leaner with a more pronounced, sometimes gamey flavor and yellow-tinted fat from beta-carotene in pasture. Grain-finished local beef offers richer marbling similar to supermarket beef but with better aging and handling practices that improve tenderness.
The quality gap narrows when comparing premium supermarket brands (Certified Angus Beef, organic lines) to local beef, but local options still win on transparency and traceability. You know exactly which farm raised your steak and can ask questions about feeding, antibiotics, and processing.
Is local beef worth the extra cost? Yes, if you prioritize flavor, animal welfare, and supporting local agriculture. The price premium (typically 30-50% higher) reflects smaller scale, better practices, and longer aging. For everyday ground beef or stew meat, the difference matters less; save your budget for premium steaks and roasts where quality shines.
Best Cuts of Local Beef for Grilling Beginners
Ribeye, strip steak (New York strip), and sirloin are the most forgiving cuts for grilling beginners because their natural marbling and fat content prevent drying out even with slight overcooking. These cuts deliver consistent results with minimal technique, making them ideal for mastering basic grilling skills before moving to leaner or more expensive options.
Beginner-friendly grilling cuts ranked by ease:
- Ribeye (easiest): High fat content, intense marbling, stays juicy even at medium-well; forgiving temperature range
- Strip steak: Moderate marbling, good beef flavor, slightly less forgiving than ribeye but still reliable
- Sirloin: Leaner than ribeye, requires more attention to avoid overcooking, best at medium-rare to medium
- Flat iron: Tender, well-marbled shoulder cut, affordable, great flavor but needs proper grain cutting
- Hanger steak: Flavorful but requires careful cooking to medium-rare; good for building skills
Basic grilling technique for beginners:
- Pat steaks dry and bring to room temperature (30 minutes)
- Season generously with salt and pepper only
- Preheat grill to high heat (450-500°F)
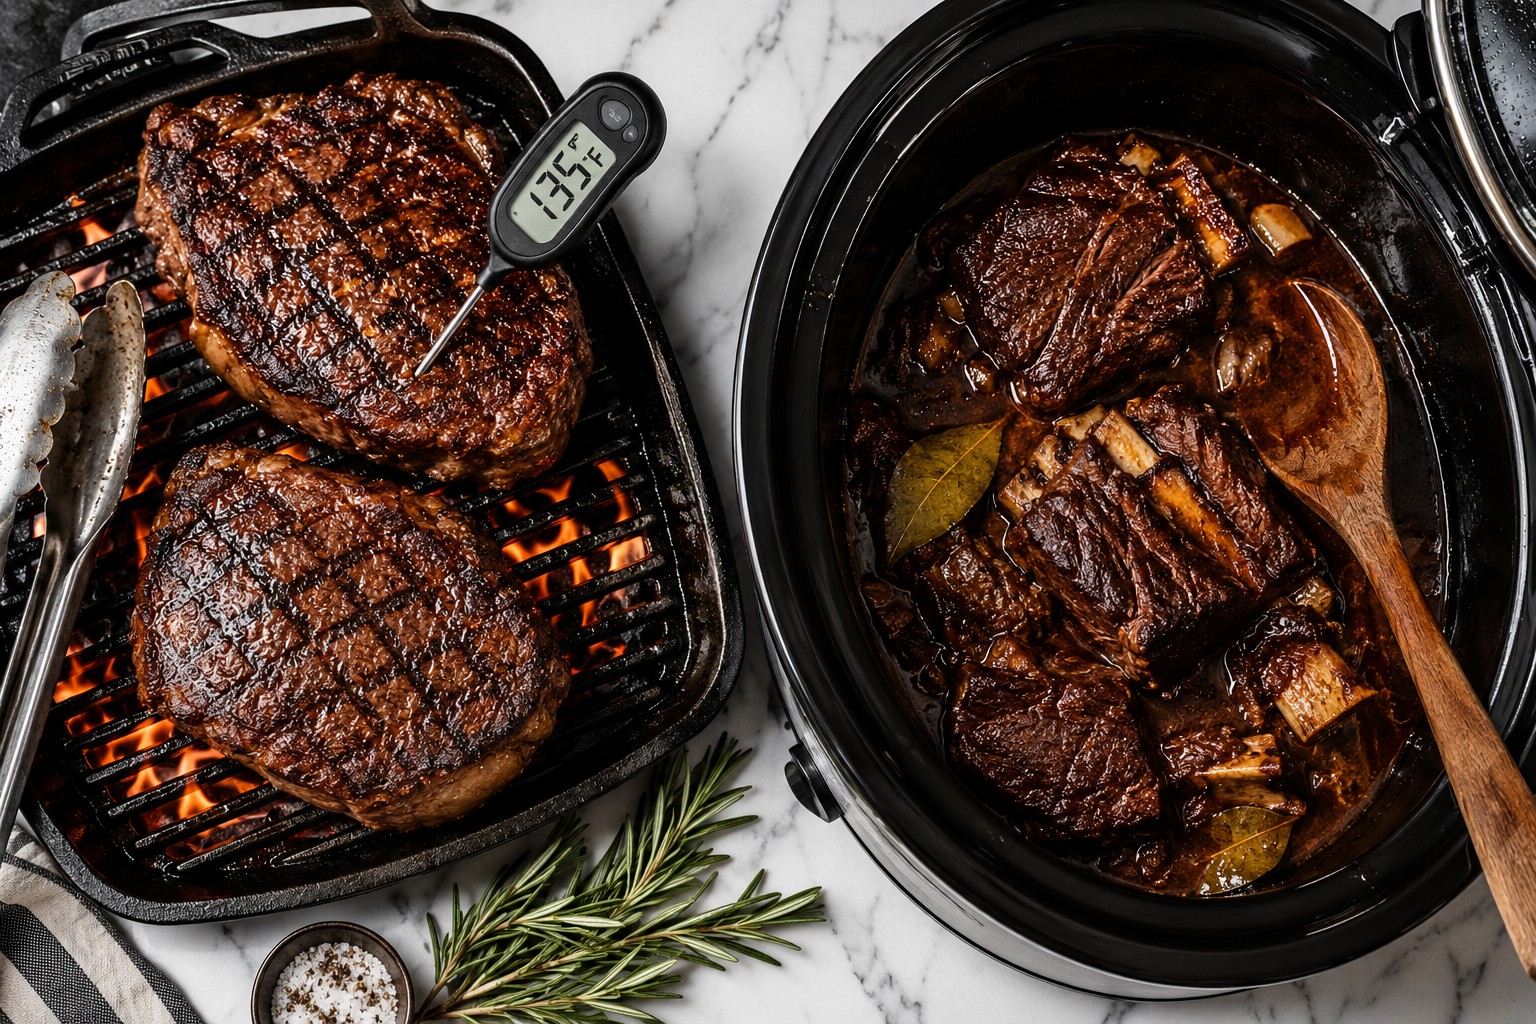
- Sear 3-4 minutes per side for 1-inch thick steaks
- Check internal temperature: 130-135°F for medium-rare, 135-145°F for medium
- Rest 5-10 minutes before slicing
For grass-fed local beef, reduce cooking time by 20-30% compared to grain-finished beef because lower fat content means faster cooking. Grass-fed steaks also benefit from slightly lower grill temperatures (425-450°F) to prevent exterior charring before the interior reaches target temperature.
Common beginner mistake: Flipping steaks multiple times or pressing down with a spatula, which releases juices and reduces tenderness. Flip once, leave it alone, and trust the process.
How Much Does Local Grass-Fed Beef Cost Per Pound in 2026
Local grass-fed beef typically costs $12-18 per pound for premium cuts like ribeye and strip steak, $8-12 per pound for ground beef and roasts, and $6-10 per pound when purchased in bulk (quarter or half cow) based on hanging weight. Prices vary significantly by region, with higher costs in urban areas and lower prices in rural farming communities.
2026 price ranges by purchase type:
- Individual premium cuts (ribeye, strip, tenderloin): $15-22/lb
- Individual standard cuts (sirloin, chuck roast, brisket): $10-15/lb
- Ground beef and stew meat: $8-12/lb
- Quarter cow (approximately 100 lbs packaged): $7-9/lb hanging weight
- Half cow (approximately 200 lbs packaged): $6.50-8/lb hanging weight
- Whole cow (approximately 400 lbs packaged): $6-7.50/lb hanging weight
Bulk purchases require upfront payment and significant freezer space but reduce per-pound costs by 30-50%. A quarter cow typically yields 25-30 lbs ground beef, 15-20 lbs roasts, 10-15 lbs steaks, and the remainder in stew meat, short ribs, and organ meats.
Hidden costs to consider:
- Processing fees: $0.75-1.25 per pound hanging weight (cutting, wrapping, freezing)
- Delivery or pickup fees: $25-75 depending on distance
- Freezer purchase if needed: $200-600 for chest freezer
Grain-finished local beef costs slightly less, typically $10-16 per pound for premium cuts and $5.50-7.50 per pound for bulk purchases. The price difference reflects lower feed costs and faster finishing times compared to 100% grass-fed operations.
Budget tip: Split a half or quarter cow with friends or family to access bulk pricing without overwhelming your freezer. Many farms accommodate split orders with separate processing instructions.
What to Look for When Buying Beef from a Local Farm
Look for deep red color, firm texture, visible marbling appropriate to the cut, and clean, fresh smell when evaluating beef quality at local farms. The best indicator of quality is transparency, farms that openly discuss feeding practices, processing facilities, and aging methods typically produce superior beef.
Quality checklist for local beef purchases:
Visual inspection:
- Color: Deep red to burgundy (grass-fed) or bright red (grain-finished); avoid brown or gray
- Marbling: White fat streaks throughout muscle for premium cuts; minimal for grass-fed
- Fat color: Creamy white (grain-finished) or yellow (grass-fed from beta-carotene)
- Texture: Firm, not mushy or slimy; should spring back when pressed
- Moisture: Slightly moist but not wet or pooling liquid
Farm transparency indicators:
- Willingness to discuss feeding practices in detail
- Open invitation to visit the farm (even if you don’t go)
- Clear labeling of cuts with processing date
- USDA inspection stamp or state inspection certification
- References from other customers or restaurants
Questions to ask before buying:
- What do you feed your cattle? (100% grass, grass with grain finish, specific grain mix)
- How long do you age the beef? (14+ days is ideal)
- Where is it processed? (USDA facility, state-inspected, on-farm)
- What breed(s) do you raise? (Angus, Hereford, and crossbreeds typically offer best marbling)
- Do you use antibiotics or hormones? (Many farms avoid both; some use antibiotics only for illness)
Red flags: Reluctance to answer questions, no processing date on packages, strong or off odors, excessive liquid in packaging, or prices significantly below market rates (may indicate quality issues).
For those interested in precision cooking techniques, consider using smart kitchen scales for accurate portion sizing and macro tracking when working with premium local beef.
How to Tell If Local Beef Is Actually Grass-Fed or Grain-Finished
Grass-fed beef shows yellow-tinted fat, leaner muscle tissue, and a more pronounced mineral flavor, while grain-finished beef displays bright white fat, more marbling, and milder taste. The most reliable verification comes from asking the farmer directly about feeding practices and requesting documentation if they claim specific certifications.
Physical indicators of grass-fed vs. grain-finished:
Grass-fed characteristics:
- Fat color: Yellow to golden (from beta-carotene in grass)
- Marbling: Minimal to moderate; leaner overall
- Muscle color: Deeper red, sometimes darker
- Texture: Firmer, denser muscle fibers
- Flavor: More pronounced, earthy, sometimes described as gamey
Grain-finished characteristics:
- Fat color: Bright white to cream
- Marbling: Moderate to heavy; more intramuscular fat
- Muscle color: Bright red to cherry red
- Texture: Softer, more tender muscle fibers
- Flavor: Milder, buttery, sweeter notes
Verification methods:
- Ask directly: Reputable farms clearly state feeding practices and finishing periods
- Check certifications: American Grassfed Association (AGA) or USDA Grass-Fed labels
- Request feeding timeline: Grass-finished cattle spend 20-28 months on pasture; grain-finished typically get 90-120 days of grain after pasture
- Visit the farm: See the feeding operation firsthand
- Compare prices: 100% grass-fed typically costs 20-30% more than grain-finished
Many farms use a “grass-fed, grain-finished” approach where cattle graze on pasture for most of their lives, then receive grain supplementation for the final 3-4 months to increase marbling. This hybrid approach offers a middle ground between pure grass-fed leanness and conventional grain-fed richness.
Common confusion: “Grass-fed” without “grass-finished” may mean cattle ate grass early in life but finished on grain. Look for “100% grass-fed” or “grass-finished” for cattle that never received grain.
Common Mistakes When Grilling Premium Local Beef Steaks
Overcooking lean grass-fed beef and skipping the rest period are the two most common mistakes that ruin premium local steaks, turning expensive cuts dry and tough. Grass-fed beef requires 20-30% less cooking time than grain-finished beef due to lower fat content, and all steaks need 5-10 minutes of rest to redistribute juices.
Top grilling mistakes and fixes:
1. Cooking straight from the refrigerator
- Problem: Cold center cooks unevenly, leading to overcooked exterior and undercooked interior
- Fix: Remove steaks 30-45 minutes before grilling to reach room temperature
2. Under-seasoning or over-complicating seasoning
- Problem: Premium beef flavor gets lost under heavy rubs or marinades
- Fix: Use coarse salt and black pepper only; add 1-2 teaspoons per pound
3. Not preheating the grill properly
- Problem: Steaks stick, don’t develop crust, and cook unevenly
- Fix: Preheat to 450-500°F for 10-15 minutes; grill grates should be smoking hot
4. Flipping multiple times or pressing down
- Problem: Releases juices, reduces tenderness, prevents proper crust formation
- Fix: Flip once halfway through cooking; never press with spatula
5. Cutting immediately after cooking
- Problem: Juices run out onto the cutting board instead of staying in the meat
- Fix: Rest 5 minutes for thin steaks, 10 minutes for thick cuts
6. Using the same temperature for grass-fed and grain-finished
- Problem: Grass-fed overcooks quickly due to less fat insulation
- Fix: Reduce cooking time by 30% or lower grill temperature to 425°F for grass-fed
7. Not using a meat thermometer
- Problem: Guessing doneness leads to over or undercooking expensive cuts
- Fix: Invest in instant-read thermometer; pull steaks at 130-135°F for medium-rare
Edge case: Very thick steaks (2+ inches) benefit from reverse searing, start in a 275°F oven until internal temperature reaches 115°F, then sear on high heat for 2 minutes per side. This technique ensures even cooking throughout.
Slow Cooker Recipes for Tough Cuts of Local Beef
Chuck roast, brisket, short ribs, and shank are ideal for slow cooking because their high collagen content breaks down into gelatin over 6-8 hours of low heat, creating fork-tender, richly flavored results. These tougher, less expensive cuts ($8-12 per pound) deliver better slow-cooked results than premium steaks, which become dry and stringy with extended cooking.
Best tough cuts for slow cooking:
- Chuck roast: Marbled shoulder cut; perfect for pot roast, shredded beef, or stews
- Brisket: Chest muscle with heavy connective tissue; ideal for BBQ-style or braised preparations
- Short ribs: Bone-in or boneless; extremely flavorful with high fat content
- Shank: Cross-cut leg bone with surrounding meat; classic for osso buco
- Round roast: Lean rear leg cut; requires liquid and longer cooking time
Classic slow cooker pot roast recipe:
- 3-4 lb chuck roast, patted dry and seasoned with salt and pepper
- 2 tablespoons oil for searing (optional but recommended)
- 1 large onion, quartered
- 4 carrots, cut in chunks
- 4 potatoes, quartered
- 3 cloves garlic, smashed
- 2 cups beef broth
- 2 tablespoons tomato paste
- 2 bay leaves, 1 teaspoon thyme
Instructions:
- Sear roast in hot pan 3-4 minutes per side (optional)
- Place vegetables in slow cooker bottom
- Add roast on top of vegetables
- Mix broth, tomato paste, and herbs; pour over roast
- Cook on low 8 hours or high 5-6 hours
- Roast is done when fork-tender and easily shreds
Braised short ribs variation:
- 3 lbs bone-in short ribs, seasoned
- 1 bottle red wine (or 2 cups beef broth)
- 1 onion, diced
- 2 carrots, diced
- 4 cloves garlic
- 2 tablespoons tomato paste
- Fresh rosemary and thyme
Cook on low 7-8 hours until meat falls off bone. The wine adds depth but can be replaced with broth for alcohol-free version.
Slow cooking tips for local beef:
- Grass-fed tough cuts may cook 30-60 minutes faster than grain-finished due to less fat
- Always use enough liquid (1-2 cups minimum) to prevent drying
- Don’t lift the lid during cooking; each peek adds 15-20 minutes to cooking time
- For richer flavor, sear meat before slow cooking to develop Maillard reaction
For complementary side dishes, explore high-protein comfort bowls that pair well with slow-cooked beef.
How Long to Slow Cook Local Beef Chuck Roast for Tenderness
Cook chuck roast on low heat for 8-10 hours or on high heat for 5-6 hours to achieve fork-tender results where the meat easily shreds with minimal pressure. The roast is properly done when an instant-read thermometer shows 190-205°F internal temperature and a fork twists easily in the thickest part.
Timing guide by cooking method:
Slow cooker:
- Low setting (200-210°F): 8-10 hours for 3-4 lb roast
- High setting (280-300°F): 5-6 hours for 3-4 lb roast
Dutch oven (oven braising):
- 275°F: 3.5-4 hours covered
- 300°F: 3-3.5 hours covered
Instant Pot/pressure cooker:
- High pressure: 60-75 minutes plus natural release (15-20 minutes)
Factors affecting cooking time:
- Size: Add 1-2 hours for roasts over 5 lbs; reduce 1 hour for roasts under 2 lbs
- Fat content: Grass-fed lean roasts may cook 30-60 minutes faster
- Starting temperature: Room temperature roasts cook 30-45 minutes faster than refrigerator-cold
- Liquid amount: More liquid conducts heat better, slightly reducing cooking time
- Altitude: Add 30 minutes per 1,000 feet above sea level
Doneness indicators:
- Internal temperature: 190-205°F (higher than steak because collagen needs to break down)
- Fork test: Fork twists easily with no resistance
- Visual: Meat pulls apart into shreds rather than slicing cleanly
- Texture: Extremely tender, almost falling apart
Common timing mistake: Pulling the roast too early at 160-170°F when it’s technically “done” but still tough. Chuck roast needs to reach 190°F+ for collagen to convert to gelatin. If your roast is tough after the recommended time, keep cooking, it’s not done yet.
Overcooking risk: Chuck roast is very forgiving. Even an extra 1-2 hours on low won’t ruin it, though texture may become slightly mushy. Grass-fed roasts are slightly less forgiving due to lower fat content.
Best Way to Store Bulk Local Beef from a Farm Share
Vacuum-seal individual portions, label each package with cut name and date, and freeze at 0°F or below for optimal quality retention up to 12 months. Proper portioning before freezing prevents repeated thawing and refreezing, which degrades texture and increases bacterial risk.
Step-by-step storage process:
1. Initial processing (day of pickup):
- Inspect all packages for tears or leaks
- Separate into categories: steaks, roasts, ground beef, stew meat, specialty cuts
- Decide portion sizes based on household needs (typically 1-2 steaks, 1 lb ground beef, etc.)
2. Repackaging for long-term storage:
- Best method: Vacuum sealer removes air, prevents freezer burn, extends shelf life to 12+ months
- Good alternative: Heavy-duty freezer bags with air pressed out, double-wrapped
- Budget option: Original butcher paper wrapped in additional layer of plastic wrap and foil
3. Labeling system:
- Cut name (ribeye, chuck roast, ground beef)
- Weight or number of pieces
- Processing date (from farm)
- Freezing date (your date)
- Example: “Ribeye (2 steaks, 1.5 lb) – Processed 3/15/26 – Frozen 3/16/26”
4. Freezer organization:
- Group similar cuts together in bins or sections
- Place newest packages in back, oldest in front (FIFO rotation)
- Keep inventory list on freezer door or nearby
- Store ground beef and smaller items in top sections for easy access
Freezer storage times for quality:
- Steaks and roasts: 12 months (vacuum-sealed), 6-9 months (freezer bags)
- Ground beef: 4-6 months (vacuum-sealed), 3-4 months (freezer bags)
- Stew meat and cubes: 8-10 months (vacuum-sealed), 4-6 months (freezer bags)
- Bones for broth: 12+ months (any method)
Thawing best practices:
- Refrigerator thawing: 24 hours per 5 lbs (safest method)
- Cold water thawing: 30 minutes per pound in sealed bag, changing water every 30 minutes
- Never thaw on counter at room temperature (bacterial growth risk)
Freezer requirements: Chest or upright freezer set to 0°F or below. A quarter cow requires approximately 4 cubic feet of freezer space; half cow needs 8 cubic feet.
For creative ways to use various cuts, check out leftover transformation recipes that work equally well with beef.
Who Should Buy Local Beef and Who Should Stick with Store-Bought
Buy local beef if you have freezer space for bulk purchases, value transparency in your food supply, and want to support regional agriculture while accessing premium quality. Stick with store-bought beef if you need shopping flexibility, have limited storage, or prioritize lower upfront costs over sourcing details.
Local beef is ideal for:
- Families with freezer space: Quarter or half cow purchases require 4-8 cubic feet of dedicated freezer storage
- Quality-focused cooks: Those who notice and appreciate flavor differences in well-aged, properly raised beef
- Sustainability-minded consumers: People who prioritize shorter supply chains, animal welfare, and supporting local farms
- Adventurous eaters: Willing to use less common cuts (tongue, liver, oxtail) that come with bulk purchases
- Budget-conscious bulk buyers: Upfront investment of $1,200-2,500 for half cow reduces per-pound cost significantly
Store-bought beef makes more sense for:
- Small households: Singles or couples who can’t consume 100-400 lbs of beef before quality declines
- Apartment dwellers: Limited or no freezer space beyond standard refrigerator freezer
- Flexible shoppers: Those who prefer buying specific cuts as needed rather than committing to variety pack
- Budget-limited shoppers: Can’t afford $600-2,500 upfront cost even if per-pound price is better
- Convenience-focused cooks: Value ability to pick up beef during regular grocery trips
Hybrid approach: Buy premium local steaks and roasts for special occasions while using store-bought ground beef and stew meat for everyday cooking. This balances quality, cost, and storage needs.
Decision framework: Calculate your household’s monthly beef consumption, multiply by 12, and compare to typical bulk purchase sizes. If you eat 15 lbs of beef monthly (180 lbs yearly), a half cow (200 lbs) makes sense. If you eat 5 lbs monthly (60 lbs yearly), bulk purchases will overwhelm your freezer and budget.
Do I Need Special Equipment to Cook Premium Local Beef Properly
No specialized equipment is required, a reliable instant-read meat thermometer, cast iron skillet or grill, and basic slow cooker or Dutch oven handle 95% of local beef cooking needs. The thermometer is the only truly essential upgrade, ensuring proper doneness without cutting into expensive steaks.
Essential equipment (under $100 total):
- Instant-read meat thermometer ($15-30): Non-negotiable for accurate doneness; prevents over/undercooking
- Cast iron skillet ($25-40): Excellent heat retention for perfect steak searing
- Slow cooker or Dutch oven ($30-60): Either works for braising tough cuts
Nice-to-have upgrades ($100-300):
- Vacuum sealer ($80-150): Extends freezer storage life from 6 to 12+ months
- Grill with temperature control ($150-300): More consistent results than basic charcoal grill
- Sous vide precision cooker ($100-200): Foolproof temperature control for perfect steaks
Equipment you DON’T need:
- Expensive knife sets (one good chef’s knife suffices)
- Specialty marinades or tenderizers (salt and pepper work best)
- Meat tenderizing mallets (proper cooking makes this unnecessary)
- Infrared thermometers (instant-read is more accurate for internal temperature)
Cooking method equipment requirements:
Grilling:
- Gas or charcoal grill (any quality level)
- Instant-read thermometer
- Long-handled tongs
- Grill brush for cleaning
Pan-searing:
- Cast iron or heavy stainless steel skillet
- Instant-read thermometer
- Kitchen tongs or spatula
Slow-cooking:
- Slow cooker (3-6 quart) OR
- Dutch oven (5-7 quart) with lid
Roasting:
- Roasting pan with rack
- Instant-read thermometer
- Aluminum foil for resting
The quality of your beef matters far more than expensive equipment. A $15 thermometer and $30 cast iron skillet will produce better results with premium local beef than $500 of gadgets with commodity supermarket meat.
Budget priority: If choosing one upgrade, buy the instant-read thermometer first. It prevents the costly mistake of ruining expensive steaks through over or undercooking.
Frequently Asked Questions
How can I tell if local beef has gone bad in the freezer? Look for freezer burn (gray-brown dry spots), ice crystals throughout the package, or strong off-odors when thawed. Properly frozen beef at 0°F remains safe indefinitely but quality declines after 12 months. Discard if thawed beef smells sour, feels slimy, or shows green/gray discoloration.
Should I buy grass-fed or grain-finished local beef for better flavor? Grain-finished offers more marbling, milder flavor, and tender texture similar to restaurant steaks. Grass-fed provides leaner meat with pronounced, earthy flavor and yellow fat. Choose grain-finished for traditional steak experience, grass-fed for distinctive taste and lower fat content. Many farms offer both options.
Can I cook frozen local beef without thawing first? Yes, but add 50% more cooking time and expect less even results. Frozen steaks won’t develop proper crust when grilling. For slow-cooked roasts, frozen works fine, add 2-3 hours to cooking time. Thawing in refrigerator 24-48 hours produces better texture and flavor for all cuts.
What’s the difference between hanging weight and packaged weight when buying bulk? Hanging weight is the carcass weight after initial processing (removing hide, organs, head). Packaged weight is actual take-home meat after cutting, trimming, and deboning, typically 60-65% of hanging weight. A 400 lb hanging weight quarter cow yields approximately 240-260 lbs of packaged beef.
How do I prevent grass-fed local beef from tasting gamey? Cook to medium-rare (130-135°F) rather than well-done to preserve moisture and reduce mineral flavors. Marinate for 2-4 hours in acidic ingredients (wine, vinegar, citrus) to mellow strong flavors. Choose grain-finished local beef if you consistently dislike grass-fed taste, it’s not a defect, just a preference.
Is local beef safer than supermarket beef regarding bacteria? Both require proper handling and cooking to 145°F minimum for safety. Local beef from small processors may have less exposure to cross-contamination than large facilities, but USDA inspection standards apply equally. Safety depends more on your storage and cooking practices than source. Always use clean surfaces and cook to proper temperatures.
Can I use the same recipes for local beef as regular beef? Yes, with minor adjustments. Reduce cooking time by 20-30% for grass-fed beef due to lower fat content. Use slightly lower temperatures (25°F less) to prevent exterior burning. All other recipe elements (seasonings, liquids, techniques) transfer directly. Slow-cooked recipes work identically for both types.
What should I do with unusual cuts that come with bulk beef purchases? Tongue and heart make excellent tacos when braised and sliced thin. Liver can be pan-fried with onions or made into pâté. Oxtail and soup bones create rich broths. Shank works perfectly for osso buco. If you won’t use them, ask the processor to exclude these cuts or donate them to friends who cook adventurously.
How much freezer space do I actually need for a quarter cow? Plan for 4-5 cubic feet of freezer space for a quarter cow (approximately 100-125 lbs packaged beef). A standard chest freezer (7 cubic feet) comfortably holds a quarter with room for other items. Half cow requires 8-10 cubic feet. Measure your freezer’s interior dimensions before committing to bulk purchases.
Does local beef need to rest after cooking like regular beef? Yes, all beef, local or supermarket, grass-fed or grain-finished, needs 5-10 minutes rest after cooking. Resting allows juices to redistribute throughout the meat rather than running out when cut. Tent loosely with foil during rest period. Internal temperature will rise 5°F during rest (carryover cooking).
Can I refreeze local beef after thawing if I don’t use it all? Safe but not ideal. Beef thawed in refrigerator can be refrozen within 1-2 days, though texture and moisture will degrade. Never refreeze beef thawed at room temperature or in warm water. Better approach: portion before initial freezing so you only thaw what you’ll use immediately.
What’s the best way to cook local beef for meal prep? Slow-cook chuck roast or brisket in large batches (4-6 lbs), shred, and portion into 1-cup servings for freezing. Ground beef can be browned in bulk and frozen in 1-lb portions. Both reheat well and work in multiple recipes. Vacuum-seal portions for 3-4 month freezer storage without quality loss.
Conclusion
Local Beef Mastery: Sourcing, Grilling, and Slow-Cooking Recipes for 2026’s Premium Proteins transforms how home cooks approach beef by connecting them directly with farms, teaching quality assessment skills, and providing techniques that highlight the superior flavor of well-raised meat. The investment in local beef, whether buying individual premium cuts at farmers markets or committing to bulk purchases, pays dividends in taste, transparency, and support for regional agriculture.
Take action this week:
- Find your source: Search LocalHarvest or Eat Wild for farms within 50 miles, visit a farmers market, or ask at local butcher shops for farm connections
- Start small: Buy 2-3 steaks or a small roast to test quality and flavor before committing to bulk purchases
- Master one technique: Practice grilling a ribeye to perfect medium-rare or slow-cooking a chuck roast until fork-tender
- Assess your storage: Measure freezer space and calculate monthly beef consumption to determine if bulk buying makes sense
- Build relationships: Talk to farmers about their practices, ask questions, and request farm visits to understand your beef’s origin
The difference between commodity supermarket beef and premium local beef becomes obvious with your first properly cooked grass-fed ribeye or slow-braised grain-finished short rib. Whether you’re grilling weeknight steaks or preparing Sunday pot roast, sourcing quality local beef and applying proper cooking techniques elevates everyday meals into memorable dining experiences that support your local food system.
SEO Meta Title: Local Beef Mastery: Sourcing, Grilling & Slow-Cooking 2026


