
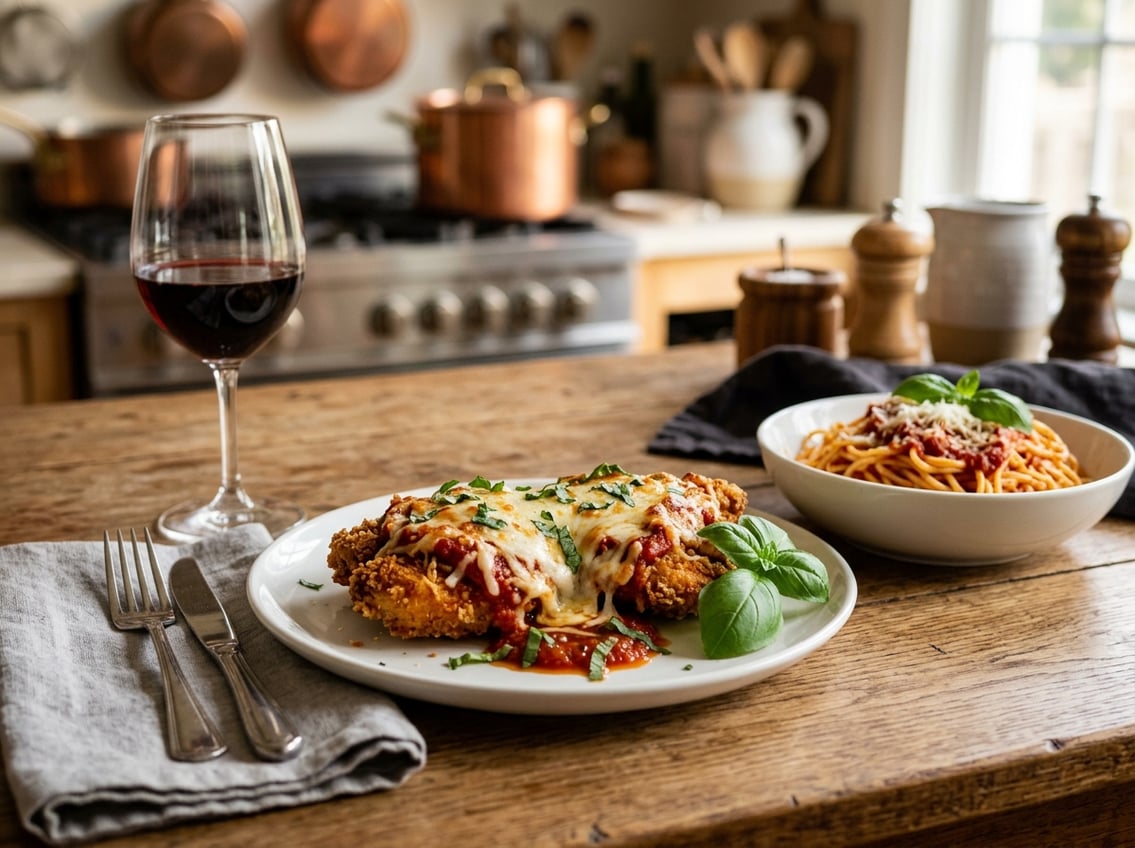
Can You Use Chicken Thighs for Chicken Parmesan? Flavorful Twists & Tips
You can use chicken thighs for Chicken Parmesan, and they often deliver juicier, more flavorful results than breasts. Boneless, well-pounded thighs give you a tender, succulent chicken thigh Parmesan with a crisp breading that holds up under sauce and cheese.

Chicken thighs work well for Chicken Parmesan because of their flavor and texture. You can follow tips on choosing, prepping, breading, assembling, and baking thighs to get the best results.
Benefits of Using Chicken Thighs Instead of Breasts
You gain richer flavor, more forgiving cooking, and often lower cost when you swap thighs for breasts. Boneless skinless chicken thighs typically cost less per pound than boneless chicken breasts.
Flavor and Juiciness
Chicken thighs have higher fat content and more connective tissue than chicken breasts. This gives a deeper savory flavor that stands up well to tomato sauce and melted cheese.
When you use boneless chicken thighs in Chicken Parmesan, the rendered fat keeps the meat moist during breading, frying, or baking. The interior remains tender even if the outer crust gets crisp.
You’ll notice a slightly gamier, more robust taste compared with lean breast meat. That flavor pairs well with Parmesan and mozzarella, and it reduces the need for heavy seasoning.
If you brine or season the thighs lightly before breading, you’ll amplify juiciness without masking the classic chicken parm profile.
Cost-Effectiveness and Accessibility
Chicken thighs make chicken parm a budget-friendly option for weeknight dinners or feeding a group without sacrificing quality. Grocery stores often stock thighs year-round, giving you predictable availability when planning meals.
Using thighs can also reduce waste. You can use slightly smaller pieces and still get the same satiety as larger breast portions.
Parmesan chicken thighs reheat well and retain moisture, so leftovers perform better than reheated chicken breast dishes.
Texture Differences
Thigh meat delivers a looser, silkier mouthfeel than breast, which tends to be firmer and drier when overcooked. In Chicken Parmesan, thighs develop a tender, almost creamy interior that contrasts nicely with a crisp breadcrumb crust.
If you pound boneless thighs to an even thickness (about 1/2 inch), they cook uniformly and the texture becomes pleasantly consistent across servings.
Skinless boneless thighs tolerate pan-frying or finishing in the oven without becoming stringy. Adjust frying time slightly shorter than for thick breasts to avoid breaking down the meat structure.
Press breadcrumbs firmly so the crust adheres to the softer thigh surface.
Choosing and Preparing Chicken Thighs
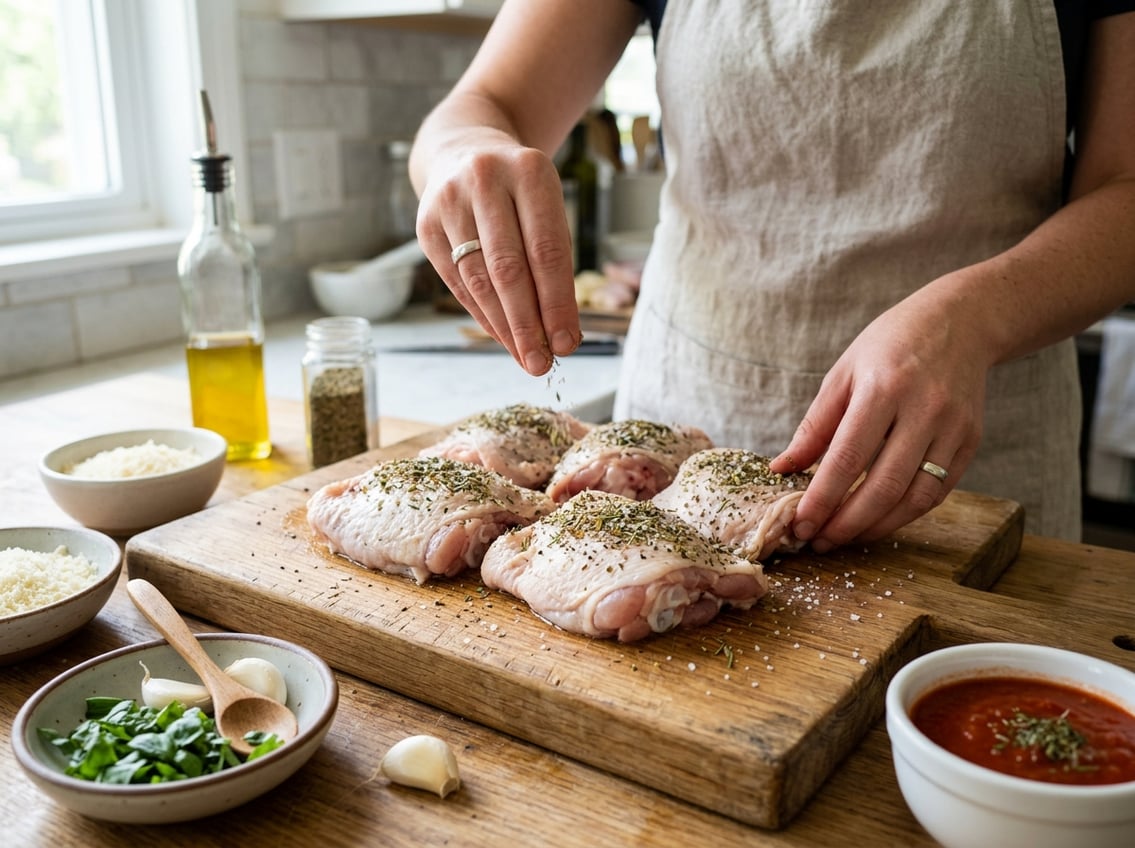
Select thighs that will give you even cooking, good browning, and reliable juiciness. Trim excess fat, decide between boneless or bone-in, and flatten each piece to a uniform thickness before breading.
Boneless vs. Bone-In Thighs
Boneless skinless chicken thighs speed prep and make breading simpler because you can pound them flat and they sit evenly in the pan. They usually cook in 18–25 minutes total (sear then bake), and they’re easier to slice for plating or sandwiches.
Bone-in thighs add flavor but need longer, gentler cooking to reach 165°F at the bone. Expect 5–10 extra minutes in the oven and watch the breading so it doesn’t overbrown.
If you choose bone-in, you can remove the bone before breading if you want a true cutlet texture.
How to Pound and Season for Even Cooking
Place each boneless chicken thigh between two sheets of plastic wrap or in a zip bag. Pound to an even thickness of about ½ inch using a flat meat mallet or heavy pan.
Season both sides with salt and freshly ground black pepper first, then add garlic powder, dried oregano, and a light dusting of flour before the egg wash. Do not over-salt; thighs retain seasoning differently than breasts.
Use a meat thermometer to check the internal temperature. Insert at the thickest point and target 165°F.
Tips for Marinating and Tenderizing
For a short brine, dissolve 1 tablespoon kosher salt per cup water and soak boneless skinless chicken thighs for 30–45 minutes. This increases juiciness without changing texture.
Rinse and pat dry before breading to ensure the coating adheres. Acidic marinades (lemon, yogurt) should be brief—15–30 minutes—because prolonged exposure can make the meat mushy.
For tenderizing without flavor change, use a light papaya- or pineapple-based enzyme marinade for under 20 minutes. Always blot thighs dry after marinating so breadcrumbs crisp properly during searing and baking.
Breading and Coating Techniques
This section shows how to get breaded chicken thighs that stay on during cooking and crisp properly. Focus on surface dryness, orderly stations, and choosing the right crumbs and cheese for texture and flavor.
Setting Up a Proper Dredging Station
Create three shallow dishes: seasoned all-purpose flour (or gluten-free flour if needed), a beaten-egg wash with a tablespoon of water or milk, and your final coating—panko breadcrumbs mixed with grated Parmesan or Parmigiano-Reggiano.
Season the flour and breadcrumbs with salt, pepper, garlic powder, and a little paprika for color. Work on a tray or baking sheet lined with a cooling rack so excess coating drops away.
Pat each chicken thigh dry with paper towels before you start. Dredge in flour, shake off excess, dip into egg wash, then press firmly into the breadcrumb mixture.
Chill the breaded thighs on the rack for 20–30 minutes to set the layers before baking or frying. Use separate utensils for each station to avoid cross-contamination.
If you double-coat, repeat the egg and breadcrumb steps, pressing the crumbs onto the surface to build a thicker crust.
Panko Breadcrumbs vs. Traditional vs. Gluten-Free
Panko breadcrumbs give a light, flaky crust that browns evenly and stays crisp longer than fine traditional crumbs. They also trap less oil when frying and form a more pronounced crunch after baking.
Mix panko with finely grated Parmesan or Parmigiano-Reggiano to add savory depth and help the crumbs adhere. Traditional fine breadcrumbs create a denser, more uniform crust that clings well when properly applied and pressed.
For gluten-free, use a gluten-free flour for dredging and substitute gluten-free panko or crushed gluten-free crackers for breadcrumbs. Binders like a teaspoon of Dijon or a splash of buttermilk in the egg wash improve adhesion for all crumb types.
Adjust seasoning by adding 2–3 tablespoons of grated cheese per cup of crumbs.
Getting the Crispiest Breaded Chicken
Temperature control and patience matter most for crispiness. If frying, heat oil to 350–375°F so the crust sets quickly and absorbs less oil.
For oven-baked thighs, preheat to 400°F and bake on a wire rack set over a rimmed sheet for even air circulation and bottom crisping. Press breadcrumbs onto the thighs with your palms to create contact.
Use a light spray of oil over the crust before baking or a shallow pan-fry to jumpstart browning. Flip only once when a golden edge appears.
If using Parmesan or Parmigiano-Reggiano, mix it finely into the crumbs rather than sprinkling on top. Chill breaded pieces before cooking to firm the adhesion and reduce slippage during handling.
Assembly and Baking Methods
Keep the breading crisp, the sauce controlled, and the cheese melty. Use a hot oven and a wire rack when possible, and time sauce and cheese application so the topping doesn’t make the crust soggy.
Pan-Frying, Oven-Baking, or Air Frying
Pan-fry thighs in ¼–½ inch of oil at about 350°F until golden, roughly 5–7 minutes per side for pounded boneless thighs. Transfer to a wire rack over a sheet pan so excess oil drains; this preserves crispness before baking.
If you prefer to skip frying, bake breaded thighs on a lightly oiled wire rack at 400°F for 20–30 minutes, flipping once, until the crust reaches golden and the internal temperature is 165–175°F.
Air fryers give consistent results. Spray the breading lightly with oil and air fry at 350°F for 18–22 minutes, flipping halfway.
Use a single layer and don’t crowd the basket so hot air can crisp all sides. Bring thighs up to safe internal temp before adding sauce and cheese to avoid long bake times that soften the crust.
Adding Marinara Sauce Without Making Soggy
Spoon a controlled amount of marinara—about 2 tablespoons per thigh—so the sauce flavors the chicken without drowning the crust. Warm the sauce first; room-temp or hot sauce reduces oven time and prevents prolonged exposure that softens breading.
Pat excess oil from the underside of each thigh with a paper towel before assembly. Place sauce only on the top center of each piece, leaving a border of exposed crust to keep edges crisp.
If you like more sauce, serve extra on the side rather than layering it under the cheese. Briefly broil for 1–2 minutes after assembly to set the sauce and dry the surface slightly before finishing under melting heat.
Melting Cheese: Timing and Types
Choose low-moisture mozzarella for even melting and minimal water release. Use fresh mozzarella sparingly because its higher moisture can make the crust soggy.
Combine 1–2 ounces low-moisture mozzarella per thigh with a light dusting of Parmigiano-Reggiano for flavor and browning. Layer cheese after sauce and return to a 350°F oven for 8–12 minutes, or until cheese is bubbly and edges brown.
For a browned top, finish 1–2 minutes under a high broiler while watching closely. Add a thin slice of provolone beneath mozzarella for extra melt and flavor, or sprinkle grated Parmigiano-Reggiano on top for a crisp finish.
Cheese Choices and Layering
Choose cheeses that balance moisture, melt, salt, and texture so the thighs stay juicy without turning soggy. Use a combination of cheeses to get a golden crust, a savory backbone, and a satisfying stretch.
Mozzarella: Fresh vs. Low-Moisture
Fresh mozzarella gives a creamy, delicate melt and a milky flavor, but it releases more water as it heats. If you use fresh balls, drain and pat slices dry, then press between paper towels for 10–15 minutes; that reduces pooling on top of sauced thighs.
Low-moisture mozzarella delivers a firmer, more reliable melt and better browning. It has less moisture and more stretch when shredded, so it crisps slightly under a broiler and preserves the breading beneath.
For best results, shred low-moisture yourself from a block rather than using pre-shredded blends that contain anti-caking agents. You can combine both: thin slices of drained fresh mozzarella for creaminess, topped with a light sprinkle of shredded low-moisture to encourage browning and the classic cheese pull.
Parmesan and Provolone Options
Grated Parmesan or Parmigiano-Reggiano adds sharp, nutty umami and helps crust the top layer. Use finely grated Parmigiano-Reggiano for flavor intensity; sprinkle a light, even layer before and after sauce to season through the bite and to create a golden crust.
Provolone brings a mild, slightly tangy background and melts smoothly without overpowering other flavors. Use thin slices or thinly shredded provolone between the mozzarella and sauce to add body and a silkier melt.
A suggested ratio: 60% mozzarella, 25% provolone, 15% finely grated Parmesan for balanced flavor and texture. Adjust salt carefully, since Parmesan is quite salty.
Crafting the Cheese Pull Effect
Place moisture-controlled mozzarella closest to the heat source and sprinkle low-moisture shreds on top to maximize the cheese pull. Start with a thin sauce layer on the thighs, then add drained fresh slices or low-moisture shreds directly on the chicken.
Finish with a sprinkle of provolone and a dusting of grated Parmesan. Bake at 375 to 400°F until the cheese melts and bubbles.
Broil for 1 to 2 minutes to brown the top. Let the dish rest 3 to 5 minutes before cutting so the cheese sets slightly and stays stretchy when you pull a piece.
Serving Suggestions and Side Dishes
Serve chicken-thigh Parmesan with sides that balance its rich, cheesy profile and crisp coating. Choose starches to soak up sauce and vegetables for contrast.
Best Pasta Pairings
Pair the dish with pastas that hold sauce and don’t overwhelm the chicken. Rigatoni, penne, or mafaldine trap tomato sauce in their ridges and folds.
For a lighter plate, choose spaghetti or angel hair. Toss the pasta with a drizzle of olive oil and a pinch of salt before plating so it doesn’t clump under the chicken.
Season pasta simply. Use 1 to 2 tablespoons of good-quality olive oil, 1 clove minced garlic, and 1 teaspoon of Italian herbs (oregano, basil, thyme) per 4 servings.
Finish with a tablespoon of grated Parmesan per serving and a few fresh basil leaves. Serve portions of 2 to 3 ounces (uncooked weight) pasta per person for a main course.
Toss the pasta with a ladle of warm tomato sauce before placing the chicken thighs on top to keep crusts crisp.
Garlic Bread and Roasted Vegetables
Garlic bread adds crunchy, buttery texture that soaks up sauce. Use a baguette or ciabatta, butter mixed with minced garlic, chopped parsley, and a sprinkle of Italian herbs.
Toast at 400°F for 6 to 8 minutes until golden. For a quicker option, broil sliced bread with olive oil and garlic for 2 to 3 minutes per side.
Roast vegetables provide balance and color. Toss broccoli florets, zucchini slices, or cherry tomatoes with olive oil, salt, pepper, and a pinch of Italian herbs.
Roast at 425°F for 12 to 18 minutes until edges brown and vegetables turn tender. Serve a generous 1 to 1½ cups of roasted vegetables per person.
Arrange vegetables to one side of the plate and place garlic bread diagonally across the bowl of sauce for contrasting textures.
Make-Ahead and Meal Prep Tips
Prepare components ahead to streamline weeknight dinners. Bread and season the chicken thighs, then refrigerate on a tray covered for up to 24 hours to firm the crust and shorten cooking time.
Make the tomato sauce 2 to 3 days in advance and reheat gently. For reheating, bake assembled chicken thighs at 350°F for 15 to 20 minutes covered.
Uncover and broil 1 to 2 minutes to re-crisp the coating. Keep pasta slightly undercooked when you first boil it so reheating won’t turn it mushy.
Store garlic bread in foil and reheat at 375°F for 8 to 10 minutes. Pack roasted vegetables separately and reheat briefly to preserve texture.
Dietary Variations and Common Mistakes
Choose the right starch substitute, keep the breading crisp, and verify internal temperature. Small prep steps like patting thighs dry and seasoning each coating layer help prevent failures.
Gluten-Free and Low-Carb Options
Make Chicken Parmesan with gluten-free flour and alternative crumbs to keep good texture. Use a cup of gluten-free flour (rice or chickpea work well) for dredging.
Press gluten-free panko or crushed pork rinds into the egg wash for crunch. For low-carb, swap breadcrumbs for a mixture of finely grated Parmesan cheese and almond flour.
The cheese browns and adds savory depth while the almond flour provides structure. Season every layer with salt, pepper, and Italian herbs so the final crust isn’t bland.
Bake on a wire rack or lightly oil the pan to crisp the coating when avoiding deep frying. Test one piece first to fine-tune time and doneness.
Avoiding Soggy Coatings
Excess moisture or heavy sauce applied before the crust sets usually causes sogginess. Pat thighs completely dry with paper towels before dredging.
After breading, rest the pieces on a wire rack for 10 to 15 minutes to let the coating adhere. When using sauce, spoon a thin layer in the baking dish.
Place the cooked or crisped thighs on top, then add a light amount of sauce and cheese. If you pile on sauce before the crust sets, the coating will absorb liquid and go limp.
Use panko breadcrumbs for a flakier, less absorbent crust and press the crumbs firmly so they bond during frying or baking.
Ensuring Safe Internal Temperature
Cook thighs to a safe internal temperature of 165°F (74°C). Insert a calibrated meat thermometer into the thickest part without touching bone for an accurate reading.
The higher fat content helps thighs stay juicy at 165°F. Avoid guessing by eye.
If you pan-fry first and finish in the oven, check the thermometer after the oven phase. Carryover heat can raise the temperature by a few degrees.
Remove thighs when the thermometer reads 160–162°F if you expect a brief rest. Clean and recalibrate your thermometer periodically to ensure food safety and consistent results.


