
What Are Chicken Thighs Supposed to Look Like: Guide to Identifying, Cooking, and Choosing Perfect Thighs
You’ll recognize a chicken thigh by its compact, slightly pear-shaped profile and richer color compared with breast meat.
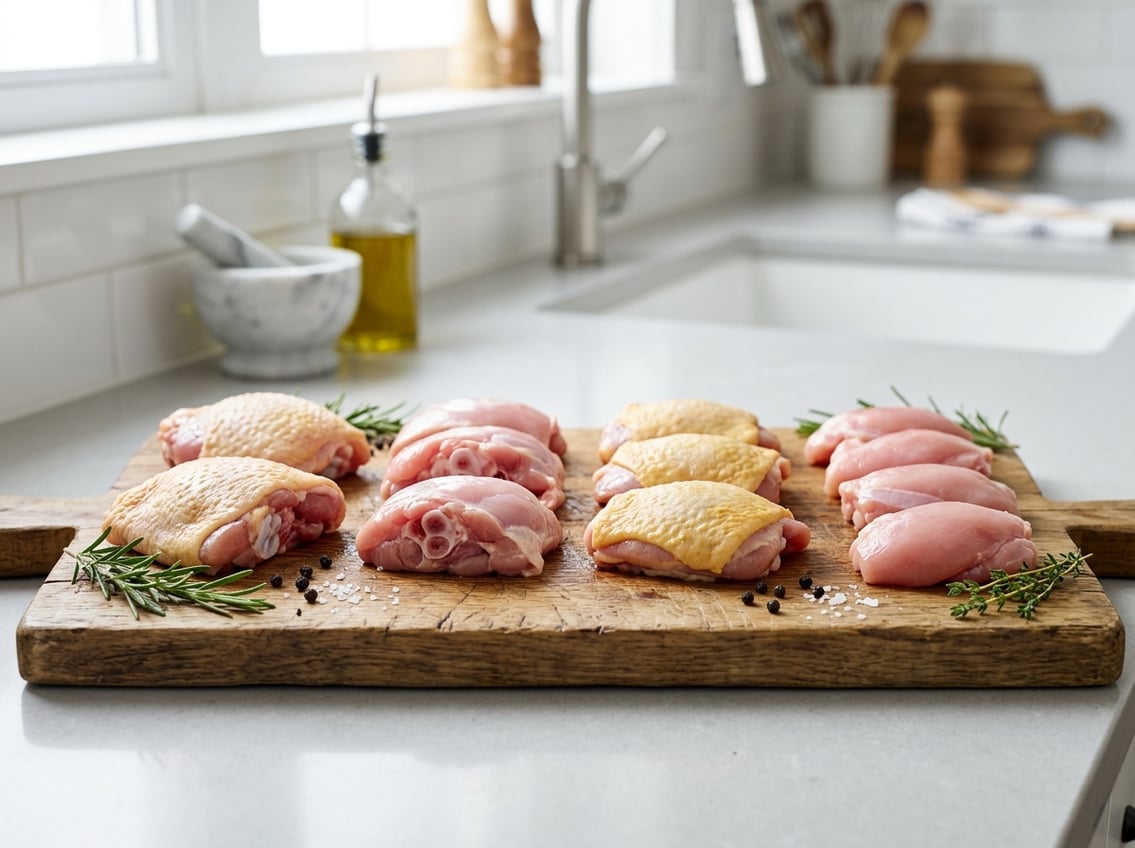
Raw thighs look pinker to deep red-pink and show more marbling from fat and connective tissue.
These features indicate you’re working with dark meat that stays juicy through many cooking methods.

When you cook thighs, they turn opaque and feel tender, not rubbery.
Skin-on pieces brown to a golden or deep amber, and boneless cuts stay plump while bone-in may pull slightly away from the bone.
The clearest sign a thigh is done is an internal temperature of 165°F (74°C) with clear juices and meat that flakes easily under gentle pressure.
You can spot differences between bone-in and boneless, skin-on and skinless, and see how grilling, roasting, or braising changes appearance and texture.
Distinguishing Raw Chicken Thighs

You can recognize thighs by their darker color, visible fat marbling, and either a rounded bone end or a compact, flattened shape.
Pay attention to surface feel and smell to judge freshness and choose the right type for your recipe.
Color and Texture Characteristics
Raw chicken thighs range from pale pink to a deeper red-pink because they are dark meat with higher myoglobin than breast.
The flesh shows fine grain and more marbling of fat, which appears as thin white streaks or pockets that help keep the meat juicy during cooking.
Skin-on thighs have a slightly dimpled, elastic skin layer that can be cream to light yellow depending on feed.
Skinless thighs reveal connective tissue near the bone and feel firmer at the joint.
Fresh thighs should feel moist and spring back when pressed, not sticky or slimy.
Shape and Size Differences
Bone-in chicken thighs keep the femur, producing an irregular, pear-shaped piece with a rounded or poking bone end.
You can feel the bone through the meat and notice denser areas around it.
These pieces often vary more in size and thickness.
Boneless chicken thighs appear compact, flattened, and more uniform for predictable cooking times.
Boneless skin-on thigh pieces keep the skin’s bulk but lack the internal bone shape.
Retail packs usually list weights; expect 3–6 ounces per thigh but sizes vary by bird and cut.
Signs of Freshness and Spoilage
Fresh raw chicken thigh looks evenly colored (pink to red-pink) with no gray or green tints.
It smells neutral or very faintly chicken-like; avoid any sour, sulfur, or ammonia odors.
The surface should be moist, not slimy; sliminess signals bacterial growth or spoilage.
Check packaging for excess liquid, torn film, or swelling.
Those indicate poor handling or age.
For safety, refrigerate thighs immediately and use within 1–2 days, or freeze for 4–6 months.
Discard any thigh with off-odor, stickiness, or unusual discoloration.
Bone-In vs. Boneless and Skin-On vs. Skinless Thighs
You’ll choose between cuts that change cooking time, flavor, and handling.
Know how to spot bone-in versus boneless pieces and how the presence or absence of skin affects texture and fat content.
Identifying Bone-In and Boneless Cuts
Look for the straight or curved bone running through a raw chicken thigh to identify a bone-in chicken thigh.
The bone creates an irregular shape and adds weight; bone-in chicken thighs often appear thicker at one end where the joint sits.
Boneless chicken thighs are flatter, more uniform, and usually have a smooth contour because the bone and cartilage have been removed.
When you press a bone-in cut, you may feel resistance where the bone lies.
A boneless chicken thigh yields more evenly to touch.
Packaging often labels “bone-in” or “boneless,” but visual checks matter when pieces are loose in a tray.
For recipes that need quick, even cooking such as stir-fries or diced additions, choose boneless chicken thighs.
For braising, roasting, or grilling when you want deeper flavor, pick bone-in chicken thigh.
Recognizing Skin-On and Skinless Varieties
Skin-on thighs show a pale, slightly textured layer of skin covering the meat.
It may have some visible fat and a thin membrane.
When raw, the skin looks glossy and slightly loose over the flesh.
After cooking it crisps and browns, protecting the meat from drying out.
Skinless thighs reveal more of the pink-red muscle and marbling and often show trimmed fat where the skin was removed.
Skin contains most of the saturated fat, so skinless chicken thighs have roughly 20–30% less fat per piece depending on trimming.
For recipes that benefit from a crispy exterior or added richness, such as roasting or grilling, pick skin-on chicken thighs.
For leaner dishes, braises where skin becomes soggy, or when you want faster, cleaner prep, choose boneless, skinless chicken thighs.
Visual Cues for Doneness When Cooking
Look for golden-brown skin, opaque flesh, and clear juices as primary signs of safety and proper cooking.
Use a thermometer to confirm doneness when visual cues conflict.
How Cooked Chicken Thighs Should Look
Cooked chicken thighs should show a golden to deep-amber skin when skin-on.
That color indicates rendered fat and surface browning.
The meat itself becomes opaque and shifts from pink to off-white or light tan away from the bone.
For bone-in dark meat chicken, a faint pink tinge near the bone can persist even at safe temperatures.
That pink does not automatically mean undercooked.
Rely on temperature and how the meat separates from the bone.
Avoid glassy or translucent spots in the thickest area; those signal undercooking.
If thighs are overcooked, the flesh looks stringy and dry, and the surface may feel tight.
Use an instant-read meat thermometer in the thickest part (not touching bone) and target at least 165°F (74°C).
Juices, Texture, and Tenderness Clues
When you pierce the thickest part of the thigh, juices should run clear.
Pink or bloody juices mean you need more time on the heat.
For bone-in pieces, check near the bone as heat takes longer to penetrate there.
Texture gives quick feedback.
Properly cooked thighs feel firm but springy and pull apart easily with a fork.
Undercooked thigh meat feels soft and resists flaking.
Overcooked thighs become dry and stringy because collagen and fat have fully rendered out.
Combine cues: clear juices, fork-tender meat, and a consistent 165°F reading confirm doneness.
If any cue conflicts, trust the meat thermometer and continue cooking until temperature and texture align.
Safe Cooking Temperatures and Tools
Aim for temperatures that ensure both safety and the texture you want.
Use a reliable thermometer and learn the visible signs that indicate whether thighs are safely cooked, underdone, or overcooked.
Using a Meat Thermometer Effectively
Use an instant-read digital meat thermometer for fast, accurate readings.
Insert the probe into the thickest part of the thigh, avoiding bone.
Touching bone reads hot and gives a false high.
Hold the probe at least ¼ inch from bone and center it in the meat for a true internal temperature.
Target 165°F (74°C) for immediate food-safety compliance.
If you prefer fork-tender dark meat, you can cook thighs to 175–195°F, where connective tissue breaks down and meat becomes more tender.
If you cook lower than 165°F, you must hold at that lower temp long enough to pasteurize.
This requires specific time/temperature tables, so use a trusted source.
Check multiple spots on larger pieces or a whole bird.
Clean and sanitize the probe after each use to avoid cross-contamination.
Calibrate your thermometer periodically according to the manufacturer’s instructions.
Recognizing Safe and Overcooked Signs
Safe cooked thighs reach the correct temperature and show clear juices when pierced in the thickest spot.
Juices should run clear or slightly pinkish only if the temp reaches pasteurization conditions.
Rely on your thermometer, not color alone.
Overcooked chicken thighs feel dry, stringy, and may shred rather than flake.
The skin will be tough and the meat fibrous.
Visual cues include very pale meat with little sheen and tight muscle fibers.
Texture matters more than color.
Tender, moist thighs will resist a fork slightly and pull apart in moist strands.
If you see gelatinous, glossy meat that shreds easily and the thermometer reads 190–195°F, you’ve reached the tender-breakdown zone.
Beyond about 210°F the meat can become stringy and lose flavor.
Appearance Changes Across Cooking Methods
Different cooking methods change color, texture, and surface finish in predictable ways.
Pay attention to skin color, interior opacity, and the juices to judge doneness and intended texture.
Baking and Roasting Results
When you bake or roast thighs at 375–425°F, the skin turns golden to deep brown as fat renders and browning occurs.
If you roast on a rack the skin crisps more.
If you bake covered or in a sauce the skin will be softer and paler.
Interior meat becomes opaque and slightly darker than breast meat.
The flesh near the bone can stay a bit pink but should reach 165°F (75°C).
Use an instant-read thermometer inserted into the thickest part, avoiding the bone.
Look for clear juices when pierced and slight shrinkage without stringiness.
If the skin or surface looks dry and fibrous, you likely overcooked the thighs.
Finish under a broiler for 1–3 minutes to deepen color without drying the interior.
Grilling and Searing Visuals
Grilling and high-heat searing produce rapid browning, pronounced grill marks, and a textured crust from caramelization.
Expect dark brown to charred edges on high-heat contact points.
Controlled charring adds flavor, but large blackened areas signal overcooking.
The interior should remain juicy.
Grilled thighs often reach the target temperature faster at the exterior than near the bone, so move pieces to indirect heat if the outside is done but the center is not.
Searing in an oven-safe skillet gives a uniform, deeply browned skin and glossy pan juices.
Baste or glaze near the end to create a shiny, sticky finish without burning sugars.
Cooking From Frozen: What to Expect
If you cook thighs from frozen, surface color develops more slowly and moisture release increases.
Expect paler skin and more steam during the first part of cooking.
Start at a moderate oven temperature (about 350°F) to allow the interior to thaw and heat evenly.
Then raise heat or broil briefly to brown the exterior.
Frozen-to-cooked thighs can show residual pinkness near the bone despite reaching 165°F, especially if previously brined.
Always verify temperature in the thickest section.
Cut tests will show opaque, flaky meat and clear juices when done.
If juices are pink, continue cooking.
Drumstick vs. Thigh
You can tell a drumstick from a chicken thigh at a glance by shape and placement. The drumstick forms the lower leg piece, tapering to a rounded end and surrounding a single long bone you can see and feel.
A bone-in chicken thigh sits above the knee joint. It appears wider and flatter with a shorter, thicker bone.
Look for differences in meat and texture when choosing cuts. Thighs contain more visible fat and connective tissue, which keeps them juicier during cooking.
Drumsticks feel slightly firmer and leaner. They hold their shape better when roasted or grilled.
Check visual cues to assess freshness and quality. Skin should remain smooth and intact on both cuts; avoid tears, discoloration, or an off smell.
For bone-in chicken thigh pieces, make sure the bone looks clean. The joint area should not be discolored or dried out.
Think about how you’ll cook and serve them. If you want easy handheld pieces, drumsticks work well.
If you need meat that shreds or stays moist in a sauce, choose bone-in chicken thighs.


