
One-Pan Wonders: Mastering Salmon Orzo, Stovetop Chicken, and 20-Minute Stir-Fries for Busy Weeknights
Last updated: June 8, 2026
Quick Answer
One-Pan Wonders: Mastering Salmon Orzo, Stovetop Chicken, and 20-Minute Stir-Fries for Busy Weeknights delivers complete, flavorful dinners in 30 minutes or less using just one cooking vessel. These techniques combine protein and sides in a single pan, reducing prep time, cleanup, and stress while maintaining restaurant-quality results. The key is understanding proper sequencing, temperature control, and choosing ingredients that cook at similar rates.
Key Takeaways
- One-pan meals cook protein and sides together in a single skillet, wok, or pan, cutting cleanup time by 60-70% compared to traditional multi-pot dinners
- Salmon orzo cooks in 20-25 minutes when you add orzo directly to the pan with liquid, allowing it to absorb flavors while the salmon finishes
- Stovetop chicken reaches safe internal temperature (165°F) in 12-15 minutes for medium-thickness breasts when properly seared and covered
- Best pans for one-pan cooking include 12-inch stainless steel skillets, cast iron pans, and carbon steel woks, though nonstick works for delicate proteins
- Stir-fries succeed with high heat and quick-cooking vegetables like bell peppers, snap peas, and broccoli florets that soften in 5-7 minutes
- Common mistakes include overcrowding the pan and adding all ingredients simultaneously, which causes steaming instead of proper browning
- Meal prep works best with stir-fries and chicken dishes that reheat well, while salmon orzo is ideal for fresh cooking to maintain texture
- Picky eaters can customize portions by keeping components separate until the final few minutes of cooking
What Is a One-Pan Meal and Why Is It Easier for Weeknights?
A one-pan meal cooks the entire dinner—protein, starch, and vegetables—in a single cooking vessel from start to finish. This approach saves time because you’re building flavors sequentially in one place rather than juggling multiple pots, and cleanup involves washing just one pan instead of three or four.
The efficiency comes from strategic layering. You start with ingredients that need the longest cooking time or highest heat (like searing chicken), then add quicker-cooking components (vegetables, grains) that benefit from the fond and rendered fats already in the pan. This creates deeper, more complex flavors than cooking everything separately.
Why busy weeknights benefit most:
- Total active cooking time drops to 20-30 minutes
- No need to time multiple burners or coordinate finishing times
- Fewer dishes mean you can start eating 15-20 minutes sooner
- Less mental load when you’re already tired from work
- Easier to scale up for families or down for singles
Choose one-pan meals when you want real food without the production. They work particularly well Monday through Thursday when time and energy are limited but you still want something better than takeout.
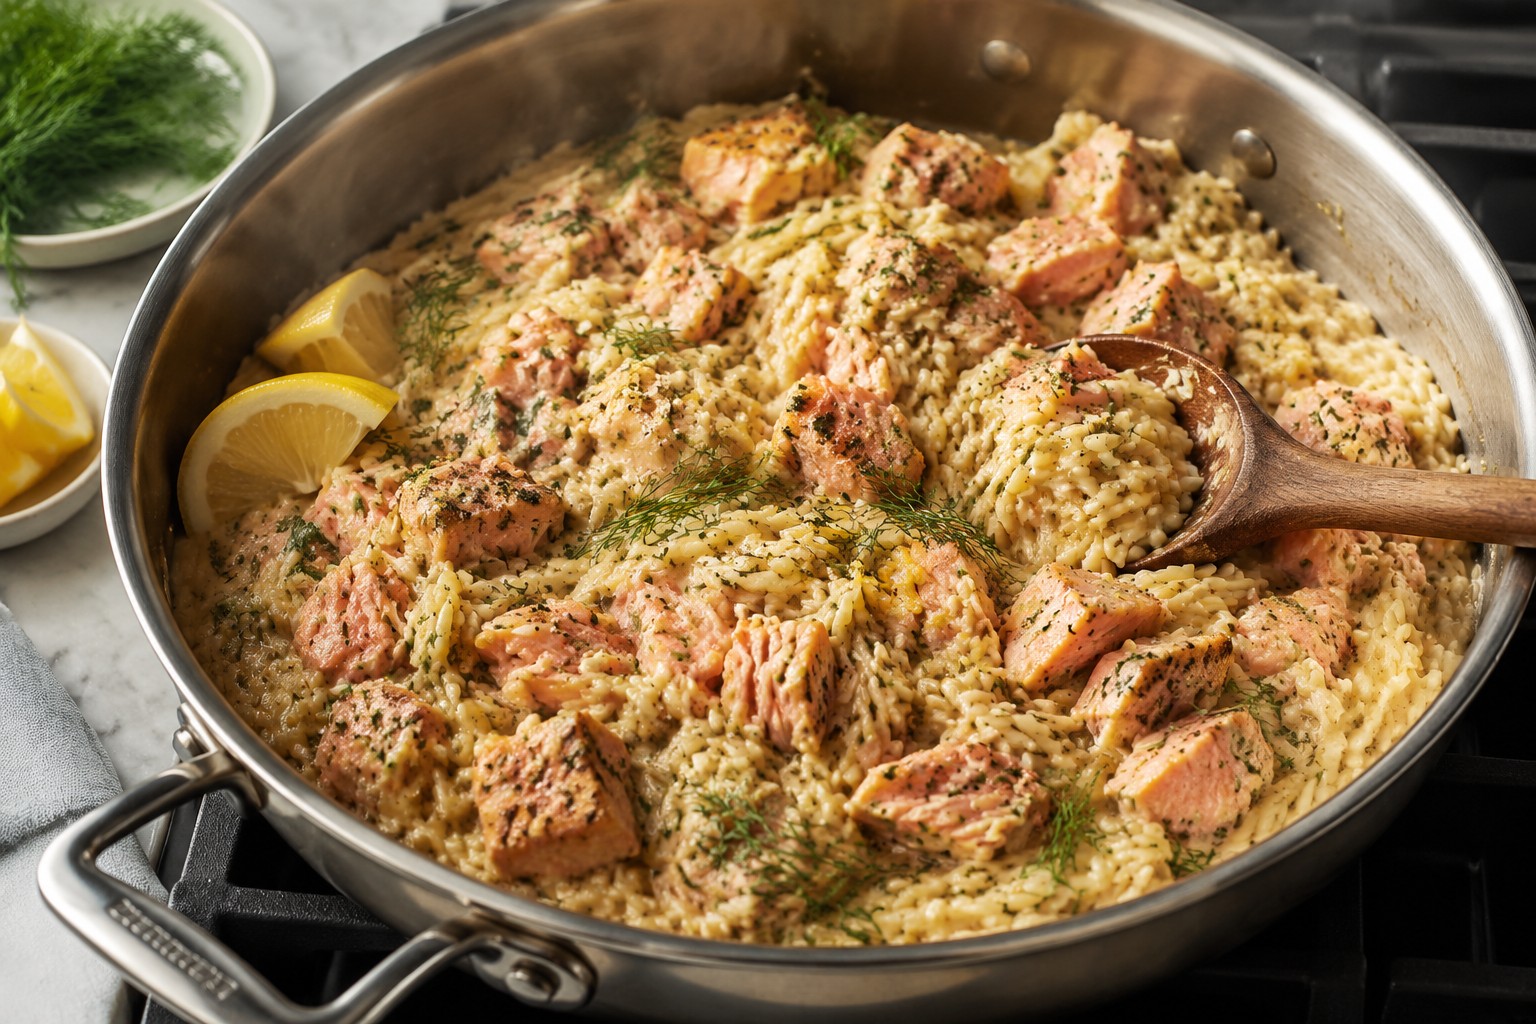
How to Make Salmon Orzo in One Pan Without It Sticking
Cook salmon orzo by searing the salmon first in a hot pan with oil, removing it temporarily, then cooking the orzo in broth directly in the same pan before nestling the salmon back in to finish. The key is using enough liquid (about 2.5 cups broth per cup of orzo) and stirring occasionally to prevent the pasta from clumping or sticking to the bottom.
Step-by-step technique:
- Sear salmon skin-side down in 2 tablespoons olive oil over medium-high heat for 4-5 minutes until crispy
- Flip and cook 2 more minutes, then remove to a plate
- Add aromatics (garlic, shallots) to the same pan and cook 1 minute
- Pour in orzo and liquid (chicken or vegetable broth), scraping up any brown bits
- Simmer uncovered for 8-10 minutes, stirring every 2-3 minutes
- Return salmon to the pan, nestling it into the orzo
- Cover and cook 3-4 more minutes until salmon reaches 125°F internal temperature
Common mistake: Adding too little liquid causes the orzo to stick and burn before it’s tender. Orzo needs more liquid than you’d think—it should look almost soupy at first. The pasta will absorb most of it as it cooks, leaving you with a creamy, risotto-like consistency.
For best results, use a stainless steel or enameled cast iron pan rather than nonstick. The fond (browned bits) from searing the salmon adds significant flavor to the orzo, and you need some sticking to create that fond.
Best Type of Pan to Use for One-Pan Dinners
A 12-inch stainless steel skillet with a lid is the most versatile choice for one-pan dinners because it handles high heat, develops flavorful fond, and provides enough surface area to cook for 3-4 people without overcrowding. Cast iron and carbon steel woks are excellent alternatives depending on the specific dish.
Pan comparison by dish type:
| Pan Type | Best For | Why It Works | Drawback |
|---|---|---|---|
| 12″ Stainless Steel Skillet | Salmon orzo, stovetop chicken | Even heat, develops fond, oven-safe | Requires more oil, learning curve |
| Cast Iron Skillet | Chicken with vegetables, seared proteins | Superior heat retention, natural nonstick when seasoned | Heavy, slower temperature changes |
| Carbon Steel Wok | Stir-fries, high-heat cooking | Rapid heating, large capacity, easy tossing | Less ideal for braising or simmering |
| Nonstick Skillet | Delicate fish, sticky sauces | Easy cleanup, minimal oil needed | Can’t develop fond, lower heat tolerance |
Choose stainless steel if you’re making dishes with pan sauces or braised components where you want to deglaze and build layers of flavor. The slight sticking actually helps create better taste.
Choose cast iron if you’re cooking bone-in chicken or dishes that benefit from going from stovetop to oven. The heat retention means proteins stay hot while vegetables finish cooking.
Choose a wok if you’re primarily making stir-fries and need the high, sloped sides for tossing ingredients without spilling. The shape concentrates heat at the bottom for proper searing.
For more guidance on keeping chicken moist during stovetop cooking, check out our guide on the best way to cook chicken breast to keep it tender.
Salmon Orzo vs Sheet Pan Salmon: Which Is Faster?
Salmon orzo in a skillet is typically faster by 5-10 minutes because you’re cooking everything on the stovetop at once, taking about 20-25 minutes total. Sheet pan salmon requires preheating the oven to 400-425°F (which takes 10-15 minutes), then baking for 12-15 minutes, bringing total time to 30-35 minutes including prep.
Time breakdown comparison:
Salmon Orzo (Stovetop):
- Prep: 5 minutes
- Searing salmon: 6 minutes
- Cooking orzo with salmon: 12 minutes
- Total: 23 minutes
Sheet Pan Salmon:
- Prep: 5 minutes
- Oven preheat: 12 minutes
- Baking time: 15 minutes
- Total: 32 minutes
The stovetop method also gives you more control. You can adjust heat instantly if the orzo is cooking too fast or the salmon needs more time. With sheet pan cooking, you’re committed once it goes in the oven.
Choose sheet pan salmon when you’re cooking for more than 4 people or want truly hands-off cooking where you can walk away. The oven provides more even, gentle heat that’s harder to overcook.
Choose salmon orzo when you’re cooking for 2-4 people on a tight timeline and want a complete meal with built-in starch. The stovetop method also creates a creamier, more cohesive dish since the orzo absorbs the salmon’s flavors.
Can You Cook Chicken and Vegetables Together in One Pan Safely?
Yes, you can safely cook chicken and vegetables together in one pan as long as the chicken reaches 165°F internal temperature and you avoid cross-contamination by not letting raw chicken juices touch vegetables that won’t be cooked. The safest approach is to sear the chicken first, then add vegetables that will cook in the rendered fat and pan juices.
Safe cooking sequence:
- Pat chicken dry and season both sides
- Sear chicken in hot oil for 5-6 minutes per side until golden
- Check temperature with an instant-read thermometer (should read 165°F at the thickest part)
- Remove chicken to a clean plate
- Add vegetables to the same pan with any rendered fat
- Cook vegetables 5-7 minutes until tender
- Return chicken to warm through, or slice and serve on top
Food safety rules:
- Never place cooked chicken back on the same plate that held raw chicken
- Ensure chicken reaches 165°F throughout, not just on the surface
- If adding vegetables before chicken is fully cooked, make sure they’ll cook long enough to reach safe temperatures (165°F) too
- Use separate cutting boards for raw chicken and vegetables during prep
Common mistake: Adding delicate vegetables like spinach or cherry tomatoes at the same time as raw chicken. These vegetables cook in 2-3 minutes and will be mushy by the time the chicken is safe to eat. Add them in the last few minutes instead.
For detailed techniques on keeping chicken moist during stovetop cooking, see our article on how to cook chicken breast without drying it out.
How Long Does Stovetop Chicken Actually Take to Cook Through?
Stovetop chicken breasts take 12-15 minutes total to cook through to 165°F when using medium-thickness pieces (6-8 ounces each) and the proper sear-and-steam method. Thicker breasts or bone-in pieces can take 18-22 minutes, while thin cutlets cook in just 8-10 minutes.
Timing by thickness:
- Thin cutlets (1/2 inch): 4-5 minutes per side = 8-10 minutes total
- Medium breasts (3/4 inch): 6-7 minutes per side = 12-15 minutes total
- Thick breasts (1+ inch): 8-10 minutes per side = 18-20 minutes total
- Bone-in, skin-on: 10-12 minutes per side = 22-25 minutes total
The sear-and-steam method for perfect timing:
- Heat 2 tablespoons oil in a skillet over medium-high heat
- Add chicken and cook undisturbed for 6 minutes (don’t flip early)
- Flip chicken and reduce heat to medium
- Add 1/4 cup liquid (broth, wine, or water) and cover immediately
- Cook covered for 6-8 more minutes
- Check temperature—should read 165°F at the thickest part
The covering step is crucial. It traps steam that cooks the chicken from all sides, not just the bottom, which speeds up cooking and keeps the meat moist. Without the lid, you’ll need 3-5 extra minutes and risk drying out the exterior.
Visual doneness cues (use thermometer to confirm):
- Juices run clear when pierced
- Meat is firm but springs back when pressed
- No pink color at the center when sliced
For more details on proper cooking times, visit our guide on how long it takes to cook chicken breast in a pan.
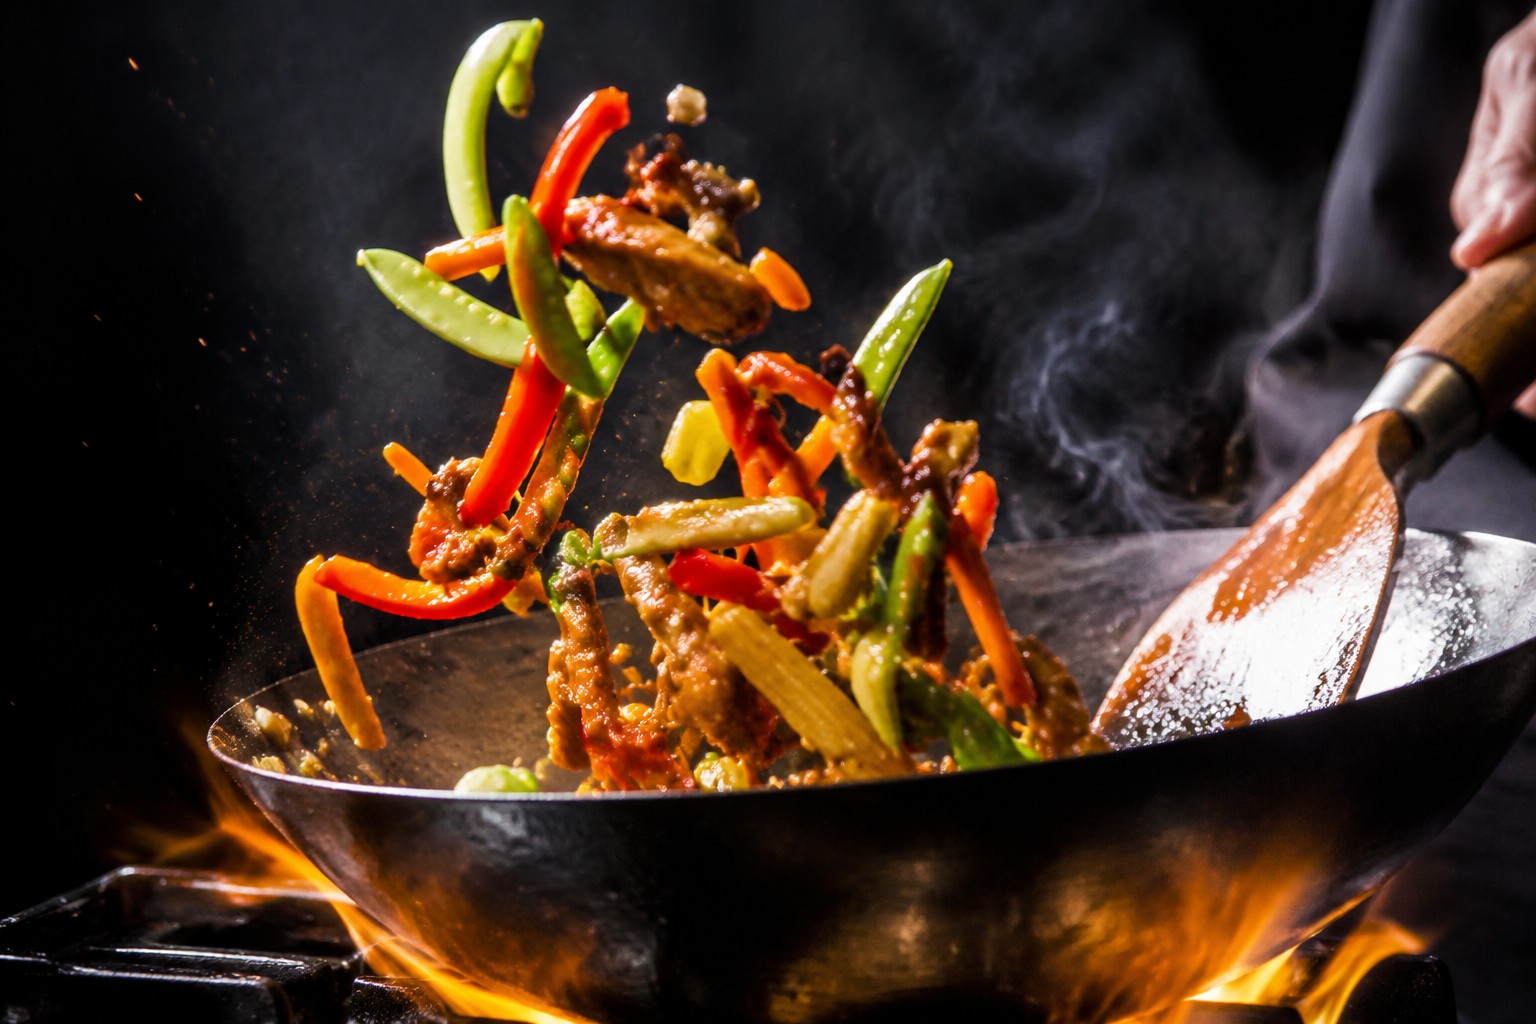
What Vegetables Work Best in 20-Minute Stir-Fries?
The best vegetables for 20-minute stir-fries are quick-cooking options that soften in 5-7 minutes over high heat while maintaining some crunch: bell peppers, snap peas, broccoli florets, carrots (thinly sliced), mushrooms, zucchini, and baby corn. These vegetables have similar cooking times and won’t turn mushy before your protein is done.
Vegetable timing guide for stir-fries:
Quick-cooking (3-4 minutes):
- Snap peas
- Snow peas
- Spinach
- Bean sprouts
- Leafy greens
Medium-cooking (5-7 minutes):
- Bell peppers (any color)
- Broccoli florets
- Mushrooms (sliced)
- Zucchini (half-moons)
- Asparagus (cut into 2-inch pieces)
Longer-cooking (8-10 minutes, add first):
- Carrots (thin slices or matchsticks)
- Cauliflower florets
- Green beans
- Baby corn
Stir-fry sequencing strategy:
- Cook protein first (chicken, beef, shrimp) and remove from wok
- Add longest-cooking vegetables (carrots, cauliflower) with a splash of water
- After 3-4 minutes, add medium vegetables (peppers, broccoli)
- In final 2 minutes, add quick vegetables (snap peas, greens)
- Return protein and toss with sauce
Common mistake: Cutting vegetables too large or unevenly. A 1-inch broccoli floret cooks in 5 minutes; a 2-inch floret needs 10 minutes and will still be raw in the center. Keep pieces small (1/2 to 1 inch) and uniform for even cooking.
Avoid watery vegetables like tomatoes or pre-cooked items like canned water chestnuts until the very end. They release moisture that kills the high heat you need for proper stir-frying.
Do One-Pan Meals Work If You Don’t Have Nonstick Cookware?
One-pan meals work excellently without nonstick cookware—in fact, stainless steel and cast iron often produce better results because they develop fond (browned bits) that add significant flavor to sauces and grains. The key is using enough fat, preheating the pan properly, and not moving food too early.
How to prevent sticking in non-nonstick pans:
For stainless steel:
- Preheat the pan for 2-3 minutes over medium heat
- Add oil and wait until it shimmers (but doesn’t smoke)
- Test readiness by dropping in a small piece of food—it should sizzle immediately
- Don’t move protein for the first 4-5 minutes; it will release naturally when a crust forms
For cast iron:
- Ensure the pan is well-seasoned before cooking
- Use 1-2 tablespoons more fat than you would in nonstick
- Heat gradually—cast iron takes longer to heat but retains it better
- Let proteins develop a crust before attempting to flip
For carbon steel woks:
- Heat until a drop of water evaporates in 1-2 seconds
- Add oil and swirl to coat the entire surface
- Keep food moving constantly during stir-frying
- Use a metal spatula to scrape up any stuck bits
What actually sticks and why:
- Proteins stick most when the pan isn’t hot enough or you flip too early. The meat will naturally release once a proper sear forms.
- Starches like orzo stick if there’s insufficient liquid or you don’t stir occasionally. Add extra broth and scrape the bottom every few minutes.
- Vegetables rarely stick unless the pan is too hot and they burn, or there’s no fat in the pan.
The fond that develops in non-nonstick pans is actually desirable. When you deglaze with wine, broth, or water, those browned bits dissolve and create rich, complex sauces that nonstick pans can’t achieve.
Is Orzo Supposed to Be Cooked Separately or With the Salmon?
Orzo should be cooked directly in the pan with the salmon for one-pan meals, not separately. This method allows the pasta to absorb the salmon’s flavors, rendered fats, and any aromatics in the pan, creating a cohesive, risotto-like dish. Cooking orzo separately results in a cleaner but less flavorful outcome that defeats the purpose of one-pan cooking.
Why cooking orzo in the pan works better:
- Orzo absorbs fish oils and seasonings, becoming more flavorful than plain boiled pasta
- The starch released by orzo creates a naturally creamy sauce without adding cream
- You save 10-15 minutes by eliminating a second pot and the need to drain pasta
- The dish stays warmer longer because everything finishes at the same time
The proper technique:
- Sear salmon and remove from pan
- Add 1 cup dry orzo to the same pan
- Toast orzo for 1-2 minutes, stirring constantly
- Add 2.5 cups hot broth (chicken or vegetable)
- Simmer uncovered for 8-10 minutes, stirring every 2-3 minutes
- Nestle salmon back in during the last 3-4 minutes
- The orzo should be tender and most liquid absorbed
Liquid ratio is critical: Orzo needs about 2.5 times its volume in liquid when cooked this way (more than package directions suggest for boiling). If the liquid evaporates before the orzo is tender, add 1/4 cup more broth or water and continue cooking.
When to cook orzo separately: If you’re meal prepping or making the dish ahead, cook orzo separately to prevent it from becoming mushy when reheated. Combine just before serving.
Common Mistakes When Making One-Pan Chicken Dinners
The most common mistakes in one-pan chicken dinners are overcrowding the pan (which causes steaming instead of browning), adding all ingredients at once (leading to overcooked vegetables or undercooked chicken), and using chicken breasts of uneven thickness (resulting in dry edges and raw centers).
Top 5 mistakes and fixes:
1. Overcrowding the pan
- Problem: Chicken releases moisture that can’t evaporate, so it steams instead of sears
- Fix: Leave 1-2 inches between pieces; cook in batches if needed for more than 4 pieces
2. Not pounding chicken to even thickness
- Problem: Thin ends overcook and dry out before thick centers reach 165°F
- Fix: Pound breasts to uniform 3/4-inch thickness, or butterfly thick pieces
3. Adding vegetables too early
- Problem: Vegetables turn mushy while waiting for chicken to cook through
- Fix: Add hearty vegetables (potatoes, carrots) with 10 minutes left; delicate ones (spinach, tomatoes) in the final 2-3 minutes
4. Using too low heat
- Problem: Chicken doesn’t develop a flavorful crust and takes longer to cook
- Fix: Start with medium-high heat for searing, then reduce to medium once you add liquid and cover
5. Skipping the rest period
- Problem: Juices run out when you cut immediately, leaving dry chicken
- Fix: Let chicken rest 5 minutes after cooking before slicing
Temperature check locations matter: Always check the thickest part of the breast, not near the edges. If cooking multiple pieces, check each one—they may finish at different times depending on size.
For comprehensive tips on keeping chicken moist, read our article on the best way to cook chicken breasts to keep them moist and tender.
Are One-Pan Meals Good for Meal Prep or Just Fresh Cooking?
One-pan meals work well for meal prep, but success depends on the specific dish. Stovetop chicken with vegetables and stir-fries reheat excellently and often taste better the next day as flavors meld. Salmon orzo is best eaten fresh because reheating can overcook the fish and make the pasta mushy.
Best one-pan meals for meal prep:
Excellent reheaters:
- Chicken with root vegetables (potatoes, carrots, parsnips)
- Beef or pork stir-fries with hearty vegetables
- Sausage with peppers and onions
- Chicken thighs with beans or lentils
Moderate reheaters (consume within 2 days):
- Chicken breast with quick-cooking vegetables
- Shrimp stir-fries (shrimp can get rubbery)
- Dishes with leafy greens
Poor reheaters (best fresh):
- Salmon orzo or any fish with pasta
- Dishes with delicate fish like tilapia or sole
- Meals with crispy elements that will soften
Meal prep strategy for one-pan dinners:
- Cook proteins slightly under (160°F for chicken instead of 165°F) since they’ll continue cooking when reheated
- Store components separately if possible—keep sauce separate from proteins and vegetables to prevent sogginess
- Undercook vegetables by 1-2 minutes so they don’t turn mushy when reheated
- Reheat gently using medium-low heat on the stovetop or 50% power in the microwave
- Add fresh elements when serving—a squeeze of lemon, fresh herbs, or a drizzle of olive oil brightens reheated meals
Storage times:
- Chicken-based one-pan meals: 3-4 days refrigerated
- Beef or pork: 3-4 days refrigerated
- Fish-based: 1-2 days maximum
- Vegetarian: 4-5 days refrigerated
Freeze portions in individual containers for up to 3 months. Thaw overnight in the refrigerator and reheat thoroughly to 165°F.
What to Do If Salmon Orzo Turns Out Too Dry or Mushy
If salmon orzo is too dry, immediately stir in 1/4 to 1/2 cup hot broth, white wine, or pasta water along with a tablespoon of butter or olive oil, then cover and let it sit for 2-3 minutes to absorb. If it’s too mushy, spread it on a sheet pan and place under the broiler for 3-4 minutes to evaporate excess moisture and create some texture.
Fixing dry salmon orzo:
- Add liquid gradually: Start with 1/4 cup hot broth, stir gently, wait 2 minutes
- Add fat: Stir in 1-2 tablespoons butter, olive oil, or cream for richness
- Cover and steam: Let the pan sit covered off heat for 3-5 minutes
- Taste and adjust: Add more liquid if needed, plus salt and lemon juice to brighten
Why it happened: Too little cooking liquid initially, or the heat was too high and evaporated liquid too quickly before the orzo absorbed it.
Fixing mushy salmon orzo:
- Drain excess liquid if there’s visible pooling
- Spread on a sheet pan in a thin layer
- Broil 3-4 minutes to evaporate moisture and crisp the top slightly
- Stir in fresh elements: Add crispy breadcrumbs, toasted pine nuts, or fresh herbs for textural contrast
Why it happened: Too much liquid, or the orzo cooked too long. Orzo should be al dente (tender but with slight bite), not soft and falling apart.
Prevention tips:
- Measure liquid carefully: 2.5 cups per 1 cup dry orzo
- Set a timer for 8 minutes and check doneness—don’t just cook until liquid disappears
- Stir every 2-3 minutes to prevent sticking but not constantly (which releases too much starch)
- Remove from heat when orzo is slightly firmer than desired; it will continue cooking in residual heat
The texture should resemble risotto—creamy and slightly loose, not dry and clumpy or soupy and swimming in liquid.
Can Picky Eaters Customize One-Pan Dinners Easily?
Yes, picky eaters can customize one-pan dinners by keeping components separate until the final few minutes of cooking, or by dividing the pan into sections with different ingredients. The key is building the base flavor (protein and aromatics) first, then adding customizable elements that each person can include or skip.
Customization strategies:
The “build your own” approach:
- Cook protein (chicken, salmon) fully and set aside
- Prepare 2-3 vegetable options separately in the same pan
- Make a neutral base (plain orzo, rice, or noodles)
- Let each person assemble their plate with preferred components
- Offer sauce on the side rather than mixed in
The “divided pan” method:
- Use a large 14-inch skillet and create sections with aluminum foil dividers
- Cook different vegetables in each section
- Place protein in the center where everyone can access it
- Remove dividers before serving, or let people serve from their preferred section
Common picky eater modifications:
For kids who don’t like mixed foods:
- Keep sauce separate and offer for dipping
- Cook vegetables on the side of the pan, not touching the protein
- Use plain seasonings (salt, pepper) instead of complex spice blends
For adults with texture preferences:
- Offer both soft-cooked and crisp-tender vegetables
- Keep crunchy toppings (nuts, seeds, crispy onions) separate to add at the table
- Provide both creamy and acidic finishing options (sour cream vs. lemon wedges)
For dietary restrictions:
- Cook protein in sections—half with marinade, half plain
- Use separate utensils to avoid cross-contamination of allergens
- Prepare a small portion with substitutions (tofu instead of chicken, gluten-free pasta)
Time-saving tip: Most customization happens in the last 5 minutes of cooking. Build the base that everyone will eat, then divide and customize at the end rather than making completely separate meals.
How Much Cleanup Is There Really With One-Pan Cooking?
One-pan cooking typically requires washing just one pan, one cutting board, one knife, and a few prep bowls—about 5-7 items total compared to 12-15 items for traditional multi-pot dinners. Total cleanup time averages 5-8 minutes, and you can often start washing prep items while the meal cooks, leaving only the pan for after dinner.
Realistic cleanup breakdown:
Items to wash:
- 1 large skillet or wok
- 1 cutting board
- 1 chef’s knife
- 2-3 prep bowls (for measured ingredients)
- 1 spatula or wooden spoon
- 1 measuring cup
- Optional: 1 plate (if you removed protein temporarily)
Time comparison:
| Cooking Method | Items to Wash | Cleanup Time |
|---|---|---|
| One-pan dinner | 5-7 items | 5-8 minutes |
| Traditional dinner (separate protein, starch, vegetable) | 12-15 items | 15-20 minutes |
| Sheet pan dinner | 3-5 items | 3-5 minutes |
Cleanup tips to minimize effort:
- Prep while cooking: Wash cutting boards and knives while the pan simmers
- Deglaze the pan: Add liquid to dissolve stuck-on bits while still hot—makes washing easier
- Soak immediately: If you can’t wash right away, fill the pan with hot soapy water
- Use parchment rounds: Line the pan bottom with parchment for sticky dishes (though this reduces fond development)
- Wipe, don’t scrub: A properly cooked one-pan meal shouldn’t have much stuck-on food if you used enough fat
The one exception: Cast iron requires different care (no soap for some people, needs drying and re-oiling), which adds 2-3 minutes. Stainless steel and nonstick are genuinely quick to clean.
Dishwasher considerations: Most stainless steel and nonstick pans are dishwasher-safe, though hand-washing extends their life. Cast iron and carbon steel must be hand-washed and seasoned.
The real time savings isn’t just in washing—it’s in not having to coordinate timing between multiple pots, not watching several burners at once, and not having a sink full of dishes that makes you dread cooking tomorrow night too.
FAQ
How do you keep salmon from drying out in one-pan meals? Remove salmon from the pan when it reaches 120-125°F internal temperature, then let it rest while finishing other components. Nestle it back into the pan for the final 2-3 minutes to warm through. Salmon continues cooking off heat and is perfectly done at 125°F, not the 145°F often cited.
Can you make one-pan dinners without oil or butter? Yes, use broth, wine, or water for cooking, though you’ll sacrifice some flavor and browning. Start with 2-3 tablespoons of liquid and add more as needed. Proteins won’t develop a crust, and vegetables may steam rather than caramelize, but the technique still works for low-fat diets.
What’s the best way to reheat one-pan meals? Reheat on the stovetop over medium-low heat with 2-3 tablespoons of added liquid (broth or water) to prevent drying. Cover the pan and heat for 5-7 minutes, stirring occasionally. Microwave works but can create hot spots—use 50% power and stir halfway through.
Do you need to flip chicken multiple times in one-pan cooking? No, flip chicken just once. Flipping multiple times prevents proper browning and extends cooking time. Sear one side for 6 minutes undisturbed, flip once, then cover and cook the second side for 6-8 minutes until it reaches 165°F.
Can you use frozen vegetables in 20-minute stir-fries? Yes, but thaw and pat them completely dry first. Frozen vegetables release excess water that will steam rather than sear your stir-fry. Add frozen vegetables 2-3 minutes earlier than fresh since they’re partially cooked during blanching before freezing.
What’s the difference between orzo and risotto in one-pan cooking? Orzo is a rice-shaped pasta that cooks in 10-12 minutes with a set amount of liquid added all at once. Risotto is actual rice that requires 20-25 minutes and gradual liquid addition with constant stirring. Orzo creates a similar creamy texture with much less effort.
How do you prevent vegetables from getting soggy in one-pan meals? Add vegetables in stages based on cooking time, and don’t cover the pan unless you want them to steam. Keep heat at medium-high for proper evaporation, and avoid overcrowding which traps moisture. Cut vegetables uniformly so they cook evenly.
Can you cook rice instead of orzo in one-pan salmon dishes? Yes, but rice takes longer (18-20 minutes for white rice, 40-45 for brown) and requires different liquid ratios. Cook rice first with the lid on, then add salmon for the final 8-10 minutes. Orzo is faster and more forgiving for weeknight cooking.
What temperature should the pan be for one-pan cooking? Start with medium-high heat (about 375-400°F) for searing proteins, then reduce to medium (325-350°F) once you add liquids or cover the pan. Too high heat burns aromatics and evaporates liquid too quickly; too low prevents proper browning.
How do you scale one-pan recipes for larger families? Use a 14-inch pan instead of 12-inch, or cook in two batches. Don’t increase ingredient amounts beyond what fits in a single layer—overcrowding causes steaming. For families of 6+, consider using two pans simultaneously or switching to sheet pan dinners.
Are one-pan meals healthy compared to other cooking methods? One-pan meals can be very healthy since you control all ingredients and typically use moderate amounts of fat. They often include vegetables cooked with the protein, making it easier to eat a balanced meal. The method itself doesn’t add or remove nutrients compared to other techniques.
What’s the best way to add sauce to one-pan dinners without making them soggy? Add thick sauces in the final 2-3 minutes of cooking, or serve them on the side for drizzling. For pan sauces, remove solid ingredients first, then reduce the sauce in the pan before returning everything to coat. This prevents over-saucing and maintains texture.
Conclusion
One-Pan Wonders: Mastering Salmon Orzo, Stovetop Chicken, and 20-Minute Stir-Fries for Busy Weeknights transforms dinner from a multi-pot production into a streamlined, flavorful experience that fits into even the most hectic schedules. By understanding proper sequencing, temperature control, and ingredient timing, anyone can produce restaurant-quality meals in 20-30 minutes with minimal cleanup.
The key takeaways are simple: start with a properly heated pan, cook proteins first to develop flavor, add ingredients in stages based on cooking time, and don’t be afraid of a little sticking in non-nonstick pans—that fond creates the best sauces. Whether you’re making creamy salmon orzo, perfectly seared stovetop chicken, or a vibrant vegetable stir-fry, these techniques work because they respect how ingredients cook and build flavors together.
Your next steps:
- Choose one recipe to master this week—salmon orzo, stovetop chicken, or a basic stir-fry
- Invest in the right pan if you don’t have one: a 12-inch stainless steel skillet covers most needs
- Prep ingredients before cooking so you can add them at the right times without rushing
- Use a thermometer until you develop intuition for doneness—it’s the difference between dry and perfect chicken
- Experiment with vegetables based on what’s in season and what your family enjoys
Start with these foundational techniques, and you’ll find that one-pan cooking becomes your default weeknight approach—not because you have to, but because it genuinely produces better food with less stress. The dishes taste better when components cook together and share flavors, and you’ll actually enjoy cooking on Tuesday night instead of dreading it.
For more guidance on cooking chicken perfectly every time, explore our comprehensive guide on the best way to make chicken breast.
SEO Meta Title: One-Pan Wonders: Salmon Orzo, Chicken & Stir-Fries


