
Do You Cook Chicken Thighs Covered or Uncovered: Best Methods Explained
Decide what you want from your baked chicken thighs before you preheat the oven. Cover them to lock in moisture and yield tender, juicy meat, or leave them uncovered to develop crisp, browned skin and deeper flavor.
For reliably juicy thighs, cover during most of the bake and uncover near the end if you want a crispy finish. For maximum crispness, bake uncovered and monitor internal temperature.

You’ll learn how covering affects juiciness and texture. You’ll also see which techniques work best for oven-baked chicken and how skin-on versus skinless cuts change the approach.
Expect clear, science-backed tips for seasoning, timing, and avoiding common mistakes. Your next batch of baked chicken thighs will turn out just the way you want.
Covered vs. Uncovered: Effects on Juiciness and Texture
Covering or leaving chicken thighs exposed changes how moisture, skin texture, and flavor develop during baking. Choose the method that matches your goal: maximum juiciness and tender meat, or a crisp, browned exterior with concentrated flavors.
Moisture Retention and Tenderness
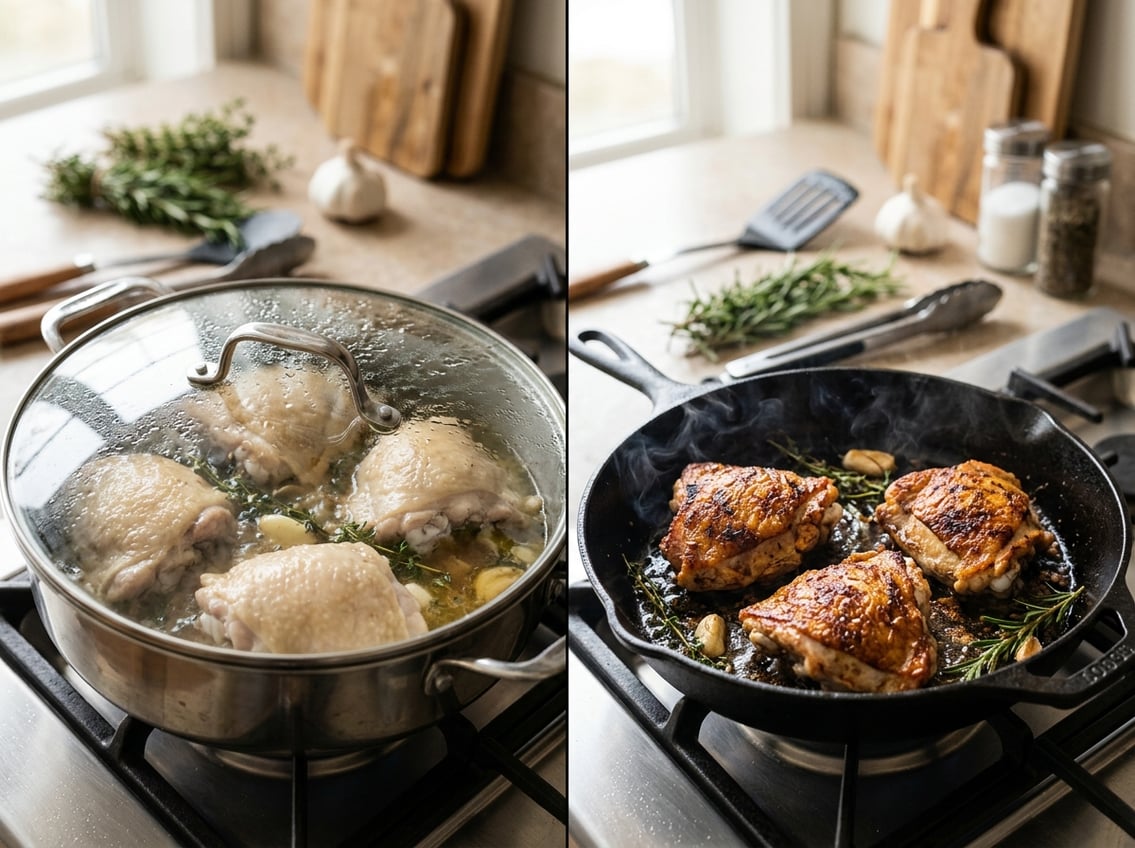
When you bake chicken covered, trapped steam slows moisture loss and keeps the interior tender. Cover the pan with foil or a lid for the first portion of cooking—this works especially well for seasoned chicken thighs and leaner cuts that dry quickly.
A 30–45 minute covered bake at 375–400°F yields thighs that reach 165°F internally with less surface evaporation. Brining or a short marinade before baking increases water retention in the meat.
Use a meat thermometer to avoid overcooking. Pull the thighs at 160–162°F and rest them to finish to safe doneness while preserving juice.
If you need vegetables in the same pan, covering helps them cook through and absorb chicken juices without drying out.
Achieving Crispy Skin
If you want crispy skin, bake chicken thighs uncovered so hot, dry air can render fat and brown the surface. Start with patted-dry skin and a light coating of oil or butter and salt to promote browning.
Bake uncovered at 400–425°F for a shorter time, or remove the cover for the final 10–15 minutes after cooking covered to crisp the skin. Position thighs on a rack in the pan to raise them from pooled juices for extra crispness.
Finish under a broiler for 1–3 minutes while watching closely for consistent results. Higher heat speeds browning but risks drying the meat, so balance heat, timing, and use of a thermometer.
Flavor Concentration
Baking uncovered concentrates surface flavors by allowing rubs and seasonings to caramelize. Seasoned chicken thighs develop deeper color and more pronounced roasted notes when exposed to dry heat.
Sugars in marinades or glazes darken and intensify taste faster when uncovered, so apply sweet glazes near the end to avoid burning. Baking chicken covered preserves aromatics in the pan, which blend into a milder, more uniform flavor across meat and vegetables.
Use robust herbs, garlic, or acidic components in the covered method to ensure the flavor penetrates the meat. If you want both concentrated surface flavor and internal juiciness, start covered to retain moisture, then uncover for a final browning phase.
Optimal Techniques for Oven-Baked Chicken Thighs
You can balance moisture, skin texture, and even cooking by choosing the right covering method, arranging thighs properly, and deciding whether to use a rack. Each choice affects how quickly the skin crisps and how uniformly the meat reaches safe temperature.
Partial Covering for Balanced Results
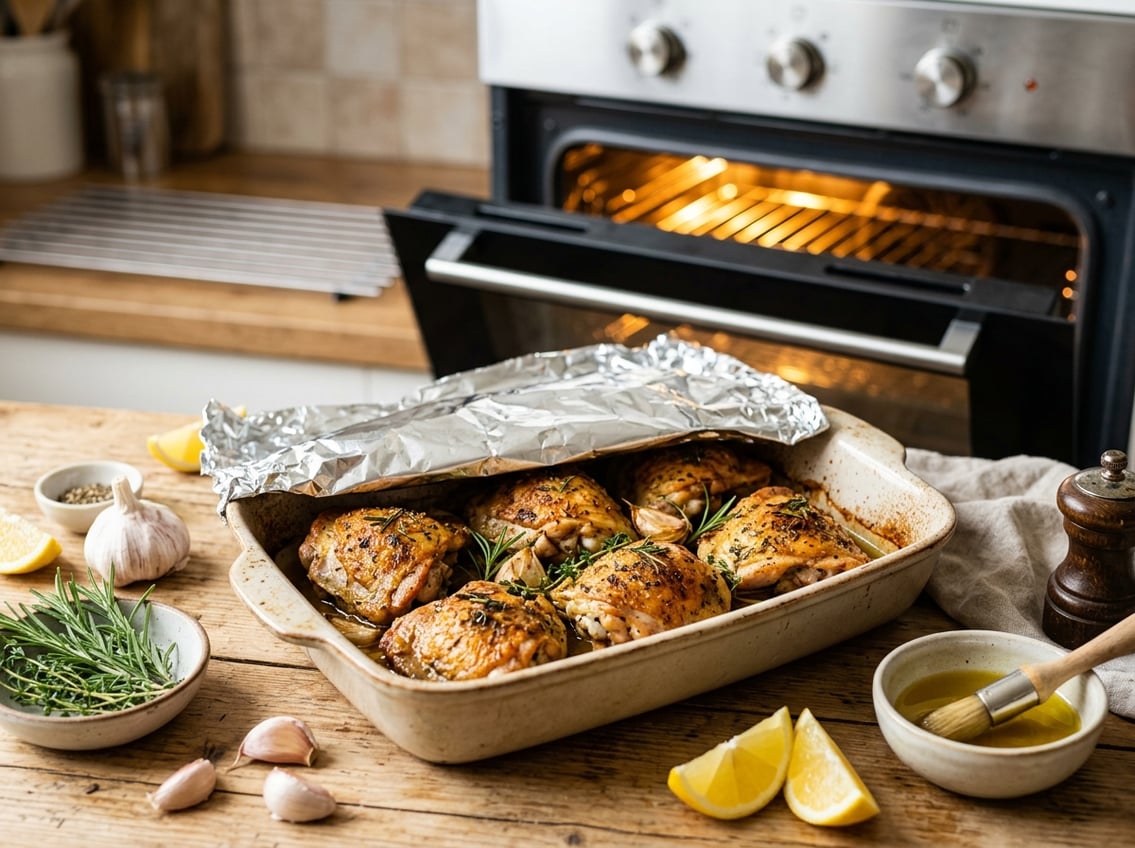
Partial covering helps prevent the tops from drying while letting the skin crisp. Tent a sheet of foil loosely over the pan for the first 20–25 minutes of a 35–40 minute bake at 400°F (200°C).
Remove the foil for the last 8–12 minutes to brown and crisp the skin without overcooking the interior. If you start from frozen, increase baking time and skip the initial tent.
Bake covered for the majority of the time to ensure even cooking, then uncover to finish browning. Always check internal temp with a probe—aim for 165°F (74°C) minimum, but 175–180°F (79–82°C) yields more tender thighs because connective tissue breaks down.
Arranging Thighs for Even Cooking
Give each thigh space to allow hot air circulation. Place thighs skin-side up on a baking sheet or in a pan with at least 1 inch (2.5 cm) between pieces.
Crowding traps steam and produces soggy skin and uneven doneness. Arrange larger pieces toward the outer edges if your oven has hot spots since they receive more direct heat.
For bone-in thighs, orient bones toward the center of the pan so heat distributes through the meat consistently. Use a thermometer in the thickest part without touching bone to confirm even cooking across the batch.
Using a Wire Rack or Baking Sheet
A wire rack over a baking sheet elevates thighs so air circulates underneath, reducing sogginess and promoting uniform browning. Use a rack when you want the crispiest skin and the most even oven-baked chicken thighs.
Line the sheet with foil for easier cleanup. If you don’t have a rack, flip the thighs halfway through baking to expose the underside to direct heat.
For baking chicken thighs from frozen, place them on a foil-lined sheet and cover for most of the cook time. Then transfer to a rack or uncover to finish so the bottom and skin both dry and crisp.
The Science Behind Perfectly Baked Chicken Thighs
Understanding how heat, surface chemistry, and resting work together lets you get crisp skin and juicy meat. You’ll control browning, prevent under- or overcooking, and use temperature tools to stop guesswork.
The Maillard Reaction and Browning
The Maillard reaction creates the deep brown color and savory flavors you want on skin. It accelerates above 300°F at the surface, so dry skin and high surface temperature matter more than oven temperature alone.
Pat the skin completely dry and use a light coating of oil or a small amount of baking powder to raise surface pH. Both increase browning speed and crispness.
Avoid crowding the pan so hot air circulates and skin dehydrates instead of steaming. Broiling for 1–3 minutes at the end can intensify browning, but watch closely to prevent burning.
Bone-in, skin-on thighs benefit because the slower cooking of the meat lets the skin render fat and crisp without the interior drying out.
Carryover Cooking Principles
Carryover cooking raises internal temperature after you remove the thighs from the oven. Dense, bone-in thighs can gain 5–10°F (about 3–6°C) during a 5–10 minute rest.
Account for that rise when you remove the chicken. Pull thighs at 160–162°F if you want a final target of 165°F after resting, or pull at 165°F if you prefer no additional rise.
Rest on a warm rack or sheet pan for 5–10 minutes to let juices redistribute into the meat. Resting allows proteins to relax so juices reabsorb rather than run out when you cut.
Cutting too soon forces liquid onto the cutting board and yields drier meat.
Monitoring Internal Temperature
Use an instant-read thermometer to judge doneness. Insert the probe into the thickest part of the thigh, avoiding bone, for an accurate reading.
Target 165°F (74°C) as the safe minimum for chicken. Many cooks prefer removing bone-in thighs at 160–162°F because of carryover.
If you use a probe thermometer in the oven, confirm with an instant-read when you think they’re close. Check several pieces if sizes vary.
Uniform pieces cook more evenly. Record readings and times for your oven so you can reproduce the exact combination of temperature and timing that gives you perfectly baked chicken thighs.
Choosing Between Skin-On and Skinless Thighs
Decide whether you want a crispy exterior and richer flavor or lower fat and quicker prep. Consider how you’ll cook them—baking, grilling, or pan-roasting changes which option performs best.
Benefits of Skin-On Chicken Thighs
Skin-on chicken thighs give you flavor and moisture. The skin renders fat during cooking, which bastes the meat and helps prevent drying, especially in baked chicken thighs and on the grill.
You can achieve a crisp, golden crust by starting skin-side down in a hot pan or by baking skin-on thighs uncovered at a high temperature for the final 10–15 minutes. That technique concentrates browning and yields crispy skin without overcooking the interior.
Skin carries seasonings and marinades well, so rubs and herb butter cling to it and intensify flavor. Expect higher calories and saturated fat compared with skinless cuts.
When to Choose Skinless
Pick skinless thighs if you want lower fat, faster marinading, and more even seasoning penetration. Removing the skin cuts calories and makes trimming visible fat easier before cooking.
Skinless thighs cook faster and respond well to moist methods—braising, stewing, or covered baking—because they lack the protective fat layer. For baked chicken thighs, cover them during most of the cook to retain juiciness, then uncover briefly if you want surface color.
They brown less aggressively, so add a quick high-heat sear or finish under a broiler to develop texture. Skinless thighs also suit diets that limit saturated fat or meals where you’ll add a sauce that supplies fat and mouthfeel after cooking.
Seasoning and Preparation Tips
Salt, fat, and heat determine how well seasonings stick and how the final texture turns out. Use dry rubs, marinades, and thickness-conscious timing to get seasoned chicken thighs that roast evenly and taste balanced.
Applying Garlic Powder and Dry Rubs
Sprinkle garlic powder evenly across skin-on thighs. It clings best to a lightly oiled surface.
Pat thighs dry with paper towels first, then rub a thin layer of neutral oil (olive or vegetable) over skin to help the garlic powder and other dry spices adhere and brown. Use a simple dry rub: 1 tsp garlic powder, 1 tsp smoked paprika, 1/2 tsp onion powder, 1 tsp kosher salt per pound of chicken, and 1/4 tsp black pepper.
Massage the rub under and over the skin for deeper flavor in bone-in cuts. For baked chicken thighs, apply rub at least 15–30 minutes before cooking; for best depth, refrigerate up to 24 hours.
Avoid overloading with garlic powder; too much can taste bitter after high-heat roasting. If you want crisp skin, keep seasoning dry and bake uncovered.
If you cover to retain moisture, remove foil for the last 10–15 minutes to let the skin crisp.
Marinades Versus Dry Seasoning
Marinades add moisture and acid-driven flavor. Dry rubs concentrate surface flavor and promote crisping.
Choose marinades with a balance: 2 tbsp oil, 1 tbsp acid (vinegar or lemon), 1–2 tsp salt, and aromatics. Marinate bone-in thighs 2–12 hours; boneless thighs need less time, 30 minutes to 4 hours.
If you plan to bake covered, a marinade helps keep meat juicy even if skin doesn’t fully crisp. For baked chicken thighs where you want crispy skin, pat thighs dry after marinating and apply a dry rub before roasting, or reserve marinade to glaze in the last 5–10 minutes.
Always discard marinade that touched raw chicken or boil it before using as a sauce. Dry seasoning saves time and shelf-life and works best when you aim to finish uncovered at high heat for golden skin.
Accounting for Size and Thickness
Thickness alters both seasoning penetration and cooking time. Thighs 1–1.5 inches thick (common bone-in) need about 25–35 minutes at 400°F; thicker pieces need longer and benefit from an initial covered phase to avoid drying the exterior.
Thinner or boneless thighs cook faster—often 18–25 minutes—and respond well to shorter marinades. Adjust salt and strong spices by weight: increase seasoning proportionally for larger pieces, but keep garlic powder conservative (about 1 tsp per pound) to avoid bitterness.
Use an instant-read thermometer in the thickest part, away from bone, aiming for 160–163°F before resting to reach safe 165°F carryover. When baking mixed sizes on one tray, elevate smaller pieces on a rack or remove them earlier to prevent overcooking.
Adjusting for Special Scenarios and Common Mistakes
You can handle frozen thighs, prevent crowding that ruins crisping and even cooking, and spot problems that come from covering. Apply these fixes to keep baked chicken juicy and safe while getting the texture you want.
Baking Chicken Thighs from Frozen
You can bake chicken thighs from frozen, but adjust time and technique. Preheat your oven to 375°F (190°C) and plan for 50–70 minutes depending on thigh size. Use a probe thermometer to confirm the thickest part reaches 165°F (74°C) without touching bone.
Place thighs on a rimmed sheet or shallow pan and separate pieces so air circulates. Cover them with foil for the first 25–35 minutes to keep the outside from drying while the interior warms.
Remove the foil for the last 10–20 minutes so the skin crisps and browns evenly. If you use a sauce, add it halfway through baking to avoid diluting the flavors.
Check for even cooking, since uneven thawing can cause hot spots or undercooked centers.
Avoiding Overcrowding
Overcrowding traps steam and prevents hot air from circulating. Arrange thighs in a single layer with at least 1 inch (2.5 cm) between pieces on the pan.
Use a wire rack set over a baking sheet to improve airflow. If you need to cook many thighs, use multiple pans and rotate them between oven racks halfway through the bake.
Crowded pans increase cooking time, so expect an extra 10–15 minutes when pieces touch. For crisp skin, leave thighs uncovered during the final 10–20 minutes of baking or briefly increase oven temperature to 425°F (220°C), watching closely to avoid burning.
Insert a probe thermometer into the thickest piece to ensure all thighs reach 165°F (74°C) for safety and consistent doneness.
Covering Pitfalls to Watch Out For
Covering can retain moisture but also create steaming, which prevents skin from crisping. If you cover with foil for tenderness, remove it in the last 10–20 minutes to finish the skin.
Otherwise, you’ll end up with pale, soft skin even if the meat cooks properly. Glass or ceramic lids trap more steam than loose foil and can extend cooking time.
When you use sauces high in sugar or honey, covering early can cause those sauces to caramelize unevenly or burn once uncovered. To avoid this, baste with sauce at the end or apply a glaze during the last 10 minutes.
Avoid letting foil touch the skin. Trapped moisture where foil contacts meat prevents browning.
When in doubt, use a short covered phase followed by an uncovered finish to balance juiciness and crisping.


