
Creamy Green Goddess Dips and Spreads: 12 Spring Recipes Featuring Smoked Trout, Veggies, and Fresh Herbs
Last updated: May 14, 2026
Quick Answer
Creamy Green Goddess dips and spreads combine fresh spring herbs (parsley, basil, chives), creamy bases like avocado or Greek yogurt, and bright citrus for versatile appetizers perfect for May entertaining. These 12 recipes feature variations with smoked trout, seasonal vegetables, and herb combinations that take 10 minutes to prepare and can be customized for dietary needs—from high-protein versions to plant-based options.
Key Takeaways
- Base formula: 1 avocado + 3/4 cup cottage cheese or Greek yogurt + 1/4 cup each fresh herbs (parsley, basil, chives) creates the classic creamy texture[1][2]
- Quick prep: All recipes blend in 10 minutes with no cooking required; chill 30+ minutes for best flavor development[2][3]
- Citrus and garlic essentials: 2-3 tsp minced garlic plus juice of 1 lemon provides the signature tangy brightness[1][3]
- Protein boost options: Use cottage cheese or Greek yogurt for 15-20g protein per serving, ideal for spring snacking[1]
- Smoked trout integration: Flake 4-6 oz smoked trout into finished dips or use as garnish for omega-3 rich variations
- Texture control: Add 2 tbsp olive oil while blending for spreadable consistency; thin with water for dressing[2][3]
- Herb flexibility: Swap in mint, cilantro, dill, or tarragon based on what’s fresh at spring farmers markets
- Make-ahead friendly: Dips keep 3-4 days refrigerated; flavors intensify after first day[2]
- Serving versatility: Pair with spring vegetables, crackers, grilled proteins, or use as sandwich spread
- Dietary adaptations: Easily made vegan with cashew cream or dairy-free yogurt while maintaining creamy texture
What Makes Green Goddess Dips Perfect for Spring 2026?
Green Goddess dips capture spring’s fresh, bright flavors through herb-forward recipes that originated in 1923 but have evolved into modern, health-conscious appetizers[5][7]. The combination of creamy bases with just-picked herbs creates what food enthusiasts call an “edible garden dip”—perfect for May gatherings when herbs are at peak freshness[9].
Why spring timing matters:
- Herb availability: Farmers markets overflow with basil, parsley, chives, and mint in May, offering superior flavor to winter imports
- Lighter eating patterns: After heavier winter meals, spring calls for fresh, vegetable-forward dips that feel indulgent but nutritious
- Entertaining season: Outdoor gatherings and Mother’s Day brunches need make-ahead appetizers that travel well
- Seasonal produce pairing: Spring vegetables like snap peas, radishes, asparagus, and baby carrots are natural dippers
The versatility of these recipes means you can prepare a base version on Sunday and customize throughout the week—adding smoked trout for protein-rich lunches, stirring in edamame for plant-based snacks, or thinning with olive oil for salad dressings.
Common mistake to avoid: Don’t make these dips with dried herbs. The fresh herb volume (3/4 to 1 cup total) is what creates the vibrant green color and garden-fresh taste that defines the category[1][2].
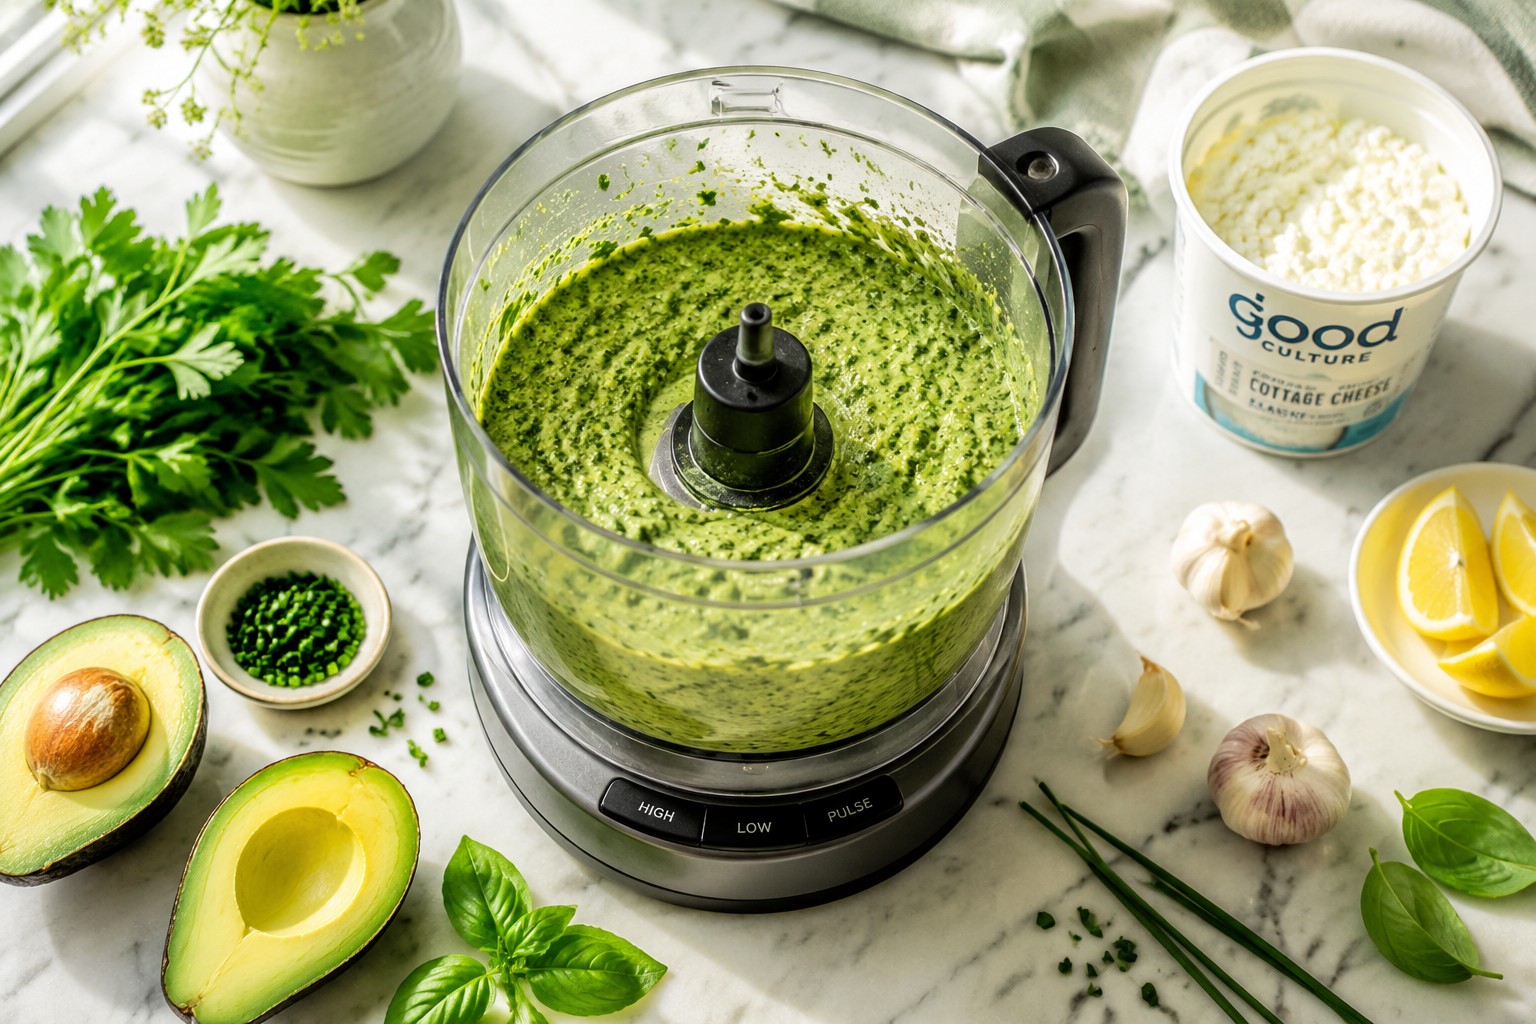
How Do You Make the Classic Creamy Green Goddess Base?
The foundational recipe requires just 6 core ingredients blended until smooth. Start with 1 ripe avocado, 3/4 cup cottage cheese or Greek yogurt, 1/4 cup each of fresh parsley, basil, and chives, 2-3 tsp minced garlic, juice of 1 lemon, and salt/pepper to taste[1][2].
Step-by-step blending process:
- Prep herbs: Roughly chop parsley, basil, and chives (no need for fine mincing—the blender handles it)
- Load blender: Add avocado chunks, cottage cheese, all herbs, garlic, and lemon juice to food processor or high-speed blender[3]
- Initial blend: Process 1-2 minutes until mostly smooth, scraping down sides once
- Add oil: With blender running, slowly drizzle in 2 tbsp olive oil for silky texture[2][3]
- Season: Taste and adjust salt, pepper, and lemon juice (start conservative—you can always add more)
- Chill: Refrigerate minimum 30 minutes to let flavors meld and texture firm up[2]
Texture troubleshooting:
- Too thick: Add water or olive oil 1 tbsp at a time while blending
- Too thin: Blend in extra avocado or 2-3 tbsp more cottage cheese
- Not smooth enough: Process longer or add 1-2 ice cubes for creamier consistency[5]
Choose cottage cheese if you want higher protein (14g per 1/2 cup vs. 10g for Greek yogurt) and tangier flavor. Choose Greek yogurt if you prefer smoother texture and milder taste[1][6].
The base recipe yields approximately 2 cups (4 servings) and takes exactly 10 minutes active time[2]. Make it your own by adjusting herb ratios—more basil for sweetness, extra chives for onion notes, or heavy parsley for earthy depth.
What Are the 12 Spring Recipe Variations?
These variations build on the classic base with seasonal ingredients, protein additions, and creative herb combinations perfect for different spring occasions.
Protein-Rich Variations
1. Smoked Trout Green Goddess Dip
- Base recipe + 6 oz flaked smoked trout + 2 tbsp fresh dill + 1 tsp capers
- Serve with cucumber rounds and rye crackers
- Omega-3 boost: approximately 1,500mg per serving
2. High-Protein Greek Goddess
- 1 cup Greek yogurt + 1/4 cup cottage cheese + standard herbs
- 20g protein per serving, ideal for post-workout snacking[1]
- Add 2 tbsp hemp hearts for extra protein and nutty flavor
3. Edamame Power Dip
- Replace avocado with 1 cup shelled edamame (cooked, cooled)
- Add 1/4 cup fresh mint + standard herbs
- Plant-based protein: 8g per serving[5]
Veggie-Forward Versions
4. Spring Pea and Pistachio Spread
- Base recipe + 1/2 cup blanched English peas + 1/2 cup toasted pistachios
- Blend pistachios for creamy texture or chop coarsely for crunch[5]
- Gorgeous bright green color perfect for spring entertaining
5. Asparagus and Tarragon Goddess
- Add 6 roasted asparagus spears (cooled) + 2 tbsp fresh tarragon
- Replace basil with extra parsley for cleaner flavor
- Pairs beautifully with grilled spring lamb
6. Radish Top and Herb Dip
- Use radish greens (from 1 bunch) in place of half the parsley
- Adds peppery bite and reduces food waste
- Serve with the radishes themselves for full-circle snacking
Citrus and Herb Combinations
7. Lemon-Dill Smoked Trout Spread
- Base recipe + 4 oz smoked trout + 1/4 cup fresh dill + extra lemon zest
- Thin with 3 tbsp olive oil for bagel spread consistency
- Perfect for Mother’s Day brunch boards
8. Lime-Cilantro Goddess with Jalapeño
- Replace lemon with 2 limes + swap parsley for cilantro + 1 seeded jalapeño[5]
- Mexican-inspired variation for taco night or chip dipping
- Add 1/4 cup pepitas for crunch
9. Orange-Mint Spring Dip
- Add zest and juice of 1 orange + 1/4 cup fresh mint
- Reduce other herbs to 2 tbsp each
- Unexpected sweetness pairs with carrots and bell peppers
Creative Additions
10. Crunchy Seed and Herb Goddess
- Base recipe + 2 tbsp each: sunflower seeds, pumpkin seeds, sesame seeds (toasted)
- Blend half smooth, pulse in remaining seeds for texture
- Nutrient-dense option with healthy fats
11. Spicy Green Goddess with Spring Onions
- Add 3 chopped spring onions + 1 tsp red pepper flakes + 1/2 tsp smoked paprika
- Kick of heat balanced by creamy base
- Excellent with grilled vegetables or as sandwich spread
12. Mediterranean Goddess with Feta
- Base recipe + 1/3 cup crumbled feta + 2 tbsp fresh oregano + 1 tsp lemon zest
- Salty, tangy variation inspired by Greek flavors[6]
- Serve with pita chips and olives
Customization tip: Start with the classic base and add one or two special ingredients rather than overhauling the entire recipe. This approach lets the fresh herb flavor shine while introducing new dimensions.
Which Herbs Work Best in Green Goddess Recipes?
The classic trio—parsley, basil, and chives—provides balanced flavor, but spring offers opportunities to experiment with what’s freshest at your local market[1][2].
Primary herb options (use 1/4 cup each):
| Herb | Flavor Profile | Best Pairings | Spring Availability |
|---|---|---|---|
| Flat-leaf parsley | Clean, slightly peppery | Universal base for all variations | Peak: April-June |
| Basil | Sweet, slightly anise | Pairs with lemon, tomatoes, Mediterranean flavors | Peak: May-September |
| Chives | Mild onion, delicate | Complements fish, eggs, potatoes | Peak: March-May |
| Dill | Bright, tangy | Essential with smoked fish, cucumbers | Peak: April-July |
| Cilantro | Citrusy, polarizing | Mexican/Asian variations, lime-based recipes | Year-round, best spring |
| Mint | Cool, refreshing | Peas, lamb, Middle Eastern flavors | Peak: May-June |
| Tarragon | Licorice-like, sophisticated | Chicken, asparagus, French-inspired dishes | Peak: April-June |
Herb combination strategies:
- Classic balance: Equal parts parsley, basil, chives (3/4 cup total)[1][2]
- Herb-forward: Increase total herbs to 1 cup for more intense green color and flavor
- Single-herb focus: Use 3/4 cup of one herb (like all basil or all cilantro) for distinct character
- Tender vs. woody: Stick to tender herbs (avoid rosemary or thyme which overpower creamy bases)
Storage and prep tips:
Wash herbs thoroughly and spin dry before using—excess water dilutes flavor and creates watery dips. Remove thick stems from parsley and cilantro, but tender basil and dill stems can be included. Chives should be snipped with scissors rather than chopped with a knife to prevent bruising[3].
Choose parsley-heavy blends if you want neutral, versatile dips that work with any dipper. Choose basil-forward versions if you’re serving with Italian-inspired foods or tomato-based dishes. Choose dill-dominant recipes if you’re incorporating smoked fish or serving with cucumber and crackers.
How Do You Incorporate Smoked Trout into Green Goddess Dips?
Smoked trout adds protein, omega-3 fatty acids, and sophisticated flavor to spring dips. The key is balancing the fish’s richness with bright herbs and citrus.
Three integration methods:
1. Blended throughout (smooth texture)
- Add 4-6 oz flaked smoked trout directly to blender with other ingredients
- Creates uniform pink-green color and distributes fish flavor evenly
- Best for spreads on bagels, sandwiches, or crackers
- Increase lemon juice by 1 tbsp to cut richness
2. Folded in (chunky texture)
- Make base dip, then gently fold in 6 oz flaked smoked trout by hand
- Maintains visible fish pieces for textural contrast
- Better presentation for serving bowls at parties
- Allows guests who don’t eat fish to enjoy plain dip separately
3. Garnished on top (visual appeal)
- Spread base dip in shallow serving bowl, top with 4 oz flaked trout
- Drizzle with olive oil, sprinkle with fresh dill and lemon zest
- Most elegant presentation for entertaining
- Keeps fish flavor optional for mixed dietary preferences
Smoked trout selection tips:
Look for hot-smoked trout (fully cooked, flaky texture) rather than cold-smoked (lox-like, silky). Hot-smoked varieties blend better into dips and provide the protein-rich, chunky texture that complements creamy bases. Quality indicators include firm flesh, pleasant smoky aroma (not fishy), and golden-brown color.
Complementary ingredients for trout variations:
- Dill: The classic pairing—use 1/4 cup fresh dill in place of basil
- Capers: Add 1-2 tbsp for briny contrast (rinse first to reduce salt)
- Horseradish: 1 tsp prepared horseradish adds subtle heat
- Cucumber: Finely diced cucumber (1/2 cup) adds crunch and freshness
- Red onion: 2 tbsp minced red onion provides sharpness
Nutrition boost: A 3 oz serving of smoked trout adds approximately 15g protein and 1,000mg omega-3 fatty acids to your dip, making it a genuinely nutritious appetizer rather than empty-calorie snacking.
Common mistake: Don’t use canned tuna as a substitute. The texture and flavor profile are completely different—smoked trout’s delicate, flaky texture and subtle smoke flavor can’t be replicated with canned fish.
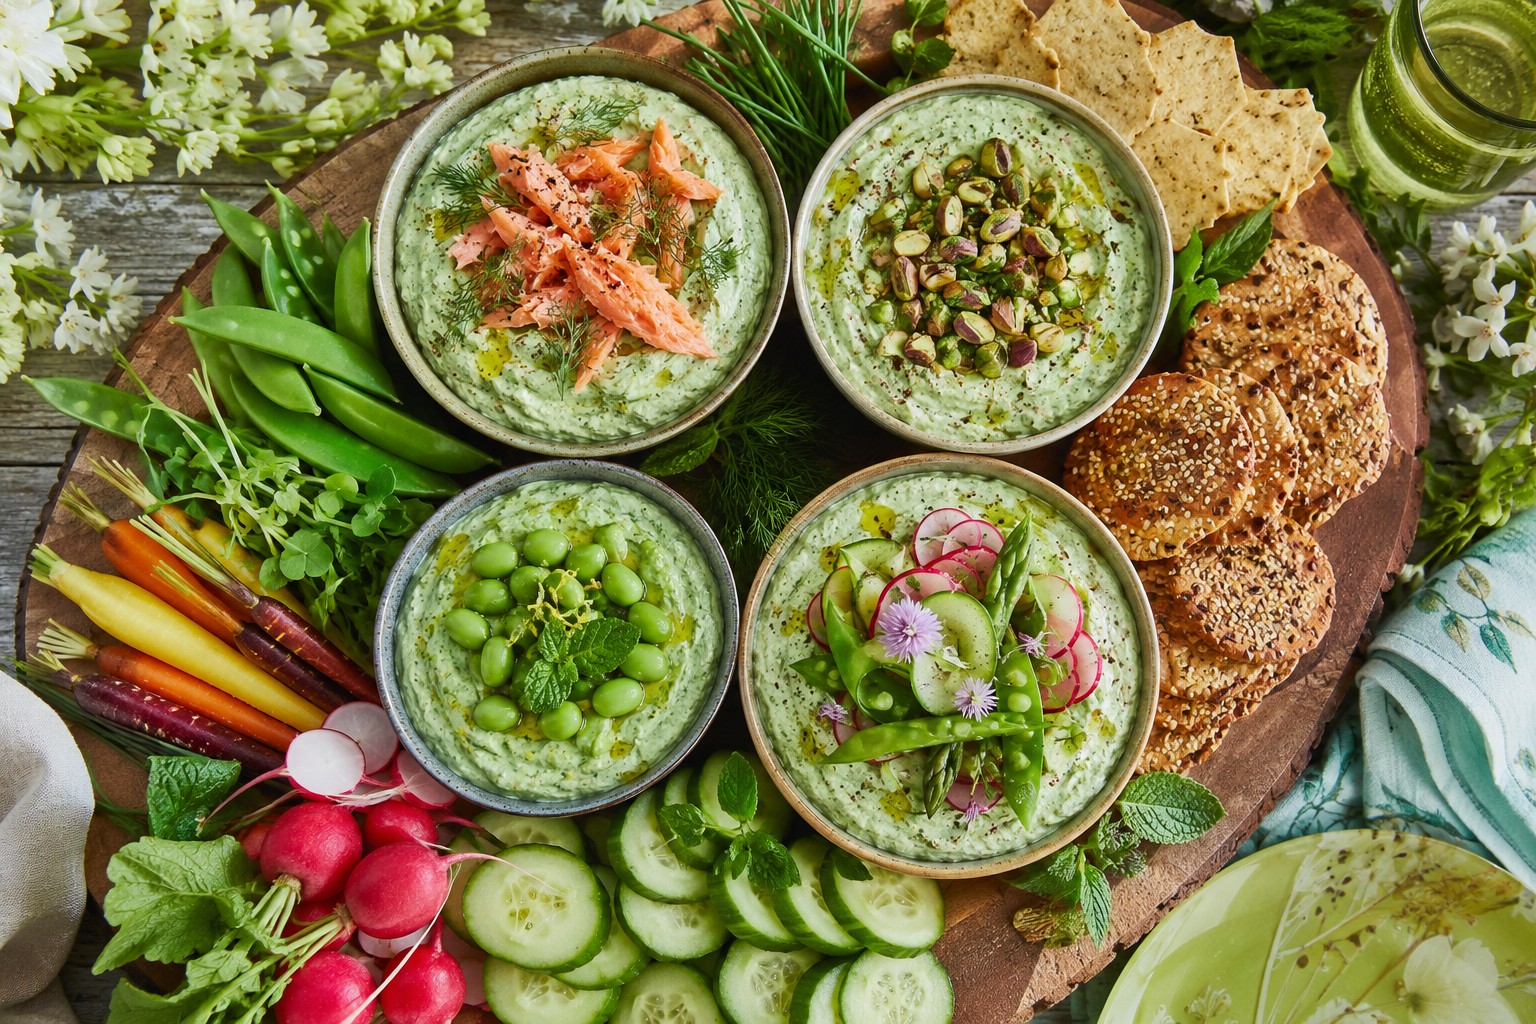
What Spring Vegetables Pair Best with These Dips?
Spring vegetables offer crisp textures and mild flavors that complement herb-forward dips without competing. Choose a variety of colors and shapes for visual appeal and different dipping experiences.
Top spring vegetable dippers:
Crunchy options:
- Snap peas: Sweet, crisp, perfect scoop shape for thick dips
- Radishes: Peppery bite balances creamy richness (try watermelon and French breakfast varieties)
- Baby carrots: Classic choice, available in rainbow colors for visual interest
- Celery sticks: Neutral flavor, sturdy enough for thick spreads
- Cucumber rounds: Refreshing, can be used as edible “crackers”
- Bell pepper strips: Sweet crunch, use multiple colors
Blanched options (briefly cooked, chilled):
- Asparagus spears: Blanch 2 minutes, shock in ice water, serve cold
- Green beans: Haricots verts (thin French beans) work best
- Broccoli florets: Blanch 1 minute to soften slightly while maintaining crunch
- Cauliflower: Try orange or purple varieties for color contrast
Preparation tips for vegetable platters:
Cut vegetables into uniform sizes (3-4 inch pieces) for easy dipping. Arrange by color for visual impact—group greens together, then oranges, then reds and purples. Include both raw and blanched options for texture variety. Prepare vegetables up to 24 hours ahead and store in water-filled containers in the refrigerator to maintain crispness[8].
Beyond vegetables:
- Artisan crackers: Seeded, whole grain, or herb varieties
- Pita chips: Baked, not fried, for lighter option
- Bagel chips: Perfect for smoked trout variations
- Grilled bread: Rub with garlic for extra flavor
- Pretzels: Salty contrast to creamy dips
Serving ratio: Plan for 3-4 cups of cut vegetables per 1 cup of dip when serving as appetizer. For main-course salad applications, double the vegetable quantity.
Choose raw vegetables if you want maximum crunch and minimal prep. Choose blanched vegetables if you’re serving guests who prefer softer textures or want to showcase spring vegetables like asparagus that benefit from brief cooking.
How Can You Adapt These Recipes for Dietary Restrictions?
Green Goddess dips are naturally adaptable to various dietary needs without sacrificing the creamy texture or fresh herb flavor that defines the category.
Dairy-free and vegan adaptations:
Replace cottage cheese and Greek yogurt with:
- Cashew cream: Soak 1 cup raw cashews 4 hours, blend with 1/4 cup water until smooth
- Silken tofu: Use 3/4 cup firm silken tofu for neutral flavor and protein
- Coconut yogurt: Full-fat varieties provide richness (choose unsweetened)
- Tahini base: 1/2 cup tahini + 1/4 cup water creates creamy, nutty foundation
Keep the avocado in all vegan versions—it provides essential creaminess and healthy fats. Add 1-2 tbsp nutritional yeast for subtle cheesy flavor if desired[5].
Paleo and Whole30 compliant:
Use the avocado base with coconut cream (1/2 cup) instead of dairy. Ensure all add-ins (smoked trout, vegetables) are compliant. Skip cheese garnishes and use compliant crackers or vegetable dippers only.
Low-carb and keto-friendly:
The base recipe is already low-carb (approximately 6-8g net carbs per serving). Increase healthy fats by:
- Adding extra avocado (use 1.5 avocados instead of 1)
- Increasing olive oil to 1/4 cup
- Serving with low-carb vegetables (celery, cucumber, bell peppers, radishes)
- Using pork rinds or cheese crisps as dippers instead of crackers
High-protein modifications:
Maximize protein content for post-workout snacks or meal-replacement dips:
- Use 1 cup cottage cheese (no avocado) for 28g protein per batch[1]
- Add 2 scoops unflavored protein powder (blend thoroughly)
- Stir in 1/4 cup hemp hearts or chia seeds
- Top with hard-boiled eggs, grilled chicken, or extra smoked trout
Nut-free options:
Skip pistachio and seed variations. Use sunflower seed butter (2 tbsp) in place of nut-based creams if avoiding cashews. The standard avocado-yogurt base is naturally nut-free.
Allium-free (no garlic/onion):
Replace garlic with:
- 1 tsp garlic-infused olive oil (the oil, not the garlic pieces)
- Extra lemon zest for brightness
- 1/4 tsp asafoetida powder (Indian spice with onion-garlic flavor)
Texture modification for children or sensitive eaters:
Blend longer (3-4 minutes) for ultra-smooth consistency. Reduce herbs by half and increase avocado for milder flavor. Add 1 tbsp honey or maple syrup to balance herbal bitterness if needed.
What Are the Best Make-Ahead and Storage Strategies?
Green Goddess dips improve with time as flavors meld, making them ideal for meal prep and party planning. Proper storage maintains the vibrant green color and fresh taste.
Optimal storage timeline:
- Immediate use: Serve right after blending for brightest green color
- 30 minutes chilled: Flavors develop, texture firms up—ideal serving time[2]
- Day 1-2: Peak flavor period, herbs fully infused into creamy base
- Day 3-4: Still excellent, color may darken slightly, flavors more mellow
- Day 5+: Not recommended—herbs oxidize, color turns olive-brown
Storage container tips:
Use airtight containers with minimal air space. Press plastic wrap directly onto dip surface before sealing lid to prevent oxidation and browning. Glass containers are preferable to plastic—they don’t absorb odors and maintain freshness better.
Color preservation techniques:
- Lemon juice: The acid in lemon juice (already in recipe) helps maintain green color[1][3]
- Surface protection: Press plastic wrap directly on dip surface to exclude oxygen
- Vitamin C boost: Add 1/4 tsp ascorbic acid powder (vitamin C) to prevent browning
- Blanch herbs: Briefly blanch herbs in boiling water (10 seconds), shock in ice water, then blend—sets green color
Freezing guidelines:
Avocado-based dips don’t freeze well—they become grainy and separated when thawed. Yogurt and cottage cheese bases also suffer texture degradation. If you must freeze, use cashew cream or tofu-based versions, which tolerate freezing better. Freeze in small portions (1/2 cup containers) for up to 1 month. Thaw overnight in refrigerator and re-blend briefly before serving.
Make-ahead party strategy:
Prepare base dip 1-2 days ahead and store in airtight container. Prepare vegetables 1 day ahead and store in water-filled containers. Assemble serving platter 2-3 hours before guests arrive, keeping refrigerated until serving time. Add garnishes (smoked trout, herbs, olive oil drizzle) just before serving for freshest presentation[8].
Batch cooking approach:
Double or triple the base recipe and divide into portions. Keep one portion plain for versatile use throughout the week. Customize other portions with different add-ins (trout, vegetables, spices) for variety. This strategy gives you 3-4 different dips from one prep session.
Transportation tips:
For picnics or potlucks, transport dip in insulated cooler with ice packs. Keep vegetables separate until serving to prevent sogginess. Bring garnishes (herbs, trout, nuts) in separate small containers and add on-site for best presentation.
How Do You Use Green Goddess Beyond Dipping?
These versatile spreads work in multiple culinary applications beyond the appetizer table, making them valuable meal-prep staples for spring 2026.
Sandwich and wrap applications:
- Veggie wraps: Spread 2-3 tbsp on whole wheat tortilla, layer with spring vegetables, roll tightly
- Turkey or chicken sandwiches: Replace mayo with Green Goddess for herb-forward flavor
- Smoked salmon bagels: Use trout variation as cream cheese alternative
- Grilled vegetable panini: Spread on both bread slices before grilling
Salad dressing transformations:
Thin any variation with:
- 2-3 tbsp olive oil + 1 tbsp water for pourable consistency
- 2 tbsp white wine vinegar for tangier dressing
- 1 tbsp honey for sweet-savory balance
Use as dressing for:
- Spring greens with strawberries and goat cheese
- Chopped salad with cucumbers, tomatoes, and chickpeas
- Grain bowls with quinoa, roasted vegetables, and grilled protein
- Potato salad (replace traditional mayo-based dressing)
Protein accompaniments:
Serve as sauce alongside:
- Grilled chicken breasts: The fresh herbs complement simple grilled poultry perfectly (see our guide on keeping chicken breast juicy)
- Baked salmon: Dollop on top of hot fish for melting effect
- Lamb chops: Spring lamb and mint-forward Green Goddess are classic pairing
- Steak: Use as compound butter alternative for grilled beef
Pasta and grain applications:
- Cold pasta salad: Toss with rotini, cherry tomatoes, mozzarella, and basil
- Orzo bowls: Mix with cooked orzo, peas, and feta for Mediterranean-inspired dish (similar to our chicken breast orzo recipe)
- Grain bowls: Use as sauce for farro, quinoa, or brown rice bowls
- Zoodles: Toss with spiralized zucchini for low-carb “pasta”
Breakfast and brunch uses:
- Avocado toast upgrade: Spread on toast instead of plain mashed avocado
- Egg accompaniment: Serve with scrambled eggs, omelets, or frittatas
- Breakfast burrito: Use as sauce inside burritos with eggs, beans, and vegetables
- Smoked salmon platter: Offer as alternative to plain cream cheese
Pizza and flatbread base:
Replace traditional red sauce with Green Goddess on:
- Flatbreads topped with spring vegetables and goat cheese
- White pizza with ricotta, asparagus, and prosciutto
- Naan bread with grilled chicken and arugula
Vegetable preparation:
- Roasted vegetable topping: Dollop on hot roasted cauliflower, broccoli, or Brussels sprouts
- Baked potato topping: Replace sour cream and chives with herb-loaded dip
- Grilled corn: Spread on hot corn instead of butter
- Stuffed vegetables: Use as filling for hollowed tomatoes or bell peppers
The key to successful alternative applications is adjusting consistency—thicker for spreads and toppings, thinner for dressings and sauces. Start with the base recipe and add liquid gradually until you reach desired texture for your specific use.
Frequently Asked Questions
How long does Green Goddess dip last in the refrigerator?
Properly stored in an airtight container, Green Goddess dip lasts 3-4 days in the refrigerator. The color may darken slightly after day 2 due to herb oxidation, but flavor remains excellent. Press plastic wrap directly on the surface before sealing to minimize browning[2].
Can you make Green Goddess dip without avocado?
Yes, replace avocado with additional cottage cheese (total 1.5 cups), Greek yogurt, or cashew cream for vegan versions. The texture will be slightly less rich but still creamy. Add 2-3 tbsp olive oil to compensate for avocado’s healthy fats[5].
What’s the difference between Green Goddess dip and dressing?
The difference is consistency. Dips use less liquid for thick, scoopable texture. Dressings thin the same base with 2-4 tbsp olive oil and 1-2 tbsp water or vinegar for pourable consistency. The flavor profile remains identical[3].
Is Green Goddess dip healthy?
Yes, when made with whole-food ingredients. A typical serving provides healthy fats from avocado, protein from yogurt or cottage cheese, vitamins from fresh herbs, and minimal added sugar. One serving contains approximately 120-150 calories, 8-10g fat, 6-8g carbs, and 5-8g protein[1].
Can you use dried herbs instead of fresh?
Not recommended. Fresh herbs provide the vibrant green color and garden-fresh flavor that defines Green Goddess. Dried herbs create brown, dull-colored dips with concentrated, sometimes bitter flavor. If absolutely necessary, use 1 tbsp dried herbs for every 1/4 cup fresh, but expect significantly different results[2].
What can I substitute for cottage cheese in Green Goddess dip?
Greek yogurt (same quantity) is the closest substitute with similar protein and tang. For dairy-free options, use silken tofu, cashew cream, or coconut yogurt. Each creates slightly different texture and flavor, so adjust seasonings accordingly[1][6].
How do you prevent Green Goddess dip from turning brown?
Use fresh lemon juice (the acid prevents oxidation), press plastic wrap directly on dip surface before refrigerating, and store in airtight containers. Make dip no more than 1-2 days ahead for brightest color. Adding 1/4 tsp ascorbic acid powder also helps preserve green hue[3].
Can you freeze Green Goddess dip?
Not recommended for avocado or dairy-based versions—they become grainy and separated when thawed. Cashew cream or tofu-based vegan versions tolerate freezing better. If freezing, use within 1 month and re-blend after thawing to restore smooth texture.
What’s the best way to serve Green Goddess dip for a party?
Serve in a shallow bowl surrounded by colorful vegetable crudités and crackers. Garnish the dip surface with fresh herb sprigs, a drizzle of olive oil, and flaked smoked trout if using. Keep refrigerated until 15 minutes before serving—slightly cool temperature enhances flavor[8].
How do you make Green Goddess dip spicier?
Add 1 seeded jalapeño, 1/2 tsp red pepper flakes, or 1-2 tsp hot sauce to the blender. For milder heat, use 1/4 tsp cayenne pepper. Taste and adjust—you can always add more heat but can’t remove it[5].
Can you use Green Goddess dip as a marinade?
Yes, thin versions work as marinades for chicken, fish, or vegetables. The acid from lemon juice tenderizes proteins while herbs infuse flavor. Marinate chicken 2-4 hours or fish 30-60 minutes. Don’t reuse marinade that touched raw protein.
What herbs can you substitute in Green Goddess recipes?
Swap any tender herbs: cilantro for parsley, dill for basil, mint for chives, or tarragon for any herb. Avoid woody herbs like rosemary or thyme—they overpower the creamy base. Maintain total herb volume (3/4 to 1 cup) for proper flavor intensity[1][2].
Conclusion
Creamy Green Goddess dips and spreads bring May’s brightest spring flavors to your table through simple, versatile recipes that take just 10 minutes to prepare. These 12 variations—from classic herb blends to protein-rich smoked trout versions—offer something for every dietary preference and entertaining occasion.
Your next steps:
- Start with the classic base: Master the foundational recipe using avocado, cottage cheese, and the parsley-basil-chives trio before experimenting with variations
- Shop your farmers market: Visit this weekend to select the freshest herbs and spring vegetables—quality ingredients make the biggest difference
- Prep for the week: Make a double batch on Sunday and customize portions throughout the week for different meals and snacks
- Experiment with one variation: Choose the smoked trout, edamame, or spring pea version based on your protein preferences and try it this week
- Plan a spring gathering: Use these dips as the centerpiece of a Mother’s Day brunch, outdoor picnic, or casual dinner party with friends
The beauty of Green Goddess recipes lies in their adaptability—start with the framework provided here, then adjust herbs, proteins, and vegetables based on what’s fresh, what you love, and who you’re feeding. Whether you’re looking for healthy snacks, impressive appetizers, or versatile meal-prep staples, these spring dips deliver fresh flavor with minimal effort.
For more protein-focused recipes that complement these dips, explore our guides on preparing juicy chicken breast and easy weeknight dinners that pair beautifully with herb-forward sauces and spreads.
References
[1] Creamy Green Goddess Dip – https://goodculture.com/creamy-green-goddess-dip/
[2] Green Goddess Dip – https://funmoneymom.com/green-goddess-dip/
[3] Creamy Green Goddess Dip – https://foodwithfeeling.com/creamy-green-goddess-dip/
[5] Take A Dip Archives Season 2 Episode C54 – https://alfiecooks.substack.com/p/take-a-dip-archives-season-2-episode-c54
[6] Greek Green Goddess Dip – https://cookingforpeanuts.com/greek-green-goddess-dip/
[7] Chef Johns Green Goddess Dressing – https://www.allrecipes.com/recipe/237723/chef-johns-green-goddess-dressing/


