
Why Are My Baked Goods Not Rising? Common Causes and Easy Fixes
If your baked goods aren’t rising, you’re probably bumping into a handful of usual suspects. Most often, the leavening agents—like baking powder or baking soda—just aren’t doing their job, either because they’re expired or you didn’t measure them quite right.
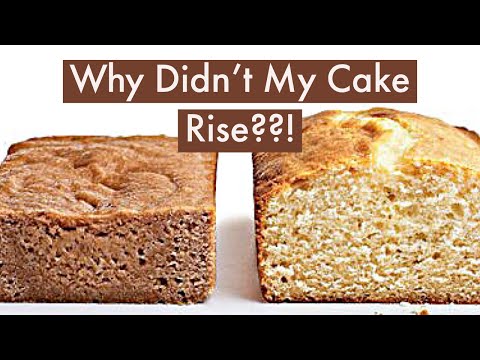
Other culprits? Oven temperature, mixing technique, and ingredient ratios can all play a part.

Maybe your oven’s running too hot or way too cold. That can make your cake set up too fast or barely rise at all.
Overmixing or undermixing the batter can mess things up, too. Even little slip-ups—too much sugar, fat, or liquid—can leave you with a dense, flat result.
For more on oven temperature and ingredient tips, you might want to check out this explanation on why cakes don’t rise.
Top Reasons Baked Goods Do Not Rise
Baked goods fall flat for a lot of reasons—sometimes it’s a mixing mistake, sometimes it’s the ingredients. Paying attention at each step really makes a difference.
Incorrect Leavening Agent Usage
If you pick the wrong leavening agent or use the wrong amount, your baked goods just won’t rise right. Baking powder and baking soda work differently—baking soda needs acid, baking powder comes with its own.
Too little leavening? You get a dense cake or bread. Too much? It’ll puff up fast and then collapse.
Mixing leavening agents into wet ingredients too soon can zap their power before the batter even hits the oven.
Double-check your recipe and measure carefully. The right leavening, in the right amount, gives you a much better shot at a tall, fluffy bake.
Expired or Inactive Yeast or Baking Powder
Old yeast or baking powder is pretty much useless for rising. Yeast is alive and makes gas as it feeds on sugar, but if it’s dead or stored wrong, it won’t do a thing.
Baking powder loses its kick over time, too. It’s supposed to react twice—once when wet, again when heated—but old stuff just fizzles out.
Not sure if your yeast is still good? Stir it into warm water with a pinch of sugar. If it doesn’t bubble after 10 minutes, it’s done for.
With baking powder, check the date and shake a little into hot water. It should fizz right away.
Improper Ingredient Measurements
Getting your measurements wrong can ruin the rise. Too much flour? The dough gets stiff and refuses to puff up.
Not enough liquid leaves you with a dry batter that can’t trap gas. Sugar feeds yeast and helps create air bubbles, but too much or too little throws things off.
Fat like butter or oil gives tenderness, but overdo it and the batter gets weighed down. Salt is important, but too much can slow or even kill the yeast.
Grab a kitchen scale or proper measuring cups—guesswork just isn’t your friend here.
Overmixing or Undermixing Batter or Dough
Mixing changes everything. If you overmix, you beat out the air bubbles that help cakes rise, and you might develop too much gluten, making things heavy.
Undermixing leaves dry pockets and uneven ingredients, blocking gas from spreading out. That can mean weird holes or uneven rising.
Try to mix just until things look blended. For cakes, that’s usually a few strokes after adding flour.
Bread dough needs proper kneading to stretch gluten, but don’t go wild—just follow the recipe.
For more on oven temperature and butter creaming, you can read about them on Why don’t my cakes rise? and Your Cakes Aren’t Rising? Here’s Why.
Essential Tips for Successful Rising

If you want your baked goods to rise, you’ve got to keep an eye on heat, timing, and the environment. These all work together to help your dough or batter puff up before it sets.
Optimal Oven Temperature and Preheating
Oven temperature is a big deal. Too hot, and the outside cooks before the inside can rise.
Too cool, and the whole process drags, sometimes making your cake or bread sink later on.
Always preheat your oven. The leavening agents need that steady heat to do their thing.
Try not to open the oven door while baking—a sudden blast of cold air can make your goodies fall flat.
If your baked goods keep sinking or rising unevenly, try dropping the oven temp by 25 degrees. Sometimes that’s all it takes to get a nice, even rise learn more.
Proper Proofing and Resting Techniques
Proofing matters, especially for bread or anything with yeast. This is when yeast makes gas and the dough expands.
You want a warm spot—somewhere around 75°-85°F—for proofing. Water temperature is important, too; too hot and you’ll kill the yeast, too cold and it just sits there.
Once it’s risen, handle the dough gently. Don’t rush the resting time or poke at it too much, or you could end up with a sunken loaf.
Keep your dough covered while it proofs to lock in moisture and keep things warm. This helps the dough rise evenly and gives you a lighter texture details.
Humidity and Kitchen Environment Impact
Humidity really changes how your baked goods rise. Dry air might cause dough to dry out fast and form a crust too early, which stops it from rising properly.
On the flip side, too much moisture makes dough sticky and tough to work with. If your kitchen feels desert-dry, try proofing dough somewhere warm and humid.
You could set a bowl of water near your dough or just toss a damp cloth over it. That way, the dough stays soft and can puff up the way it should.
Temperature matters, too. Cold kitchens slow down yeast, so dough rises way more slowly.
Try to keep your dough in a warm spot. Honestly, just tweaking humidity and temperature in your kitchen can totally change how your baked goods turn out—sometimes for the better, sometimes not so much. read more


